Git LAB
เครียมความพร้อม ติดตั้ง Git command line และ Git Bash บน windows
- สำหรับ windows สามารถ Downlaod Git terminal ได้ที่ https://git-scm.com/
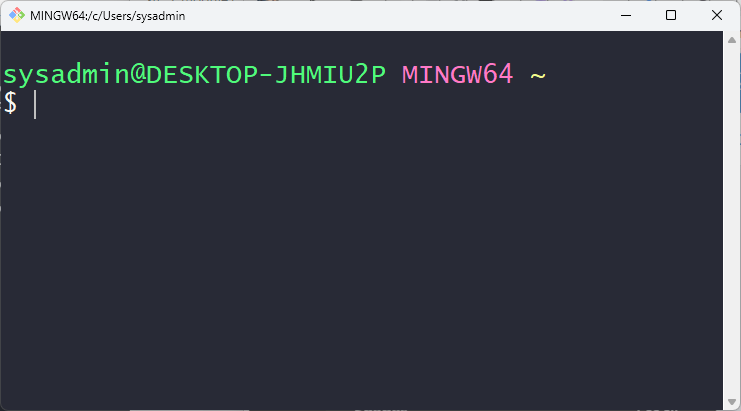
เปิด Git Bash terminal
จะได้ terminal ด้านล่าง (เป็น terminal ที่รองรับ linux command) พัฒนามาจาก MINGW64 https://www.mingw-w64.org/
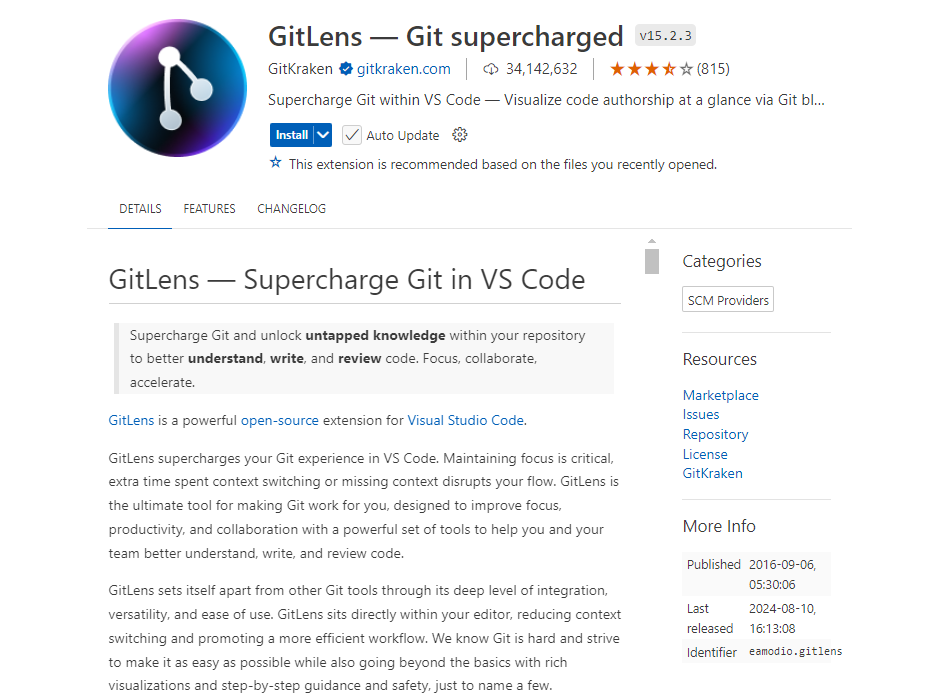
Git GUI เพื่อให้การบริหารจัดการ แบบ GUI
เราสามารถใช้งาน Git Gui ได้หลาย Software ได้แก่
-
VScode Extension
LAB1 เรียนรู้ Git อย่าง ง่ายผ่านทาง Animation
https://onlywei.github.io/explain-git-with-d3/

LAB2 เรียนรู้ Git ผ่านทาง Terminal
สำหรับ ใน lab ต่อจากนี้ไป จะทำบน git bash terminal นะครับ เพื่อความสะดวกในการใช้งาน git command line
step1 บอกให้ Git รู้ว่าเราเป็นใคร การตั้งค่าชื่อผู้ใช้และอีเมล
$ git config --global user.name "Sawangpong Muadphet"
$ git config --global user.email "sawangpongm@gmail.com"
คำสั่งเหล่านี้ใช้ในการตั้งค่าชื่อผู้ใช้และอีเมลที่ Git จะใช้ในการบันทึกข้อมูลคอมมิตแต่ละครั้ง โดยมีรายละเอียดดังนี้:
- --global หมายความว่าการตั้งค่านี้จะมีผลกับทุก repository ในเครื่องของคุณ
- user.name ใช้ในการตั้งชื่อผู้ใช้
- user.email ใช้ในการตั้งค่าอีเมลที่ใช้ในการบันทึกคอมมิต
step2 การเปิดใช้งานสีในการแสดงผล
$ git config --global color.ui true
$ git config --global -e
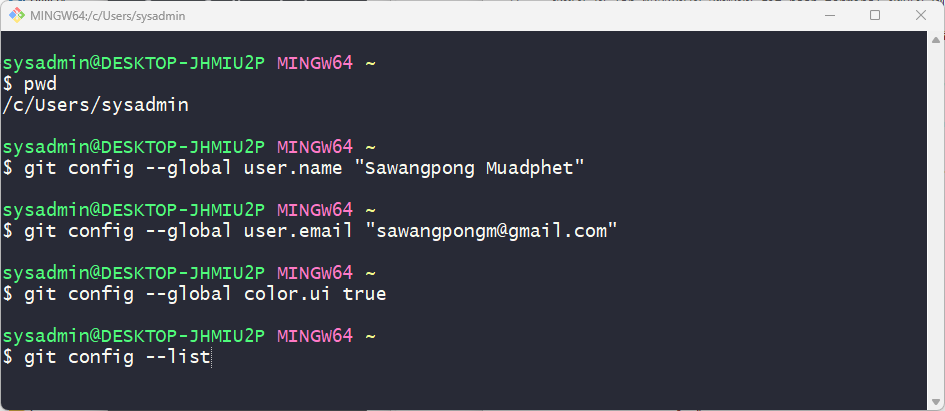
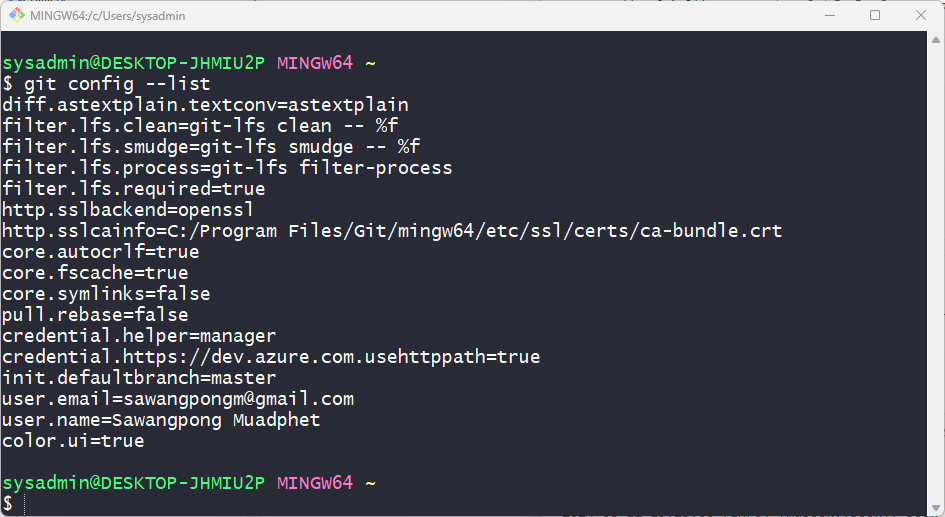
step3 แสดงค่า config
$ git config --list
step4 การเริ่มต้น Repository
- 4.1 การสร้าง Repository ใหม่ ในการเริ่มต้นโปรเจกต์ใหม่ ให้สร้าง repository ใหม่โดยใช้คำสั่ง:
$ mkdir git_lab1
$ cd git_lab1
$ git init .
Initialized empty Git repository in C:/Users/sysadmin/git_lab1/.git/

$ ls -la
total 24
drwxr-xr-x 1 sysadmin 197121 0 Aug 12 15:47 ./
drwxr-xr-x 1 sysadmin 197121 0 Aug 12 15:46 ../
drwxr-xr-x 1 sysadmin 197121 0 Aug 12 15:47 .git/
- คำสั่งนี้จะสร้างโฟลเดอร์ .git ในไดเรกทอรีปัจจุบัน ซึ่งจะใช้ในการเก็บข้อมูลของ Git เป็น hidden folder เนื่องจากขึ้นต้นด้วย จุด ต้องใช้คำสั่ง
ls -la
$ ls -la
total 12
drwxr-xr-x.  3 sysadmin sysadmin 4096 Aug 10 19:25 .
drwx------. 37 sysadmin sysadmin 4096 Aug 10 19:25 ..
drwxr-xr-x.  7 sysadmin sysadmin 4096 Aug 10 19:26 .git
- 4.2 สร้าง file หลังจากสร้าง repository แล้ว ให้เพิ่มไฟล์เข้าไปและทำการคอมมิต:
$ echo "task1  create project" > tasks.txt
$ git status

On branch master

No commits yet

Untracked files:
  (use "git add <file>..." to include in what will be committed)
	tasks.txt

nothing added to commit but untracked files present (use "git add" to track)
screen: git แจ้งว่า file ที่สร้างมาใหม่ ที่ชื่อ tasks.txt ยังไม่ได้ถูก tracks และแนะนำให้ใช้คำสั่ง git add เพื่อเริ่มต้นการ Track
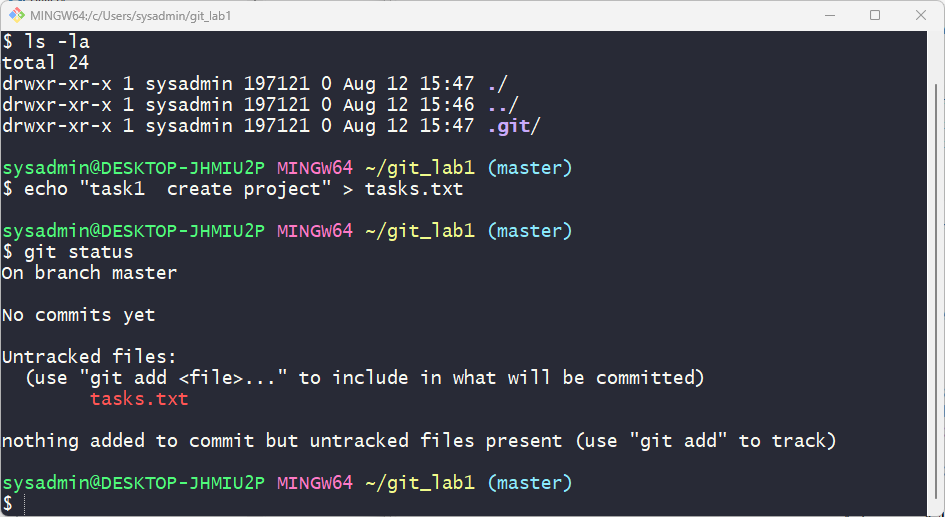
Git แสดงผลเป็นสีแดงเนื่องตากยังไม่ได้มี การ Add file tasks.txt ไว้ใน state area
- 4.3 การเพิ่มไฟล์และการทำคอมมิตแรก
$ git add .
warning: in the working copy of 'tasks.txt', LF will be replaced by CRLF the next time Git touches it

$ git commit -m "Initial commit"
[master (root-commit) 6364659] Initial commit
 1 file changed, 1 insertion(+)
 create mode 100644 tasks.txt
- git add . ใช้ในการเพิ่มไฟล์ทั้งหมดในไดเรกทอรีปัจจุบันเข้าสู่ staging area
- git commit -m "Initial commit" ใช้ในการบันทึกการเปลี่ยนแปลงเป็นคอมมิต
warning: in the working copy of 'tasks.txt', LF will be replaced by CRLF the next time Git touches it
- 4.4 handle end of line ใน windows
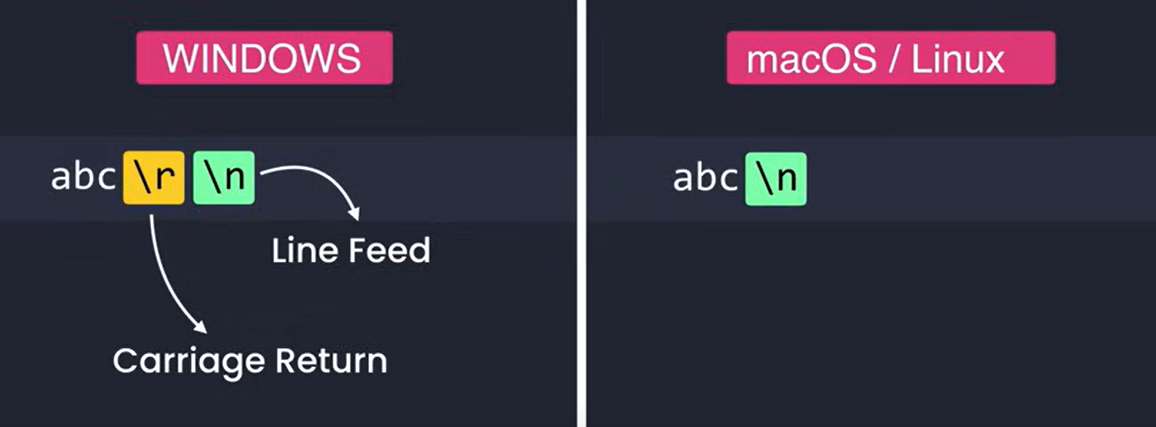
windows และ mac/linux จะมีความแตกต่างกันสำหรับ endofline ดังนั้น จะต้องทำการ Config ค่าของ Git ให้ถูกต้อง

$ git config --global core.autocrlf input
$ git config --global --list
user.email=sawangpongm@gmail.com
user.name=Sawangpong Muadphet
color.ui=true
core.autocrlf=input
step5 การใช้งานคำสั่ง git log
$ git log
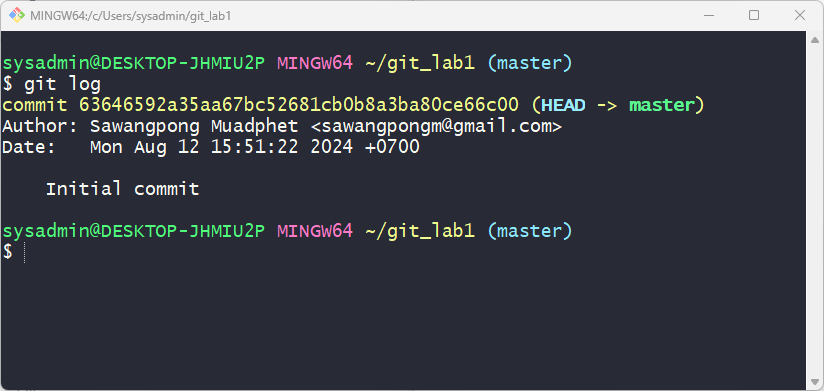
คำสั่งนี้จะแสดงประวัติของคอมมิตทั้งหมดใน branch ปัจจุบันใน terminal โดยรายละเอียดจะรวมถึง:
- SHA-1 ของคอมมิต
- Author: ชื่อผู้ทำคอมมิต
- Date: วันที่และเวลา
- Commit message: ข้อความคอมมิต
คำสั่ง git log ที่ต้องใช้ในอนาคต
$ git log <branch-name>
$ git log --oneline
$ git log --graph --oneline

ตัวอย่าง การแสดงผลแบบ Graph
*   0e25143 (HEAD, main) Merge branch 'feature'
|\
| * 16b36c6 Fix a bug in the new feature
| * 23ad9ad Start a new feature
* | ad8621a Fix a critical security issue
|/
* 400e4b7 Fix typos in the documentation
* 160e224 Add the initial code base
Ref คำสั่ง log เพิ่มเติม https://www.atlassian.com/git/tutorials/git-log
แก้ไขไฟล์ tasks.txt จำลองการพัฒนา code
ลอง แก้ไขไฟล์ tasks.txt ดู
$ echo "task2 develop/code project" >> tasks.txt
และทดสอบคำสั่งต่อไปนี้ เพื่อเป็นการทบทวน
$ git status
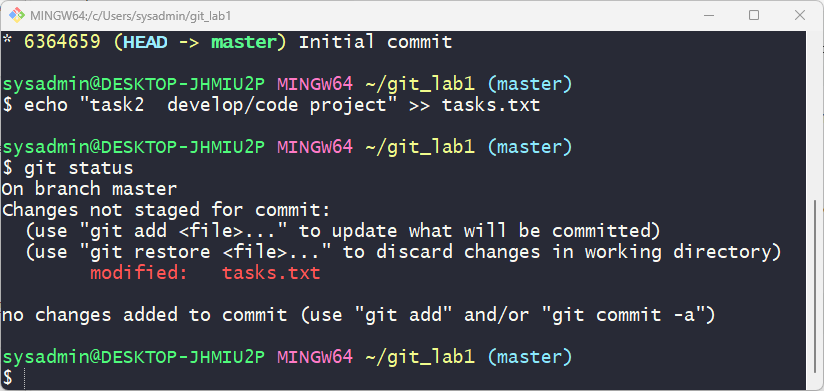
git แสดง modified
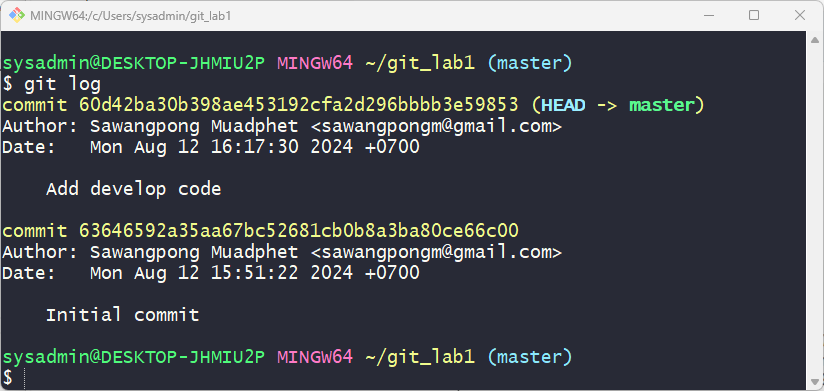
$ git add .
$ git commit "Add develop code"
[master 60d42ba] Add develop code
 1 file changed, 1 insertion(+)
สั่ง คำสั่ง:
$ git log
สั่ง คำสั่ง: git log -p เพื่อดูรายละเอียดของการเปลี่ยนแปลง
$ git log -p
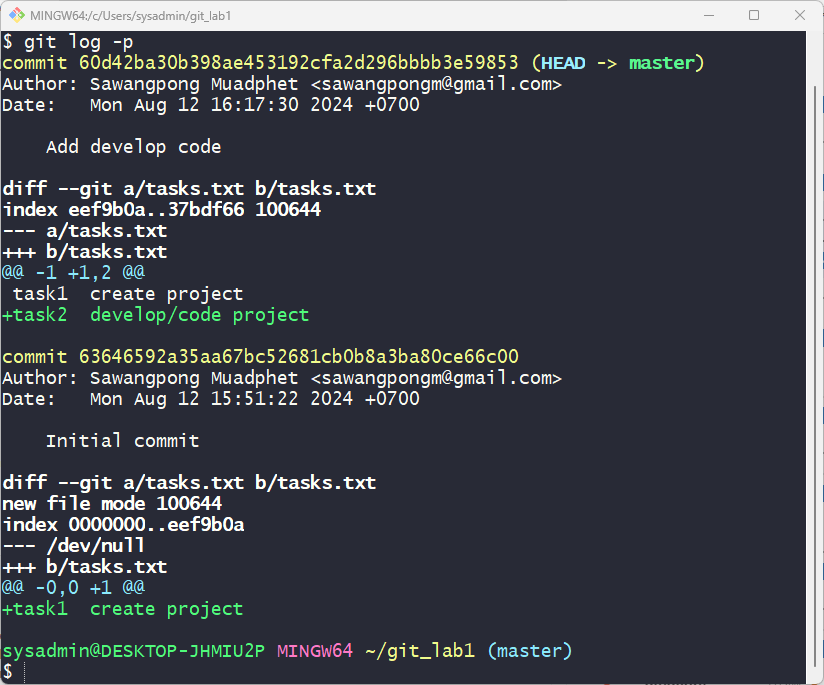
Option -p ใช้เพื่อแสดงแพตช์ (patch) ทั้งหมดที่แสดงการเปลี่ยนแปลงที่เกิดขึ้นในแต่ละคอมมิต แทนที่จะแสดงเพียงข้อความคอมมิตและข้อมูลเมตาดาต้า การใช้ -p จะทำให้คุณเห็นบรรทัดที่ถูกเพิ่มหรือถูกลบในการคอมมิตนั้น ๆ
step6 เรียนรู้คำสั่ง การสร้าง Branch
- 6.1 การสร้าง Branch ใหม่ เพื่อสร้าง branch ใหม่ ให้ใช้คำสั่ง:
รูปแบบ:
$ git branch branch-name
แทนที่ branch-name ด้วยชื่อของ branch ที่คุณต้องการสร้าง
- 6.2 การตรวจสอบ Branch สามารถตรวจสอบรายชื่อ branch ทั้งหมดได้ด้วยคำสั่ง:
รูปแบบ:
$ git branch
Branch ที่กำลังใช้งานจะมีเครื่องหมาย * ข้างหน้า
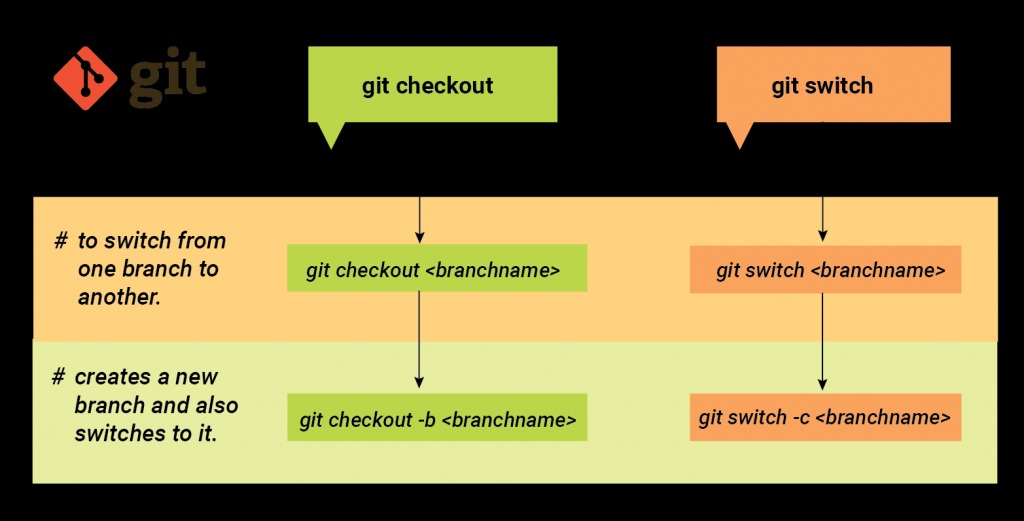
- 6.3 การสลับ Branch การสลับไปยัง Branch อื่น เพื่อสลับไปยัง branch อื่น ให้ใช้คำสั่ง:
รูปแบบ:
$ git checkout branch-name
หรือใช้คำสั่ง git switch เป็นคำสั่งใหม่กว่า:
รูปแบบ:
$ git switch branch-name
การสร้างและสลับไปยัง Branch ใหม่ในคำสั่งเดียว สามารถสร้าง branch ใหม่และสลับไปที่ branch นั้นได้ด้วยคำสั่ง:
รูปแบบ:
$ git checkout -b branch-name
หรือสามารถใช้คำสั่ง git switch ใช้คำสั่งใหม่กว่า:
$ git switch -c branch-name
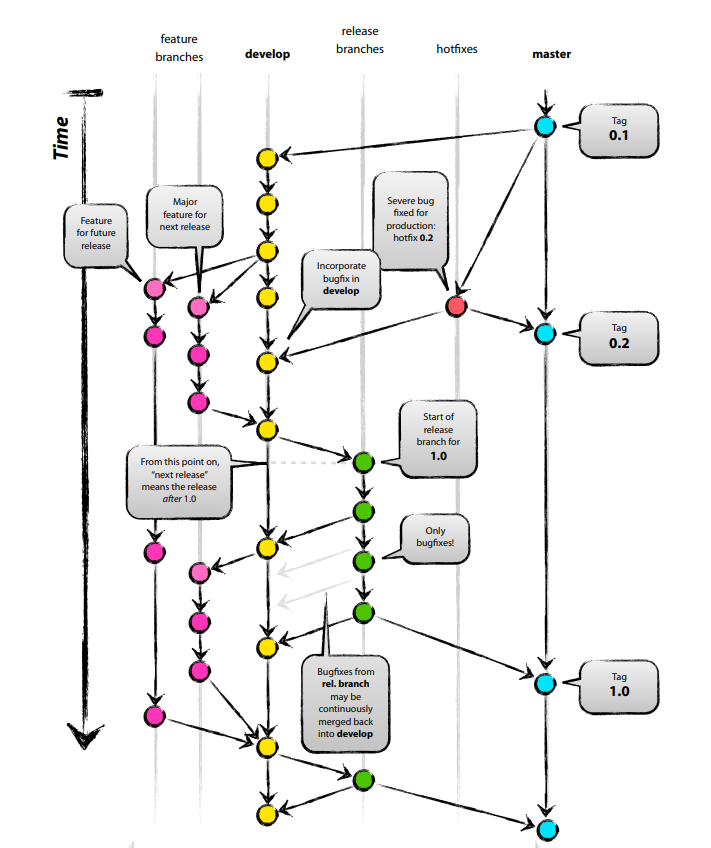
Git Flow branch model
Gitflow branching model เป็นการกำหนด โครงสร้างของการจัดการสถานะ (Stages) ของ การพัฒนา ในแต่ละ project จะมี Branch หลัก (primary branch) หลักอยู่ 2 branch ที่มีอายุอยู่ตลอดไป มีมีการลบ Branch
masterปรกติจะถูกสร้างจาก ขั้นตอนของการทำ initializationdevelopสร้างจาก master จะเป็น Branch ที่คู่ขนานกัน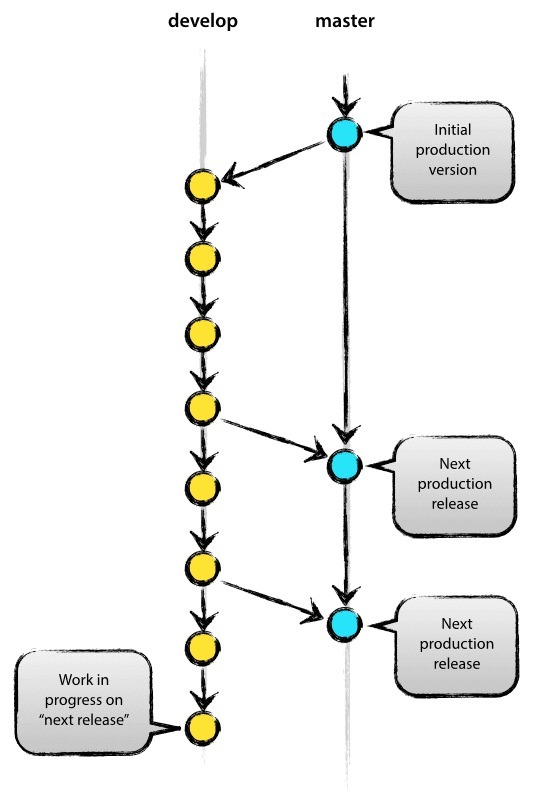
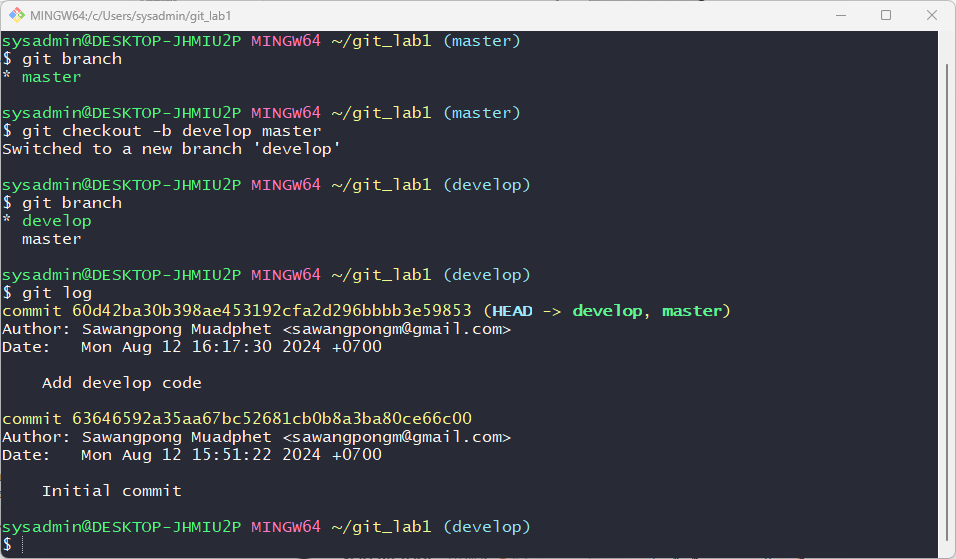
สร้าง branch develop จาก master
สั่งคำสั่ง สำหรับการสร้าง branch
$ git branch
* master

$ git checkout -b develop master
Switched to a new branch 'develop'

$ git  branch
* develop
  master
เราถือว่า origin/master เป็น Brance จะต้องสะท้อนถึงสถานะพร้อมใช้งานจริงเสมอ Production
เราถือว่า origin/develop เป็น Branch ต้องสะท้อนถึงสถานะที่มีการเปลี่ยนแปลงการพัฒนาล่าสุดสำหรับการ Release ครั้งถัดไป
เมื่อโค้ดต้นแบบในสาขา develop ถึงจุดเสถียรภาพและพร้อมสำหรับการปล่อย ผ่านการ Test และ แก้ไข Bug หมดแล้ว (Green) การเปลี่ยนแปลงทั้งหมดควรจะถูก merge กลับไปยัง master อย่างไรก็ตาม และติดแท็กหมายเลขเวอร์ชัน วิธีการทำแบบละเอียดจะกล่าวถึงต่อไป
ดังนั้น ทุกครั้งที่มีการ merge การเปลี่ยนแปลงกลับไปยัง master นั่นคือการ เตรียม Release ใหม่
Support Branch
นอกจาก master, develop branch แล้ว ยังมี Branch ที่เกิดขึ้นระหว่างกระบวนการ การพัฒนา และจะถูก Delete เมื่อ merge กลับมาก ได้แก่
- Feature Branches ดึงมาจาก
developและถูก merge กับไปยังdevelop - Release Branch ดึงมาจาก
developและถูก merge กับไปยังdevelop - Hotfix Branch ดึงมาจาก
masterและถูก merge กับไปยังmaster
ดึงมาจาก develop และถูก merge กับไปยัง develop
นำคำสั่งที่เรียนรู้จากด้านบน มาทำ LAB git workflow ค่อ
สั่ง คำสั่ง: เพื่อสร้าง release branch จาก Branch develop (แนวคิดของ Git flow)
$ git checkout -b release/1.0.0 develop
$ echo "final release/1.0.0" >> tasks.txt
$ cat tasks.txt

$ git add .
$ git commit -m "Final release/1.0.0"
$ git  diff develop

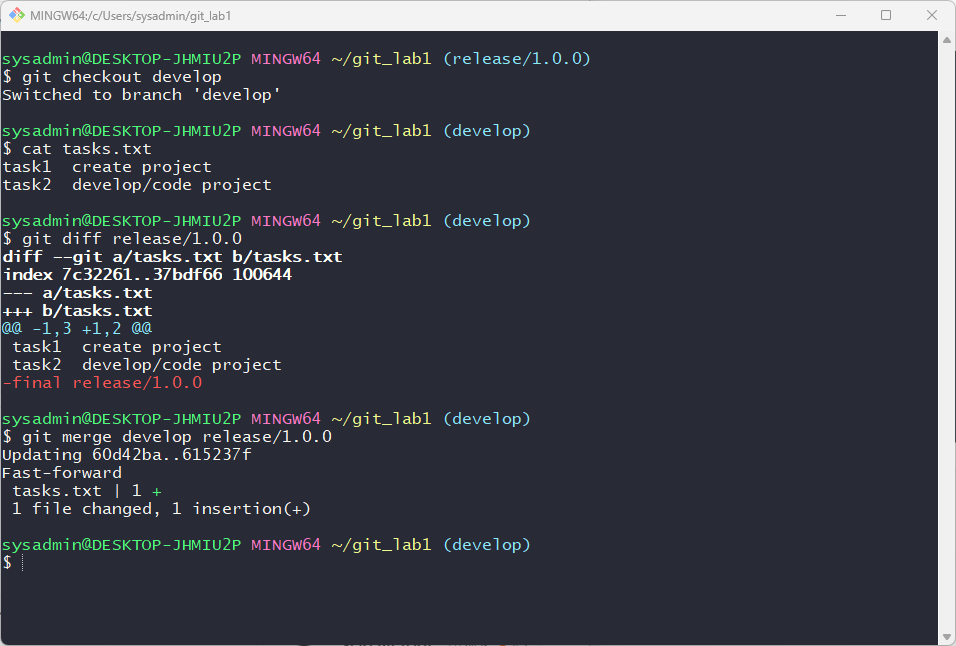
ให้กลับไป checkout develop branch
$ git checkout develop
$ cat tasks.txt
task1  create project
task2  develop/code project

$ git diff release/1.0.0
ทำการ Merge การเปลี่ยนแปลงจาก release กลับมายัง develop
$ git merge develop release/1.0.0

Updating 60d42ba..615237f
Fast-forward
 tasks.txt | 1 +
 1 file changed, 1 insertion(+)
check log:
$ git log

commit 615237f584f2b5211b17bc7a43ed0119a7eb8998 (HEAD -> develop, release/1.0.0)
Author: Sawangpong Muadphet <sawangpongm@gmail.com>
Date:   Mon Aug 12 16:38:42 2024 +0700

    Final release/1.0.0

commit 60d42ba30b398ae453192cfa2d296bbbb3e59853 (master)
Author: Sawangpong Muadphet <sawangpongm@gmail.com>
Date:   Mon Aug 12 16:17:30 2024 +0700

    Add develop code

commit 63646592a35aa67bc52681cb0b8a3ba80ce66c00
Author: Sawangpong Muadphet <sawangpongm@gmail.com>
Date:   Mon Aug 12 15:51:22 2024 +0700

    Initial commit
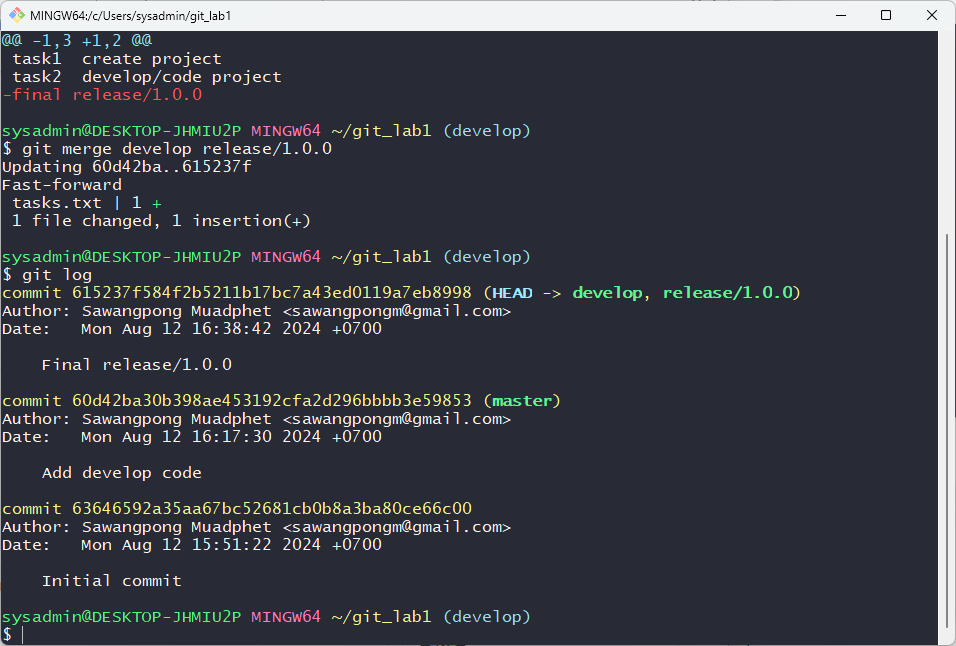
- HEAD จะชี้ ไปยัง develop , release/1.0.0 เป็นการ merge ล่าสุด