Lab2 Container Volume
Step-01 start vagrant up and install podman
> cd podman
> vagrant up
Install podman like process in lab1
sudo dnf install podman podman-docker
Step-02 Root vs Rootless in podman we can choose to start containre with root or rootless (unprivileged user). Example:
Run as rootless
$ podman run -d registry.access.redhat.com/ubi9:latest

Trying to pull registry.access.redhat.com/ubi9:latest...
Getting image source signatures
Checking if image destination supports signatures
Copying blob cc296d75b612 done   |
Copying config 159a1e6731 done   |
Writing manifest to image destination
Storing signatures
1d6ea7c49a974ffc17ebfccd3783addeec861124250df30dbce2cd38cd913b96

$ podman rm 1d6ea
Run podman as root
$ sudo su -
# podman run -d registry.access.redhat.com/ubi9:latest

Trying to pull registry.access.redhat.com/ubi9:latest...
Getting image source signatures
Checking if image destination supports signatures
Copying blob cc296d75b612 done   |
Copying config 159a1e6731 done   |
Writing manifest to image destination
Storing signatures
18b18e03e37aa8dffbbfdd3af7f352c49cae7bbf4848c56a458e3bee30e5304f

# podman rm 18b18e
both command create container in difference namespace event run same command
Processes that running within the container
- What account start podman on hosts?
- What is user account is running the processes within container
Remember Containers have their own
/etc/passwdand/etc/groupfiles that define in container users and groups. when we build container we can choose user run the process in Container
- Many Containers run their processes as root within the container, however is not recommmended from a security perspective.
4 Options to run container
Step-03 Option 1 : Container as Root
[root@centos9s ~]# podman run -it ubi9:latest /bin/bash
[root@99713d1d44e1 /]# whoami
root
[root@99713d1d44e1 /]# id -u root
0
[root@99713d1d44e1 /]# exit
[root@centos9s ~]# podman rm 99713
- processes run as UID 0 inside container
- processes run as UID 0 outside the container from host namespace
Step-04 Option 2 : Container as Root an assign user in container
[root@centos9s ~]# podman run -it -u sync ubi9:latest /bin/bash
bash-5.1$ whoami
sync
bash-5.1$ id -u sync
5
bash-5.1$ exit
exit
- Start podman as root
- processes run as UID 5 (sync) inside container
- processes run as UID 0 outside the container from host
Step-05 Option 3 : Container as user vagrant
[vagrant@centos9s ~]$ whoami
vagrant
[vagrant@centos9s ~]$ podman run -it ubi9:latest /bin/bash
[root@c39466bba6bc /]# whoami
root
[root@c39466bba6bc /]# exit
exit
- start container as user vagrant
- process run UID 1000 (vagrant) on host perspective
- process run UID 0 root inside container
- root process in container can restart process in container but can't manage process from host
- root inside container will map to user vagrant on host
Step-06 Option 4 : Container as user vagrant with sync user
[vagrant@centos9s ~]$ podman run -it -u sync ubi9:latest /bin/bash
bash-5.1$ whoami
sync
bash-5.1$ exit
exit
- start container as user vagrant
- process run UID 5 (sync) in container (also non root inside container)
- process map UID 5 inside to 1000 outside
- process run UID 1000 (vagrant) on host perspective
What is relation between maping user namespace
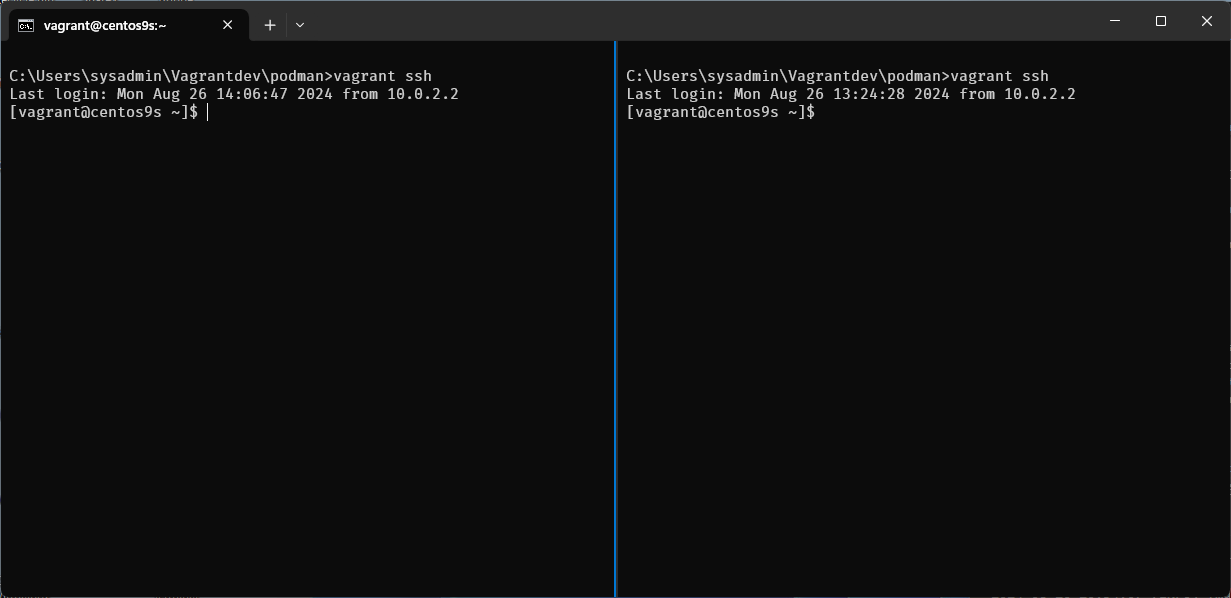
Step-07 Split windows teminal to 2 span
- boot run
vagrant sshinto Vagrant box - on Left run vagrant host command
- on Right site we run command inside container
Run monitor command on left side
$ sudo su -
# ps -ef | grep sleep
Run command on Right site
$ podman run -it ubi9:latest /bin/bash

# whoami
# id
# dnf install procps-ng -y
# sleep 5000 &
# sleep 5100 &
# sleep 5200 &

# ps -ef
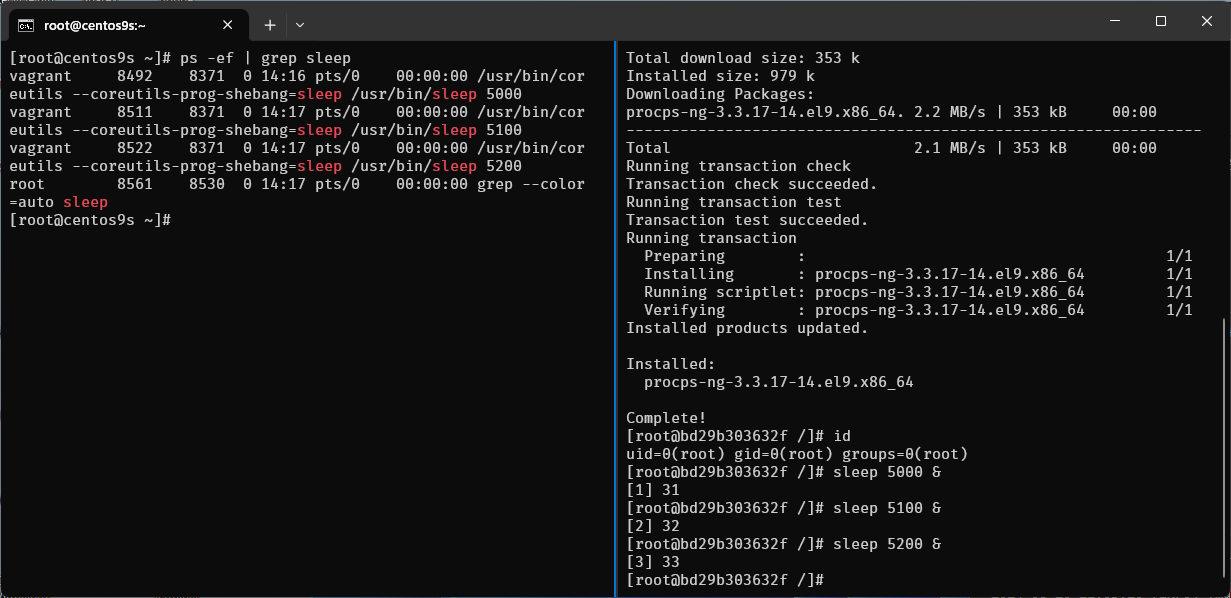
- On host perspective will run as vagrant user but inside container run as root
vagrant 8492 8371 0 14:16 pts/0 00:00:00 /usr/bin/coreutils --coreutils-prog-shebang=sleep /usr/bin/sleep 5000
Step-08 add new user in container
- create user1
- switch user
su -
# useradd -u 2000 user1
# id user1

# su - user1

$ sleep 3000 &
$ sleep 3100 &
$ sleep 3200 &
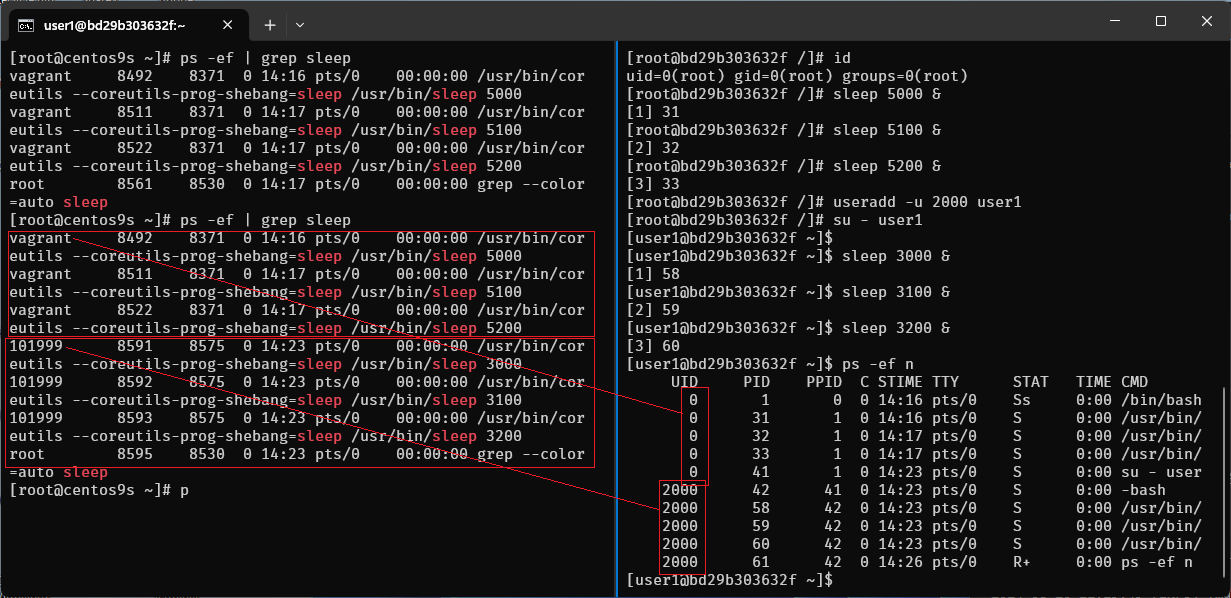
- also run
ps -ef | grep sleepin host terminal again also map with user vagrant
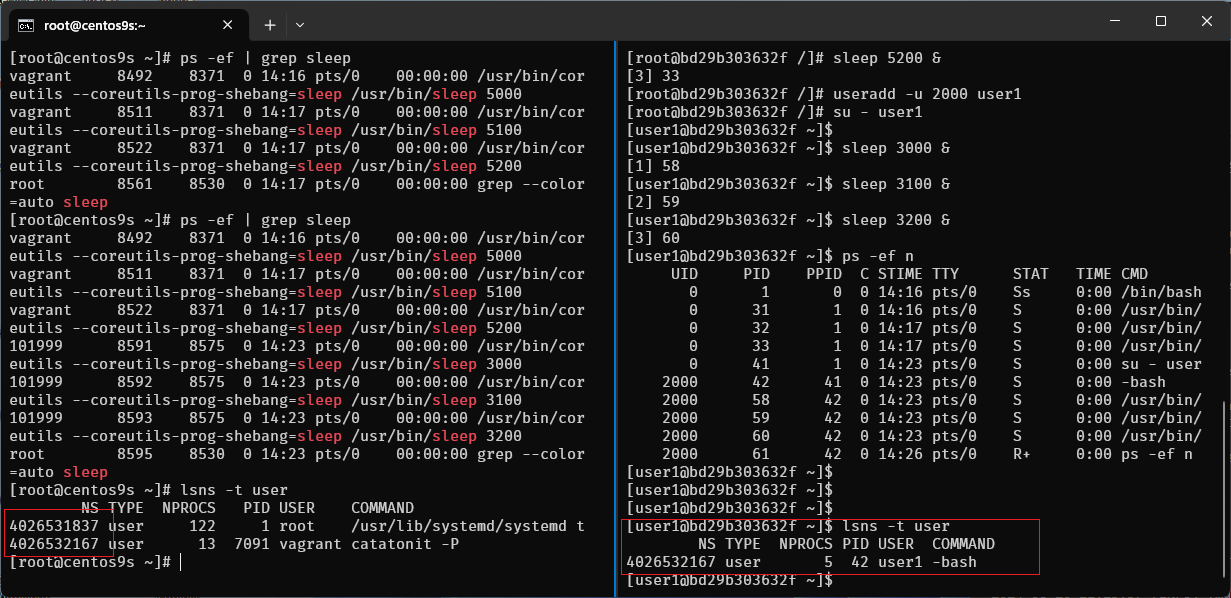
Step-09 run lsns -t user
- list user namespace in container
[user1@bd29b303632f ~]$ lsns -t user
        NS TYPE  NPROCS PID USER  COMMAND
4026532167 user       5  42 user1 -bash
- list user namespace in host
[root@centos9s ~]# lsns -t user
        NS TYPE  NPROCS   PID USER    COMMAND
4026531837 user     122     1 root    /usr/lib/systemd/systemd t
4026532167 user      13  7091 vagrant catatonit -P
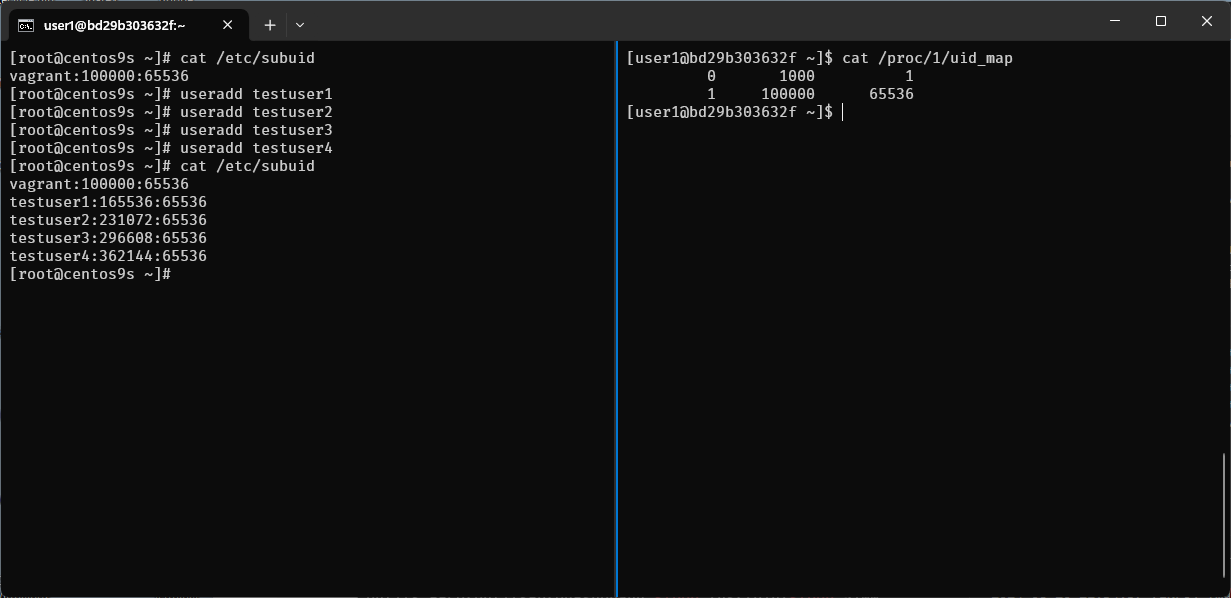
Step-10 run cat /etc/subuid
[root@centos9s ~]# cat /etc/subuid
vagrant:100000:65536
- 1st Field : Username or UID
- 2nd Field : Start Subordinate UID
- 3rd Field : Number of Subordinate UIDs
Create some more user
[root@centos9s ~]# useradd testuser1
[root@centos9s ~]# useradd testuser2
[root@centos9s ~]# useradd testuser3
[root@centos9s ~]# useradd testuser4
[root@centos9s ~]# cat /etc/subuid
vagrant:100000:65536
testuser1:165536:65536
testuser2:231072:65536
testuser3:296608:65536
testuser4:362144:65536
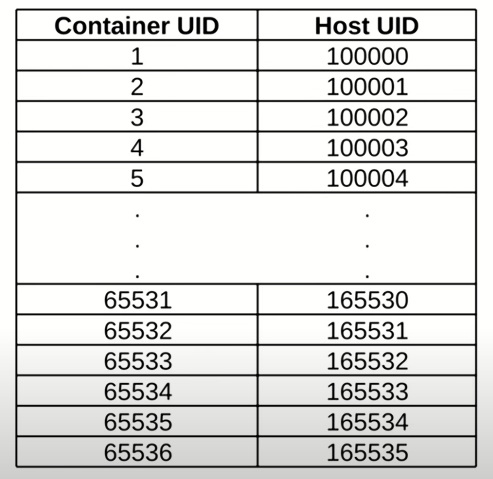
The output of cat /proc/1/uid_map shows the UID (User ID) mappings for the first process, which is typically the init or systemd process in a Linux system. This file is used in the context of user namespaces, which allow processes to have different user and group IDs inside the namespace than outside it.
Here's what each column represents:
-
Column 1 (Inside UID): The starting UID inside the user namespace.
-
Column 2 (Outside UID): The starting UID outside the user namespace.
-
Column 3 (Range): The number of UIDs in this range.
-
The first line indicates that inside the namespace, UID 0 (root) maps to UID 1000 outside the namespace. Only one UID is mapped.
-
The second line indicates that UIDs starting from 1 inside the namespace map to UIDs starting from 100000 outside the namespace, with a range of 65536 UIDs.
This setup is commonly seen in containerized environments, where the root user inside the container (namespace) is not actually root on the host system but mapped to an unprivileged user (like UID 1000). This enhances security by preventing processes within the container from having root privileges on the host system.
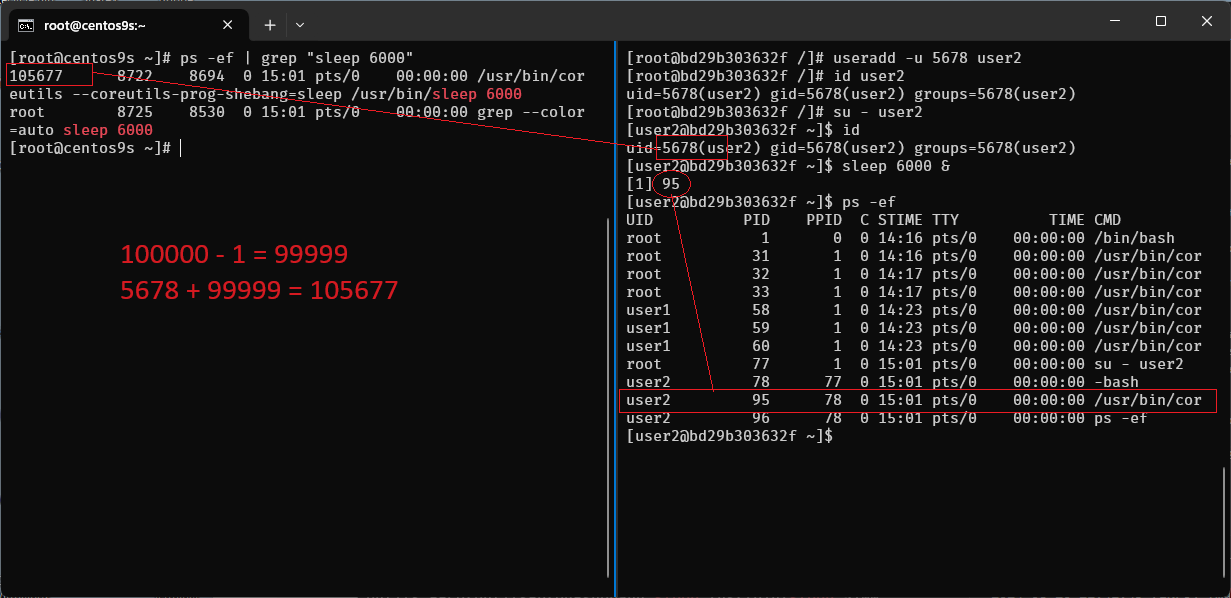
Step-11 How to find user mapping between inside and outside
[root@bd29b303632f /]# useradd -u 5678 user2
[root@bd29b303632f /]# id user2
uid=5678(user2) gid=5678(user2) groups=5678(user2)
[root@bd29b303632f /]#
- create user id 5678 in container. What is user map to host?
- Range between 100000 -1 = 99999
- User map on host 5678+99999 = 105,677
Step-12 Run monitor on host
[root@centos9s ~]# su - vagrant -c "podman ps"

[vagrant@centos9s ~]$ podman ps

[vagrant@centos9s ~]$ podman top bd29b303632f user huser args
USER        HUSER       COMMAND
root        1000        /bin/bash
root        1000        /usr/bin/coreutils --coreutils-prog-shebang=sleep /usr/bin/sleep 5000
root        1000        /usr/bin/coreutils --coreutils-prog-shebang=sleep /usr/bin/sleep 5100
root        1000        /usr/bin/coreutils --coreutils-prog-shebang=sleep /usr/bin/sleep 5200
user1       101999      /usr/bin/coreutils --coreutils-prog-shebang=sleep /usr/bin/sleep 3000
user1       101999      /usr/bin/coreutils --coreutils-prog-shebang=sleep /usr/bin/sleep 3100
user1       101999      /usr/bin/coreutils --coreutils-prog-shebang=sleep /usr/bin/sleep 3200
root        1000        su - user2
user2       105677      -bash
user2       105677      /usr/bin/coreutils --coreutils-prog-shebang=sleep /usr/bin/sleep 6000
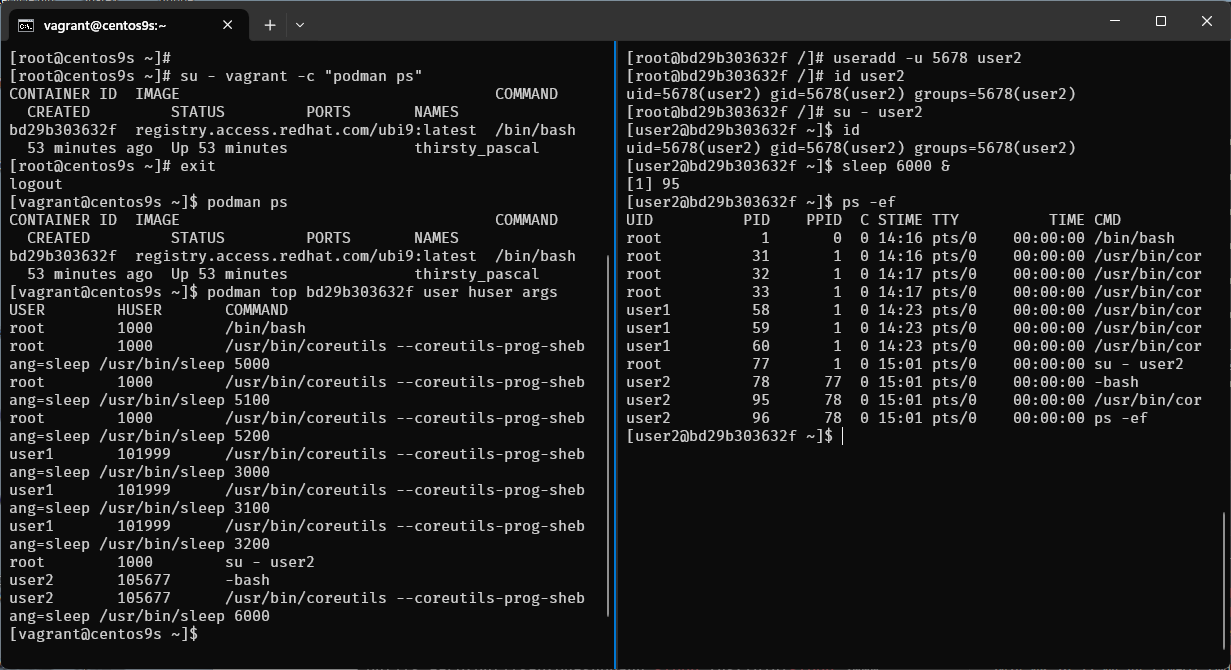
- Output command list process in container
- First Colume (USER) is from container point of view
- Second Colume (HUSER) is from Host point of view
Step-13 Limitation of Rootless container
- run nextcloud container
- map port 80:80
$ podman run -d -p 80:80 -v nextcloud_volume:/var/www/html docker.io/library/nextcloud:latest
- what is error mean?
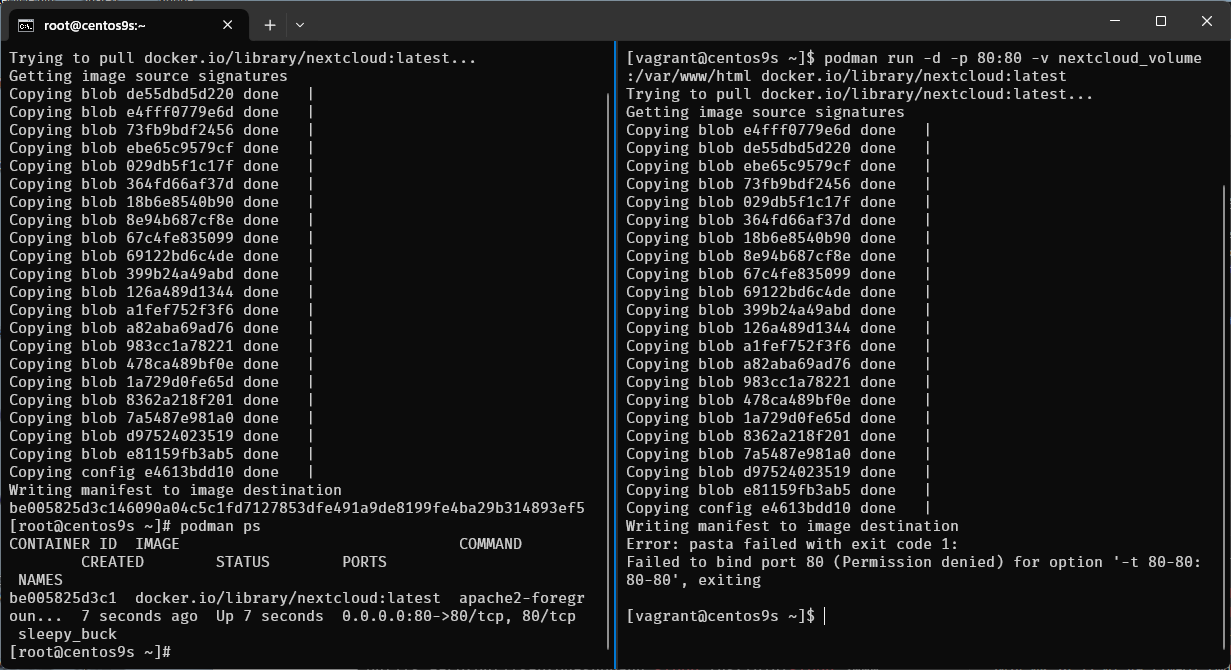
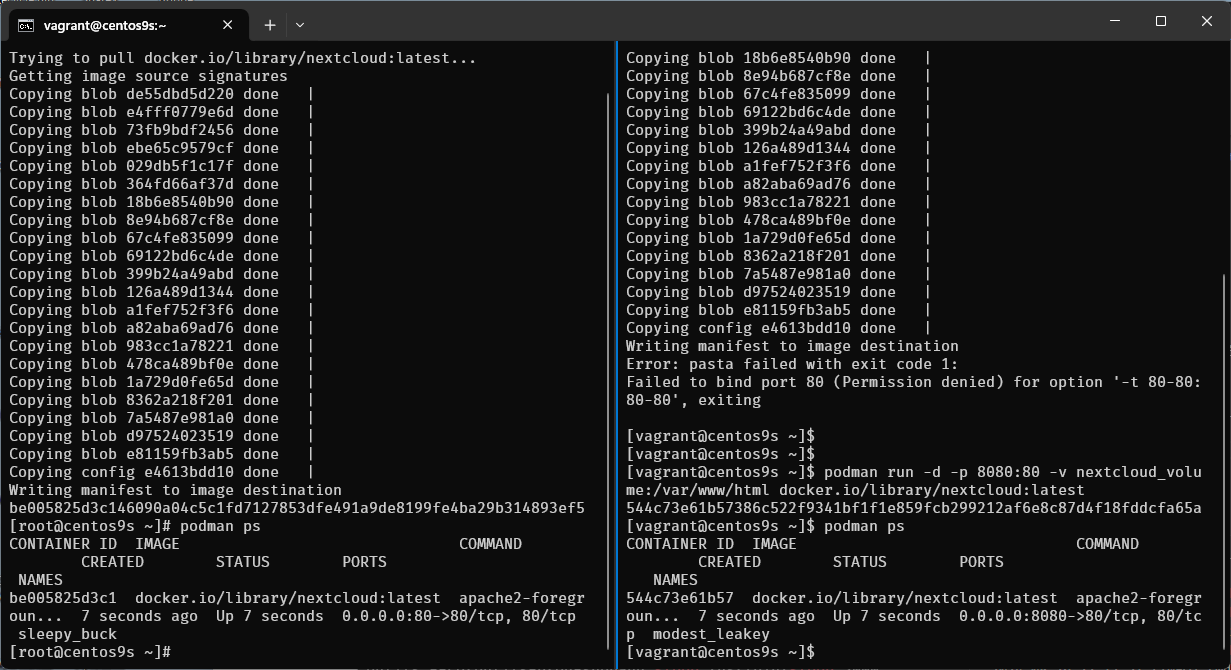
- Run command again
$ podman run -d -p 8080:80 -v nextcloud_volume:/var/www/html docker.io/library/nextcloud:latest
- Enable firewalld
[vagrant@centos9s ~]$ sudo firewall-cmd --permanent --add-port=8080/tcp
success
[vagrant@centos9s ~]$ sudo firewall-cmd --reload
success
[vagrant@centos9s ~]$ sudo firewall-cmd --permanent --add-port=80/tcp
success
[vagrant@centos9s ~]$ sudo firewall-cmd --reload
success
[vagrant@centos9s ~]$
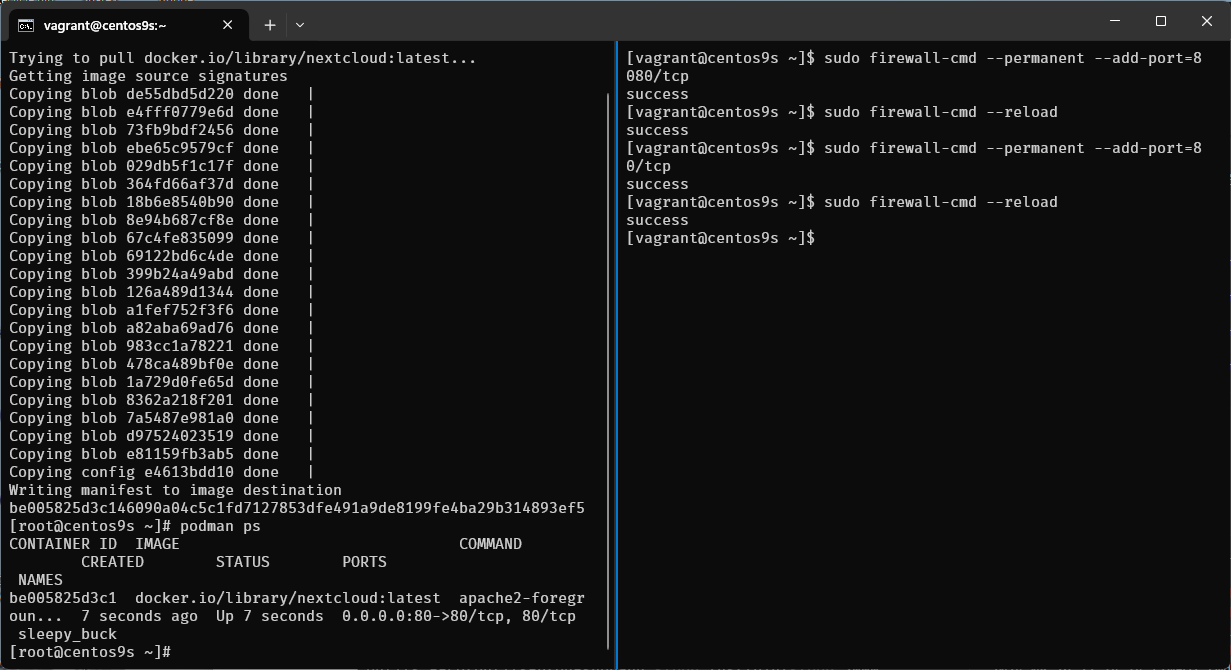
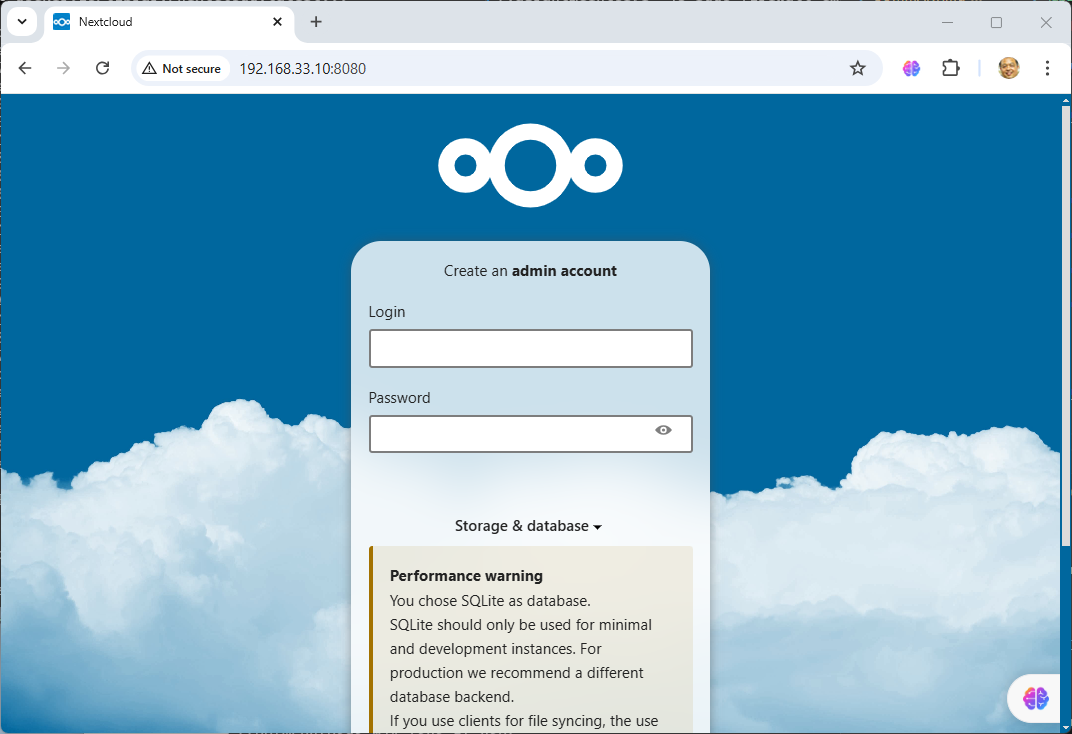
- Open browser http://192.168.33.10:8080/
- Next we run exec command to go inside next cloud container
[vagrant@centos9s ~]$ podman ps
CONTAINER ID IMAGE COMMAND CREATED STATUS PORTS NAMES
544c73e61b57 docker.io/library/nextcloud:latest apache2-foregroun... 5 minutes ago Up 5 minutes 0.0.0.0:8080->80/tcp, 80/tcp modest_leakey
[vagrant@centos9s ~]$ podman exec -it 544c73e61b57 /bin/bash
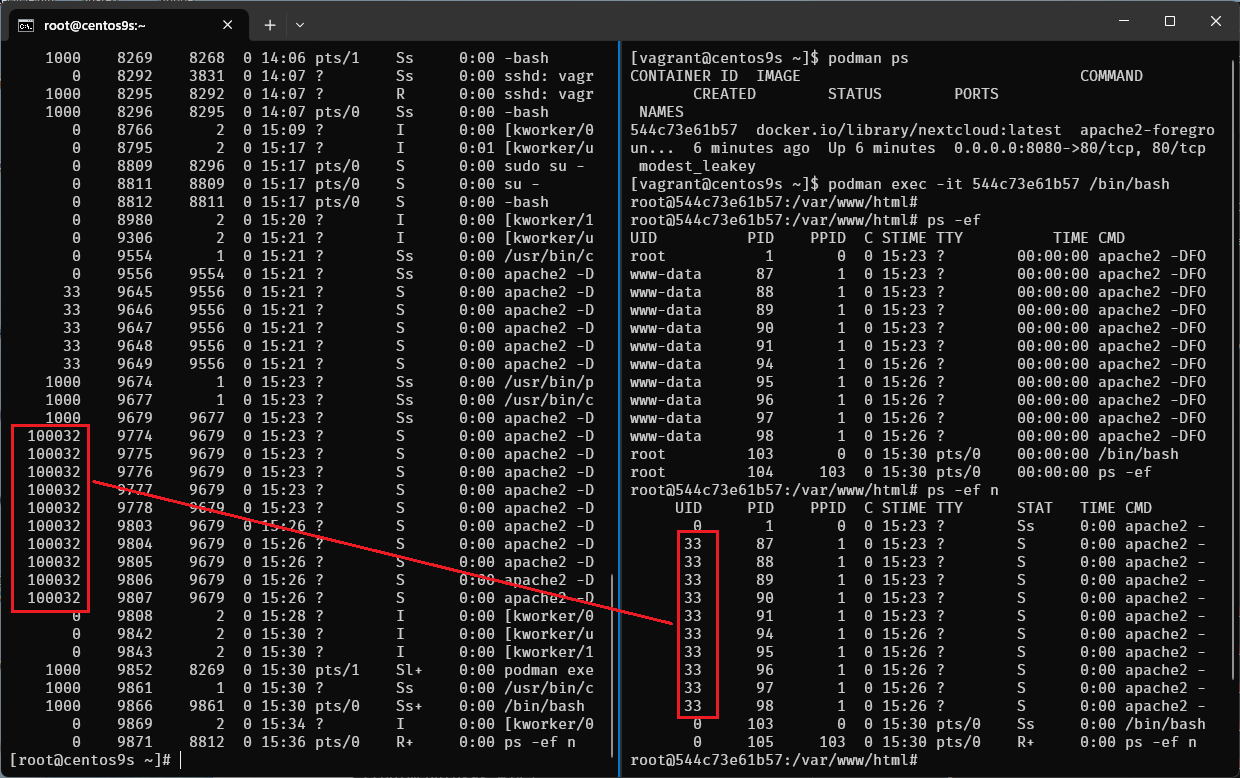
root@544c73e61b57:/var/www/html# ps -ef
root@544c73e61b57:/var/www/html# ps -ef n
ps -efshow username,ps -ef nshow user id name
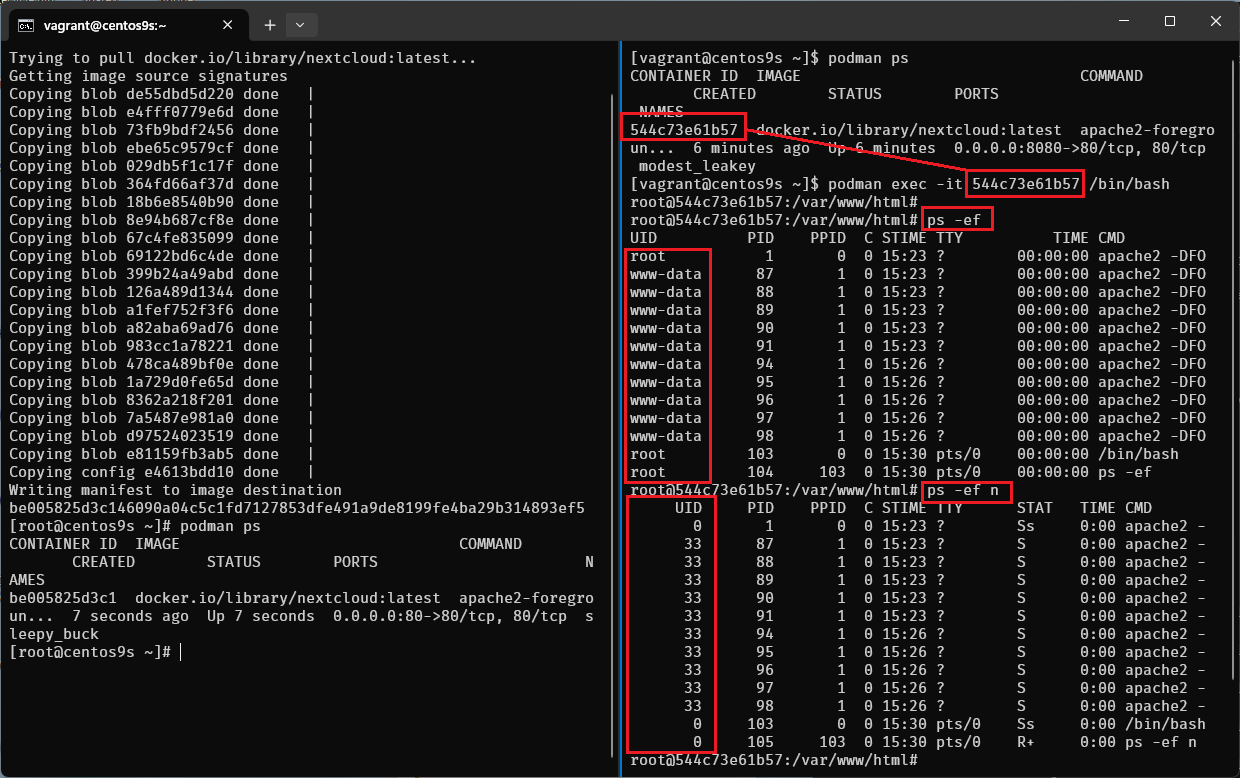
- UID of www-data is 33 then User on host will be 33+99999 = 100032
- Check from host by run
ps -ef n
- On host run command
podman volume ls
[vagrant@centos9s ~]$ podman volume ls
[vagrant@centos9s ~]$ podman volume inspect nextcloud_volume
[vagrant@centos9s ~]$ ls -l /home/vagrant/.local/share/containers/storage/volumes/nextcloud_volume/_data
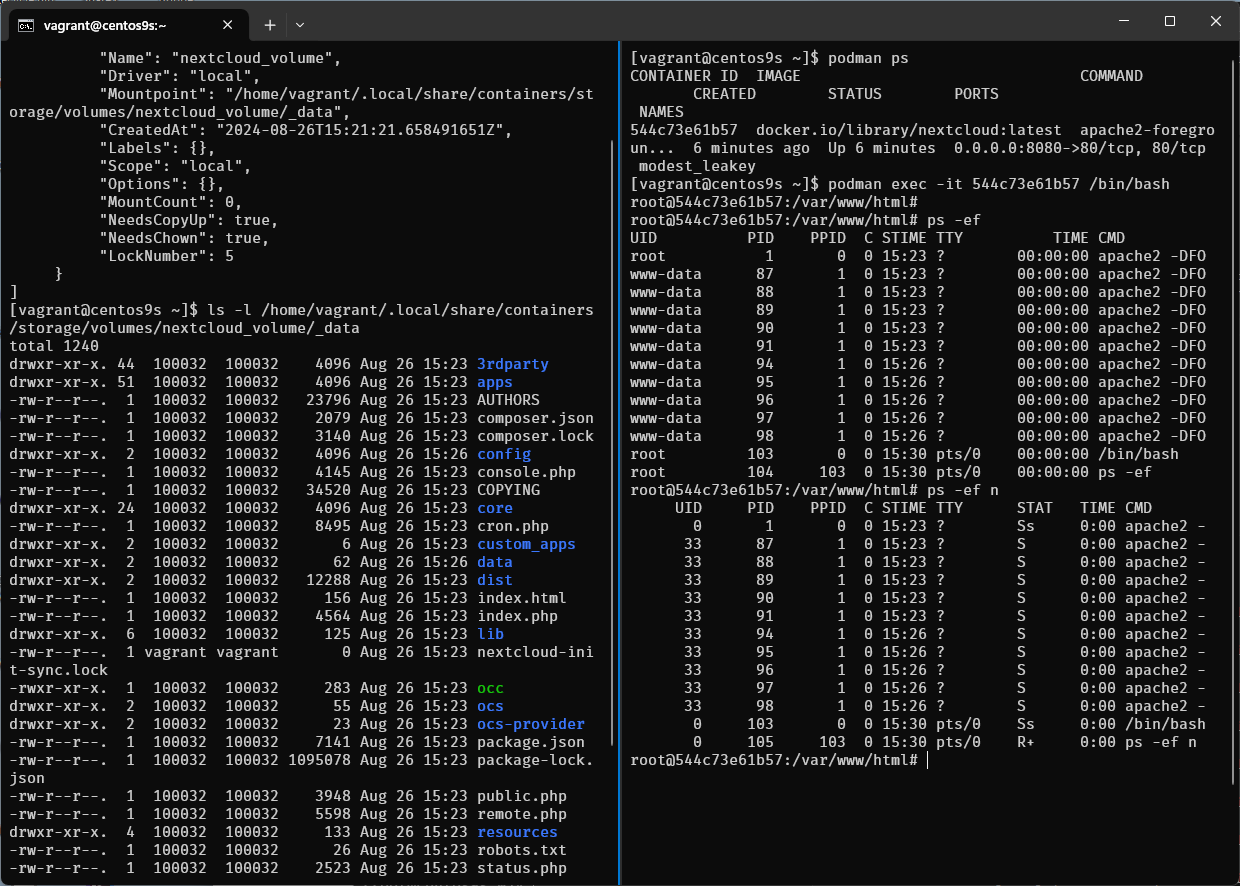
confirm user id 100032 is owner of file on host