understand linux namespace
Objective:
This lab will introduce you to Linux namespaces, which are essential for containerization. We'll explore how namespaces isolate processes and their resources, making them ideal for running multiple containers on a single host. You'll learn how to create and manipulate namespaces using the unshare command and gain hands-on experience with Podman, a popular containerization tool.
Lab Steps:
- Understanding Namespaces
-
What are namespaces?
- Isolated environments for processes
- Provide resource isolation and security
- Types: PID, network, mount, IPC, UTS, user
-
How do they work? Each namespace has its own root filesystem, network stack, etc. Processes within a namespace cannot see or interact with resources outside of it.
-
types of namespaces:
- netns – network namespace
- ipcns – IPC namespace
- mntns – mount namespace
- utsns – UTS namespace
- userns – user namespace
- Creating Namespaces with unshare
- PID namespace:
- Isolate process IDs
- Create a child process with its own PID namespace:
[vagrant@centos9s ~]$ sudo unshare --fork --pid --mount-proc bash

[root@centos9s vagrant]# ps -o pid,pidns,netns,mntns,ipcns,utsns,userns,args -p 1
    PID      PIDNS      NETNS      MNTNS      IPCNS      UTSNS     USERNS COMMAND
      1 4026532299 4026531840 4026532298 4026531839 4026531838 4026531837 bash
# ps -o pid,pidns,netns,mntns,ipcns,utsns,userns,args -p 1
Apparently, PID 1 belongs to six different namespaces:
- PID
- network
- mount
- IPC
- UTS
- user
The /proc/(PID)/ns Directory
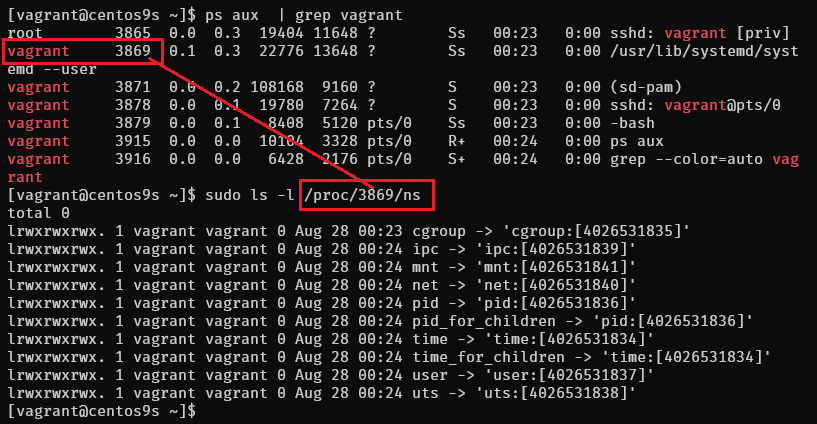
[vagrant@centos9s ~]$ ps aux  | grep vagrant
root        3865  0.0  0.3  19404 11648 ?        Ss   00:23   0:00 sshd: vagrant [priv]
vagrant     3869  0.1  0.3  22776 13648 ?        Ss   00:23   0:00 /usr/lib/systemd/systemd --user
vagrant     3871  0.0  0.2 108168  9160 ?        S    00:23   0:00 (sd-pam)
vagrant     3878  0.0  0.1  19780  7264 ?        S    00:23   0:00 sshd: vagrant@pts/0
vagrant     3879  0.0  0.1   8408  5120 pts/0    Ss   00:23   0:00 -bash
vagrant     3915  0.0  0.0  10104  3328 pts/0    R+   00:24   0:00 ps aux
vagrant     3916  0.0  0.0   6428  2176 pts/0    S+   00:24   0:00 grep --color=auto vagrant
Generally, the /proc/(PID)/ns directory contains symbolic links to the namespace files for each type of namespace that the process belongs to.
For instance, let’s use ls to check the namespaces of the process with PID 3856:
[vagrant@centos9s ~]$ sudo ls -l /proc/3869/ns
total 0
lrwxrwxrwx. 1 vagrant vagrant 0 Aug 28 00:23 cgroup -> 'cgroup:[4026531835]'
lrwxrwxrwx. 1 vagrant vagrant 0 Aug 28 00:24 ipc -> 'ipc:[4026531839]'
lrwxrwxrwx. 1 vagrant vagrant 0 Aug 28 00:24 mnt -> 'mnt:[4026531841]'
lrwxrwxrwx. 1 vagrant vagrant 0 Aug 28 00:24 net -> 'net:[4026531840]'
lrwxrwxrwx. 1 vagrant vagrant 0 Aug 28 00:24 pid -> 'pid:[4026531836]'
lrwxrwxrwx. 1 vagrant vagrant 0 Aug 28 00:24 pid_for_children -> 'pid:[4026531836]'
lrwxrwxrwx. 1 vagrant vagrant 0 Aug 28 00:24 time -> 'time:[4026531834]'
lrwxrwxrwx. 1 vagrant vagrant 0 Aug 28 00:24 time_for_children -> 'time:[4026531834]'
lrwxrwxrwx. 1 vagrant vagrant 0 Aug 28 00:24 user -> 'user:[4026531837]'
lrwxrwxrwx. 1 vagrant vagrant 0 Aug 28 00:24 uts -> 'uts:[4026531838]'
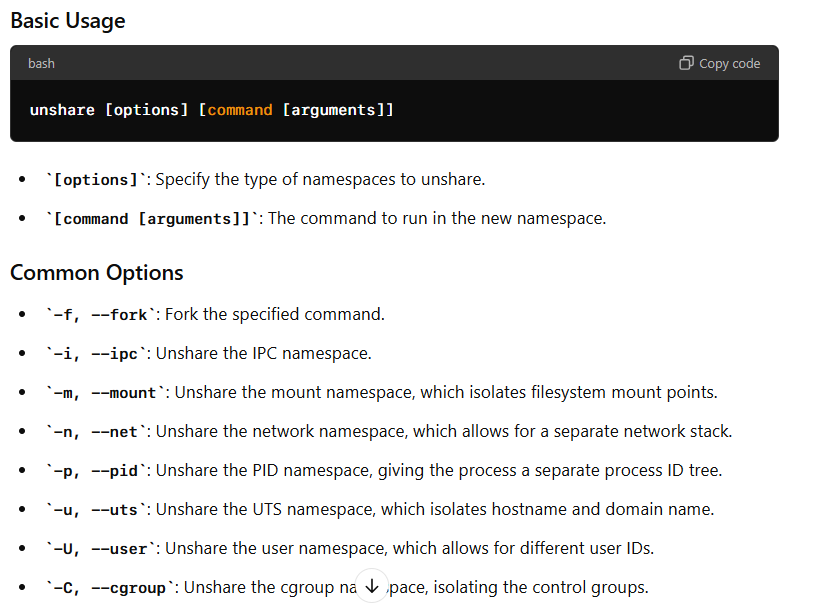
Lab: Exploring IP Netnamespaces with unshare
The unshare command in Linux is used to run a program in a new namespace or to "unshare" a namespace from the current process. Namespaces in Linux allow processes to have isolated instances of global resources such as the filesystem, network, process IDs, and more. The unshare command lets you isolate these resources so that changes in one namespace do not affect others.
Lab: Exploring IP Netnamespaces with ip netns
Objective:
This lab will introduce you to IP network namespaces (netnamespaces) and how to manage them using the ip netns command. You'll learn how to create, list, delete, and interact with netnamespaces.
Lab Steps:
- Creating a Netnamespace
- Use the add command to create a new netnamespace:
[vagrant@centos9s ~]$ sudo ip netns add red
[vagrant@centos9s ~]$ sudo ip netns add blue
- Listing Netnamespaces
- Use the list command to view all existing netnamespaces:
[vagrant@centos9s ~]$ sudo ip netns list
- list network on host
[vagrant@centos9s ~]$ ip link
- view network namespace inside namespace
[vagrant@centos9s ~]$ sudo ip netns exec red ip link
[vagrant@centos9s ~]$ sudo ip netns exec blue ip link
- Entering a Netnamespace
- Use the exec command to enter a netnamespace and execute commands within it:
[vagrant@centos9s ~]$ ip netns exec red bash
[vagrant@centos9s ~]$ ps -o pid,pidns,args
or run in short command
ip -n red link
ip -n blue link
- Run arp command on host check Arp table
[vagrant@centos9s ~]$ arp
- Run route command check routing table
[vagrant@centos9s ~]$ route
- Configuring Network Interfaces
- Create a virtual network interface within the netnamespace:
[vagrant@centos9s ~]$ sudo ip link add veth-red type veth peer name veth-blue
[vagrant@centos9s ~]$ sudo ip link set veth-red netns red
[vagrant@centos9s ~]$ sudo ip link set veth-blue netns blue
- Add ip to veth-red and veth-blue
[vagrant@centos9s ~]$ sudo ip -n red addr add 192.168.15.1/24 dev veth-red
[vagrant@centos9s ~]$ sudo ip -n blue addr add 192.168.15.2/24 dev veth-blue

[vagrant@centos9s ~]$ sudo ip -n red link set veth-red up
[vagrant@centos9s ~]$ sudo ip -n blue link set veth-blue up
if Clear ip (Just in case some thing wrong)
# ip -n red  addr flush dev veth-red
# ip -n blue addr flush dev veth-blue
- Check
[vagrant@centos9s ~]$ sudo ip  netns exec red  ip a
[vagrant@centos9s ~]$ sudo ip  netns exec blue ip a
- ping ip address from red to blue, and blue to red
[vagrant@centos9s ~]$ sudo ip netns exec blue ping 192.168.15.1
[vagrant@centos9s ~]$ sudo ip netns exec red ping 192.168.15.2
- Check arp table on red and blue
[vagrant@centos9s ~]$ sudo ip netns exec red arp
[vagrant@centos9s ~]$ sudo ip netns exec blue arp
- But arp table on host will see this
[vagrant@centos9s ~]$ arp
- Final script 1
ip netns add red
ip netns add blue
#show namespace
ip netns show
ip link add veth-red type veth peer name veth-blue
ip link set veth-red netns red
ip link set veth-blue netns blue
ip -n red addr add 192.168.15.1/24 dev veth-red
ip -n blue addr add 192.168.15.2/24 dev veth-blue
ip -n red link set veth-red up
ip -n blue link set veth-blue up

ip netns exec red ping 192.168.15.2
ip netns exec red ping 192.168.15.1
#Cleanup
ip netns delete red
ip netns delete blue
Connect more than 2 namespace
- Create virtual switch with linux bridge (or OpenVswitch) and connect namespace together via bridge
[vagrant@centos9s ~]$ sudo ip link add v-net-0 type bridge
[vagrant@centos9s ~]$ ip a
[vagrant@centos9s ~]$ sudo ip link set dev v-net-0 up
- install package
bridge-utils
[vagrant@centos9s ~]$ sudo dnf install brige-utils
[vagrant@centos9s ~]$ brctl show
- Delete old veth-red, veth-blue link because we not use anymore
[vagrant@centos9s ~]$ sudo ip -n red link del veth-red
delete veth-red and veth-blue will automatically remove
- Create new cable connect namespace to bride
[vagrant@centos9s ~]$ sudo ip link add veth-red type veth peer name veth-red-br
[vagrant@centos9s ~]$ sudo ip link add veth-blue type veth peer name veth-blue-br
- Add cable to bride
[vagrant@centos9s ~]$ sudo ip link set veth-red netns red
[vagrant@centos9s ~]$ sudo ip link set veth-red-br master v-net-0

[vagrant@centos9s ~]$ sudo ip link set veth-blue netns blue
[vagrant@centos9s ~]$ sudo ip link set veth-blue-br master v-net-0
- Set ip address and turn it up
[vagrant@centos9s ~]$ sudo ip -n red addr add 192.168.15.1/24 dev veth-red
[vagrant@centos9s ~]$ sudo ip -n blue addr add 192.168.15.2/24 dev veth-blue

[vagrant@centos9s ~]$ sudo ip -n red link set veth-red up
[vagrant@centos9s ~]$ sudo ip -n blue link set veth-blue up

[vagrant@centos9s ~]$ sudo ip link set veth-red-br up
[vagrant@centos9s ~]$ sudo ip link set veth-blue-br up
- Test ping
[vagrant@centos9s ~]$ sudo ip netns exec red ping 192.168.15.2
[vagrant@centos9s ~]$ sudo ip netns exec blue ping 192.168.15.1
- Run brctl show again
[vagrant@centos9s ~]$ brctl show
- Final summary script connect namespace with linux bridge
ip netns add red
ip netns add blue

#show namespace
ip netns show
ip link add v-net-0 type bridge
ip link set dev v-net-0 up

ip link add veth-red type veth peer name veth-red-br
ip link add veth-blue type veth peer name veth-blue-br

ip link set veth-red netns red
ip link set veth-red-br master v-net-0

ip link set veth-blue netns blue
ip link set veth-blue-br master v-net-0
ip -n red addr add 192.168.15.1/24 dev veth-red
ip -n blue addr add 192.168.15.2/24 dev veth-blie

ip -n red link set veth-red up
ip -n blue link set veth-blue up
ip link set veth-red-br up
ip link set veth-blue-br up
ip netns vs. unshare: A Comparison
Both ip netns and unshare are tools used to create and manage isolated environments (namespaces) on Linux systems, but they serve different purposes and have distinct functionalities.
ip netns
- Purpose: Primarily designed for network namespace management.
- Functionality:
- Creates, lists, deletes, and manipulates network namespaces.
- Configures network interfaces, routes, and other network-related settings within namespaces.
- Provides a high-level interface for network namespace management.
unshare
- Purpose: A more general-purpose tool for creating various types of namespaces, including PID, network, mount, IPC, UTS, and user namespaces.
- Functionality:
- Creates child processes with specific namespaces.
- Allows for granular control over namespace creation and configuration.
- Can be used to isolate processes in a variety of ways beyond just networking.
Key Differences
- Scope: ip netns is specifically focused on network namespaces, while unshare can create and manage multiple types of namespaces.
- Level of Control: unshare provides more granular control over namespace creation and configuration, allowing you to specify which namespaces to isolate and how.
- Interface: ip netns offers a more user-friendly interface for managing network namespaces, while unshare is more flexible but requires a deeper understanding of namespace concepts.
When to Use Which
- Network Namespace Management: Use ip netns when you primarily need to create, manage, and configure network namespaces.
- General Namespace Creation: Use unshare when you need to isolate processes in a variety of ways, including PID, mount, IPC, UTS, or user namespaces.
In summary, ip netns is a specialized tool for network namespace management, while unshare is a more general-purpose tool for creating various types of namespaces. The best choice depends on your specific needs and the level of control you require.
Lab1 Installation
Installation
mkdir  podman
cd podman
- สร้าง vagrantfile
# -*- mode: ruby -*-
# vi: set ft=ruby :


$script=<<-SCRIPT
    sed -i 's/PasswordAuthentication no/PasswordAuthentication yes/g' /etc/ssh/sshd_config
    sudo systemctl restart sshd.service
    sudo firewall-cmd --state
    sudo systemctl --enable --now firewalld
    sudo firewall-cmd --add-port=80/tcp
    sudo firewall-cmd --add-port=9090/tcp
    sudo firewall-cmd --reload
    sudo firewall-cmd --get-services

SCRIPT

Vagrant.configure("2") do |config|

  config.vm.box = "generic/centos9s"

  config.vm.network "forwarded_port", guest: 80, host: 8080
  config.vm.network "forwarded_port", guest: 9090, host: 9090
  config.vm.network "private_network", ip: "192.168.33.10"
  config.vm.synced_folder ".", "/vagrant"

  config.vm.provider "virtualbox" do |vb|
     vb.memory = "4096"
     vb.cpus = 2
  end

  config.vm.provision "shell", inline: $script
end
- Step 1
[vagrant@centos9s ~]$ hostnamectl

[vagrant@centos9s ~]$ sudo dnf list podman*

Last metadata expiration check: 0:00:19 ago on Sat 17 Aug 2024 07:52:49 AM UTC.
Available Packages
podman.x86_64                       2:5.1.2-1.el9                                      appstream
podman-catatonit.x86_64             2:4.3.1-3.el9                                      appstream
podman-compose.noarch               1.0.6-3.el9                                        epel
podman-docker.noarch                2:5.1.2-1.el9                                      appstream
podman-gvproxy.x86_64               2:4.6.1-5.el9                                      appstream
podman-plugins.x86_64               2:5.1.2-1.el9                                      appstream
podman-remote.x86_64                2:5.1.2-1.el9                                      appstream
podman-tests.x86_64                 2:5.1.2-1.el9                                      appstream
podman-tui.x86_64                   1.2.0-1.el9                                        epel
- install docker, docker emulator (podman-docker package)
[vagrant@centos9s ~]$ sudo dnf install podman podman-docker
Extra Packages for Enterprise Linux 9 - x86_64          2.0 kB/s | 3.1 kB     00:01
Last metadata expiration check: 0:00:01 ago on Sat 17 Aug 2024 07:52:49 AM UTC.
Dependencies resolved.
========================================================================================
 Package                Arch       Version                          Repository     Size
========================================================================================
Installing:
 podman                 x86_64     2:5.1.2-1.el9                    appstream      16 M
 podman-docker          noarch     2:5.1.2-1.el9                    appstream     102 k
Installing dependencies:
 conmon                 x86_64     3:2.1.12-1.el9                   appstream      52 k
 container-selinux      noarch     3:2.232.1-1.el9                  appstream      56 k
 containers-common      x86_64     2:1-90.el9                       appstream     143 k
 criu                   x86_64     3.19-1.el9                       appstream     560 k
 crun                   x86_64     1.15-1.el9                       appstream     223 k
 fuse-common            x86_64     3.10.2-9.el9                     baseos        8.3 k
 fuse-overlayfs         x86_64     1.14-1.el9                       appstream      67 k
 fuse3                  x86_64     3.10.2-9.el9                     appstream      54 k
 fuse3-libs             x86_64     3.10.2-9.el9                     appstream      91 k
 libnet                 x86_64     1.2-7.el9                        appstream      58 k
 libslirp               x86_64     4.4.0-8.el9                      appstream      68 k
 netavark               x86_64     2:1.11.0-1.el9                   appstream     4.1 M
 passt                  x86_64     0^20240624.g1ee2eca-1.el9        appstream     189 k
 passt-selinux          noarch     0^20240624.g1ee2eca-1.el9        appstream      31 k
 shadow-utils-subid     x86_64     2:4.9-9.el9                      baseos         86 k
 slirp4netns            x86_64     1.3.1-1.el9                      appstream      47 k
 yajl                   x86_64     2.1.0-22.el9                     appstream      38 k
Installing weak dependencies:
 aardvark-dns           x86_64     2:1.11.0-1.el9                   appstream     985 k
 criu-libs              x86_64     3.19-1.el9                       appstream      32 k

Transaction Summary
========================================================================================
Install  21 Packages

Total download size: 23 M
Installed size: 79 M
Is this ok [y/N]: y
- Step3 podman version #Check Version
[vagrant@centos9s ~]$ podman version
Client:       Podman Engine
Version:      5.1.2
API Version:  5.1.2
Go Version:   go1.22.4 (Red Hat 1.22.4-1.el9)
Built:        Thu Jul 11 06:11:34 2024
OS/Arch:      linux/amd64
- Step4 Podman info
[vagrant@centos9s ~]$ podman version
Client:       Podman Engine
Version:      5.1.2
API Version:  5.1.2
Go Version:   go1.22.4 (Red Hat 1.22.4-1.el9)
Built:        Thu Jul 11 06:11:34 2024
OS/Arch:      linux/amd64
[vagrant@centos9s ~]$ podman info
host:
  arch: amd64
  buildahVersion: 1.36.0
  cgroupControllers:
  - memory
  - pids
  cgroupManager: systemd
  cgroupVersion: v2
  conmon:
    package: conmon-2.1.12-1.el9.x86_64
    path: /usr/bin/conmon
    version: 'conmon version 2.1.12, commit: 7ba5bd6c81ff2c10e07aee8c4281d12a2878fa12'
  cpuUtilization:
    idlePercent: 86.81
    systemPercent: 2.48
    userPercent: 10.71
  cpus: 2
  databaseBackend: sqlite
  distribution:
    distribution: centos
    version: "9"
  eventLogger: file
  freeLocks: 2048
  hostname: centos9s.localdomain
  idMappings:
    gidmap:
    - container_id: 0
      host_id: 1000
      size: 1
    - container_id: 1
      host_id: 100000
      size: 65536
    uidmap:
    - container_id: 0
      host_id: 1000
      size: 1
    - container_id: 1
      host_id: 100000
      size: 65536
  kernel: 5.14.0-391.el9.x86_64
  linkmode: dynamic
  logDriver: k8s-file
  memFree: 2929623040
  memTotal: 3837628416
  networkBackend: netavark
  networkBackendInfo:
    backend: netavark
    dns:
      package: aardvark-dns-1.11.0-1.el9.x86_64
      path: /usr/libexec/podman/aardvark-dns
      version: aardvark-dns 1.11.0
    package: netavark-1.11.0-1.el9.x86_64
    path: /usr/libexec/podman/netavark
    version: netavark 1.11.0
  ociRuntime:
    name: crun
    package: crun-1.15-1.el9.x86_64
    path: /usr/bin/crun
    version: |-
      crun version 1.15
      commit: e6eacaf4034e84185fd8780ac9262bbf57082278
      rundir: /run/user/1000/crun
      spec: 1.0.0
      +SYSTEMD +SELINUX +APPARMOR +CAP +SECCOMP +EBPF +CRIU +YAJL
  os: linux
  pasta:
    executable: /usr/bin/pasta
    package: passt-0^20240624.g1ee2eca-1.el9.x86_64
    version: |
      pasta 0^20240624.g1ee2eca-1.el9.x86_64
      Copyright Red Hat
      GNU General Public License, version 2 or later
        <https://www.gnu.org/licenses/old-licenses/gpl-2.0.html>
      This is free software: you are free to change and redistribute it.
      There is NO WARRANTY, to the extent permitted by law.
  remoteSocket:
    exists: false
    path: /run/user/1000/podman/podman.sock
  rootlessNetworkCmd: pasta
  security:
    apparmorEnabled: false
    capabilities: CAP_CHOWN,CAP_DAC_OVERRIDE,CAP_FOWNER,CAP_FSETID,CAP_KILL,CAP_NET_BIND_SERVICE,CAP_SETFCAP,CAP_SETGID,CAP_SETPCAP,CAP_SETUID,CAP_SYS_CHROOT
    rootless: true
    seccompEnabled: true
    seccompProfilePath: /usr/share/containers/seccomp.json
    selinuxEnabled: true
  serviceIsRemote: false
  slirp4netns:
    executable: /usr/bin/slirp4netns
    package: slirp4netns-1.3.1-1.el9.x86_64
    version: |-
      slirp4netns version 1.3.1
      commit: e5e368c4f5db6ae75c2fce786e31eef9da6bf236
      libslirp: 4.4.0
      SLIRP_CONFIG_VERSION_MAX: 3
      libseccomp: 2.5.2
  swapFree: 2147479552
  swapTotal: 2147479552
  uptime: 0h 15m 48.00s
  variant: ""
plugins:
  authorization: null
  log:
  - k8s-file
  - none
  - passthrough
  - journald
  network:
  - bridge
  - macvlan
  - ipvlan
  volume:
  - local
registries:
  search:
  - registry.access.redhat.com
  - registry.redhat.io
  - docker.io
store:
  configFile: /home/vagrant/.config/containers/storage.conf
  containerStore:
    number: 0
    paused: 0
    running: 0
    stopped: 0
  graphDriverName: overlay
  graphOptions: {}
  graphRoot: /home/vagrant/.local/share/containers/storage
  graphRootAllocated: 134146424832
  graphRootUsed: 3115450368
  graphStatus:
    Backing Filesystem: xfs
    Native Overlay Diff: "true"
    Supports d_type: "true"
    Supports shifting: "false"
    Supports volatile: "true"
    Using metacopy: "false"
  imageCopyTmpDir: /var/tmp
  imageStore:
    number: 0
  runRoot: /run/user/1000/containers
  transientStore: false
  volumePath: /home/vagrant/.local/share/containers/storage/volumes
version:
  APIVersion: 5.1.2
  Built: 1720678294
  BuiltTime: Thu Jul 11 06:11:34 2024
  GitCommit: ""
  GoVersion: go1.22.4 (Red Hat 1.22.4-1.el9)
  Os: linux
  OsArch: linux/amd64
  Version: 5.1.2
- Test docker emulator command
[vagrant@centos9s ~]$ docker version
[vagrant@centos9s ~]$ docker info
- Run download hello-world image and run
[vagrant@centos9s ~]$ podman container run hello-world
Resolved "hello-world" as an alias (/etc/containers/registries.conf.d/000-shortnames.conf)
Trying to pull quay.io/podman/hello:latest...
Getting image source signatures
Copying blob 81df7ff16254 done   |
Copying config 5dd467fce5 done   |
Writing manifest to image destination
!... Hello Podman World ...!

         .--"--.
       / -     - \
      / (O)   (O) \
   ~~~| -=(,Y,)=- |
    .---. /`  \   |~~
 ~/  o  o \~~~~.----. ~~
  | =(X)= |~  / (O (O) \
   ~~~~~~~  ~| =(Y_)=-  |
  ~~~~    ~~~|   U      |~~

Project:   https://github.com/containers/podman
Website:   https://podman.io
Desktop:   https://podman-desktop.io
Documents: https://docs.podman.io
YouTube:   https://youtube.com/@Podman
X/Twitter: @Podman_io
Mastodon:  @Podman_io@fosstodon.org
- Check size of image hello very small
[vagrant@centos9s ~]$ podman image list
REPOSITORY            TAG         IMAGE ID      CREATED       SIZE
quay.io/podman/hello  latest      5dd467fce50b  2 months ago  787 kB
- Check instance
- option
--alllist bost stop and running Container
- option
[vagrant@centos9s ~]$ podman container list --all
CONTAINER ID  IMAGE                        COMMAND               CREATED        STATUS                    PORTS       NAMES
2b986712ab8f  quay.io/podman/hello:latest  /usr/local/bin/po...  5 minutes ago  Exited (0) 5 minutes ago              inspiring_mcnulty
Start Container
- Start container
- use container to start again
[vagrant@centos9s ~]$ podman container start inspiring_mcnulty
inspiring_mcnulty
- container will start and stop immediately but we cannot see anythings
So we will connect host terminal to standard output (STD) of container by add
start -aoption
SUMMARY Because container is very isolated. so in order to show the output of container we must attact standard output to host terminal
-a
[vagrant@centos9s ~]$ podman container start -a inspiring_mcnulty
!... Hello Podman World ...!

         .--"--.
       / -     - \
      / (O)   (O) \
   ~~~| -=(,Y,)=- |
    .---. /`  \   |~~
 ~/  o  o \~~~~.----. ~~
  | =(X)= |~  / (O (O) \
   ~~~~~~~  ~| =(Y_)=-  |
  ~~~~    ~~~|   U      |~~

Project:   https://github.com/containers/podman
Website:   https://podman.io
Desktop:   https://podman-desktop.io
Documents: https://docs.podman.io
YouTube:   https://youtube.com/@Podman
X/Twitter: @Podman_io
Mastodon:  @Podman_io@fosstodon.org
Remote Container
[vagrant@centos9s ~]$ podman container rm inspiring_mcnulty
inspiring_mcnulty
Container is just runtime instance of image. We delete container but not image because maybe we will an image to another container
- Check images again. An no need to re-download
[vagrant@centos9s ~]$ podman image list
REPOSITORY            TAG         IMAGE ID      CREATED       SIZE
quay.io/podman/hello  latest      5dd467fce50b  2 months ago  787 kB
Manage container images
- First we must know how to discover and download image from Image Registry. We use comman
podman image search
[vagrant@centos9s ~]$ podman image search nginx
NAME                                                          DESCRIPTION
registry.access.redhat.com/ubi8/nginx-120                     Platform for running nginx 1.20 or building...
registry.access.redhat.com/rhel9/nginx-124                    rhcc_registry.access.redhat.com_rhel9/nginx-...
registry.access.redhat.com/ubi8/nginx-118                     Platform for running nginx 1.18 or building...
registry.access.redhat.com/ubi9/nginx-120                     rhcc_registry.access.redhat.com_ubi9/nginx-1...
registry.access.redhat.com/ubi8/nginx-122                     rhcc_registry.access.redhat.com_ubi8/nginx-1...
registry.access.redhat.com/ubi9/nginx-122                     rhcc_registry.access.redhat.com_ubi9/nginx-1...
registry.access.redhat.com/ubi9/nginx-124                     rhcc_registry.access.redhat.com_ubi9/nginx-1...
registry.access.redhat.com/rhel8/nginx-124                    rhcc_registry.access.redhat.com_rhel8/nginx-...
registry.access.redhat.com/ubi8/nginx-124                     rhcc_registry.access.redhat.com_ubi8/nginx-1...
registry.access.redhat.com/rhscl/nginx-18-rhel7               Nginx 1.8 server and a reverse proxy server
registry.access.redhat.com/rhscl/nginx-112-rhel7              Nginx is a web server and a reverse proxy se...
registry.access.redhat.com/rhscl/nginx-114-rhel7              Nginx is a web server and a reverse proxy se...
registry.access.redhat.com/rhscl/nginx-110-rhel7              Nginx container image that delivers an nginx...
registry.access.redhat.com/rhscl/nginx-16-rhel7               Nginx 1.6 server and a reverse proxy server
registry.access.redhat.com/ubi7/nginx-118                     Platform for running nginx 1.18 or building...
registry.access.redhat.com/ubi7/nginx-120                     Platform for running nginx 1.20 or building...
registry.access.redhat.com/3scale-amp23/apicast-gateway       3scale's API gateway (APIcast) is an OpenRe...
registry.access.redhat.com/3scale-amp20/apicast-gateway       3scale's API gateway (APIcast) is an OpenRes...
registry.access.redhat.com/3scale-amp25/apicast-gateway       3scale's API gateway (APIcast) is an OpenRes...
registry.access.redhat.com/rhamp10/apicast-gateway            3scale's API gateway (APIcast) is an OpenRes...
registry.access.redhat.com/3scale-amp20-beta/apicast-gateway  3scale's API gateway (APIcast) is an OpenRes...
registry.access.redhat.com/3scale-amp21/apicast-gateway       3scale AMP image used for API gateway
registry.access.redhat.com/3scale-amp24/apicast-gateway       No description
registry.access.redhat.com/rhmap45/wildcard-proxy             RHMAP image that provides mapping and proxy...
registry.access.redhat.com/rhmap46/wildcard-proxy             RHMAP image that provides mapping and proxy...
registry.redhat.io/rhel8/nginx-114                            Nginx is a web server and a reverse proxy se...
registry.redhat.io/rhel8/nginx-118                            Platform for running nginx 1.18 or building...
registry.redhat.io/ubi8/nginx-120                             Platform for running nginx 1.20 or building...
registry.redhat.io/rhel9/nginx-120                            rhcc_registry.access.redhat.com_rhel9/nginx-...
registry.redhat.io/rhel8/nginx-122                            rhcc_registry.access.redhat.com_rhel8/nginx-...
registry.redhat.io/rhel9/nginx-124                            rhcc_registry.access.redhat.com_rhel9/nginx-...
registry.redhat.io/rhel8/nginx-116                            Platform for running nginx 1.16 or building...
registry.redhat.io/ubi8/nginx-118                             Platform for running nginx 1.18 or building...
registry.redhat.io/rhel8/nginx-120                            Platform for running nginx 1.20 or building...
registry.redhat.io/ubi9/nginx-120                             rhcc_registry.access.redhat.com_ubi9/nginx-1...
registry.redhat.io/ubi8/nginx-122                             rhcc_registry.access.redhat.com_ubi8/nginx-1...
registry.redhat.io/rhel9/nginx-122                            rhcc_registry.access.redhat.com_rhel9/nginx-...
registry.redhat.io/ubi9/nginx-122                             rhcc_registry.access.redhat.com_ubi9/nginx-1...
registry.redhat.io/ubi9/nginx-124                             rhcc_registry.access.redhat.com_ubi9/nginx-1...
registry.redhat.io/rhel8/nginx-124                            rhcc_registry.access.redhat.com_rhel8/nginx-...
registry.redhat.io/ubi8/nginx-124                             rhcc_registry.access.redhat.com_ubi8/nginx-1...
registry.redhat.io/rhscl/nginx-18-rhel7                       Nginx 1.8 server and a reverse proxy server
registry.redhat.io/rhscl/nginx-112-rhel7                      Nginx is a web server and a reverse proxy se...
registry.redhat.io/rhscl/nginx-114-rhel7                      Nginx is a web server and a reverse proxy se...
registry.redhat.io/rhscl/nginx-110-rhel7                      Nginx container image that delivers an nginx...
registry.redhat.io/rhscl/nginx-16-rhel7                       Nginx 1.6 server and a reverse proxy server
registry.redhat.io/rhscl/nginx-116-rhel7                      Platform for running nginx 1.16 or building...
registry.redhat.io/rhscl/nginx-118-rhel7                      Platform for running nginx 1.18 or building...
registry.redhat.io/ubi7/nginx-118                             Platform for running nginx 1.18 or building...
registry.redhat.io/rhscl/nginx-120-rhel7                      Platform for running nginx 1.20 or building...
docker.io/library/nginx                                       Official build of Nginx.
docker.io/library/unit                                        Official build of NGINX Unit: Universal Web...
docker.io/nginx/nginx-ingress                                 NGINX and  NGINX Plus Ingress Controllers fo...
docker.io/paketobuildpacks/nginx
docker.io/linuxserver/nginx                                   An Nginx container, brought to you by LinuxS...
docker.io/linuxserver/letsencrypt                             A Letsencrypt nginx container, brought to yo...
docker.io/stackstorm/st2timersengine
docker.io/rancher/nginx-ingress-controller
docker.io/droidwiki/nginx
docker.io/nginx/unit                                          This repository is retired, use the Docker o...
docker.io/nginx/nginx-ingress-operator                        NGINX Ingress Operator for NGINX and NGINX P...
docker.io/nginxinc/nginx-s3-gateway                           Authenticating and caching gateway based on...
docker.io/rancher/nginx
docker.io/shinsenter/phpfpm-nginx                             🌏 (PHP) PHP + Nginx Docker images for bot...
docker.io/paketobuildpacks/php-nginx
docker.io/bitnami/nginx-ingress-controller                    Bitnami container image for NGINX Ingress Co...
docker.io/rancher/mirrored-library-nginx
docker.io/pppy/s3-nginx-proxy                                 A lightweight kubernetes deployable nginx-ba...
docker.io/bitnami/wordpress-nginx                             Bitnami container image for WordPress with N...
docker.io/bitnami/nginx-exporter                              Bitnami container image for NGINX Exporter
docker.io/docker/dtr-nginx
docker.io/drud/nginx-ingress-controller
docker.io/jitesoft/nginx                                      Nginx on alpine linux
docker.io/rancher/mirrored-longhornio-longhorn-engine
docker.io/openmicroscopy/omero-web-standalone                 Standalone OMERO.web image which uses serves...
the output show image nginx from many registry. registries show 2 main registries. registry.redhat.io, docker.io so we can search nginx image from only docker.io
[vagrant@centos9s ~]$ podman image search docker.io/nginx
NAME                                                   DESCRIPTION
docker.io/library/nginx                                Official build of Nginx.
docker.io/library/unit                                 Official build of NGINX Unit: Universal Web...
docker.io/nginx/nginx-ingress                          NGINX and  NGINX Plus Ingress Controllers fo...
docker.io/paketobuildpacks/nginx
docker.io/linuxserver/nginx                            An Nginx container, brought to you by LinuxS...
docker.io/linuxserver/letsencrypt                      A Letsencrypt nginx container, brought to yo...
docker.io/stackstorm/st2timersengine
docker.io/rancher/nginx-ingress-controller
docker.io/droidwiki/nginx
docker.io/nginx/unit                                   This repository is retired, use the Docker o...
docker.io/nginx/nginx-ingress-operator                 NGINX Ingress Operator for NGINX and NGINX P...
docker.io/nginxinc/nginx-s3-gateway                    Authenticating and caching gateway based on...
docker.io/rancher/nginx
docker.io/shinsenter/phpfpm-nginx                      🌏 (PHP) PHP + Nginx Docker images for bot...
docker.io/paketobuildpacks/php-nginx
docker.io/bitnami/nginx-ingress-controller             Bitnami container image for NGINX Ingress Co...
docker.io/rancher/mirrored-library-nginx
docker.io/pppy/s3-nginx-proxy                          A lightweight kubernetes deployable nginx-ba...
docker.io/bitnami/wordpress-nginx                      Bitnami container image for WordPress with N...
docker.io/bitnami/nginx-exporter                       Bitnami container image for NGINX Exporter
docker.io/docker/dtr-nginx
docker.io/drud/nginx-ingress-controller
docker.io/jitesoft/nginx                               Nginx on alpine linux
docker.io/rancher/mirrored-longhornio-longhorn-engine
docker.io/openmicroscopy/omero-web-standalone          Standalone OMERO.web image which uses serves...
[vagrant@centos9s ~]$
- File config which config registries (/etc/containers/registries.conf)
[vagrant@centos9s ~]$ sudo vim /etc/containers/registries.conf
- Unqualified image name. podman will search in order from list
unqualified-search-registries = ["registry.access.redhat.com", "registry.redhat.io", "docker.io"]
- Change list of registries. and save file
unqualified-search-registries = ["docker.io","quay.io"]
- Run command.
[vagrant@centos9s ~]$ podman image search nginx
[vagrant@centos9s ~]$ podman image search quay.io/nginx
Download image with command podman image pull
- download httpd image and force pull image from docker.io registry
[vagrant@centos9s ~]$ podman image pull docker.io/httpd
Trying to pull docker.io/library/httpd:latest...
Getting image source signatures
Copying blob fd1a778092db done   |
Copying blob e4fff0779e6d done   |
Copying blob 4f4fb700ef54 done   |
Copying blob 1d0292c3dcd2 done   |
Copying blob 1316399d8fbf done   |
Copying blob b4cc6570db82 done   |
Copying config a49fd2c04c done   |
Writing manifest to image destination
a49fd2c04c0236f25b2724476ff48d73af6811f28e0db3765df6bb7f0f88bf7a
- Check image
[vagrant@centos9s ~]$ podman images
REPOSITORY               TAG         IMAGE ID      CREATED       SIZE
docker.io/library/httpd  latest      a49fd2c04c02  4 weeks ago   152 MB
quay.io/podman/hello     latest      5dd467fce50b  2 months ago  787 kB
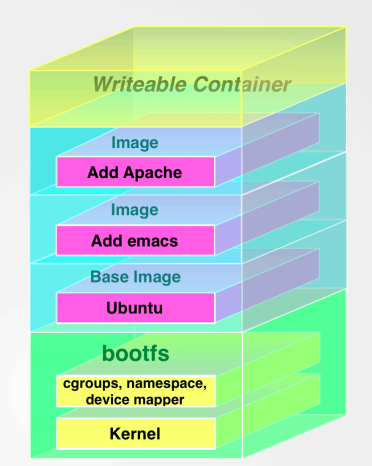
Images consist of many layers. every image start from base images (foundation of image) and base image will share with other images
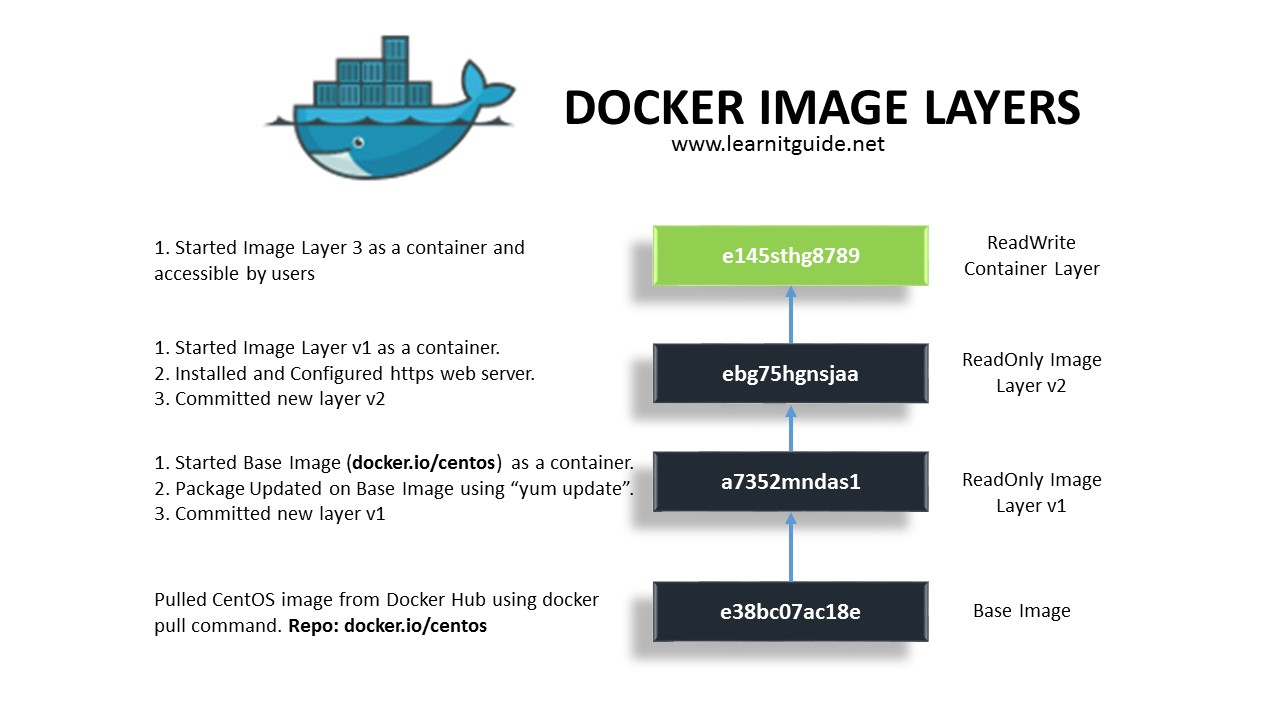
Top most layer is only layer that can editable. but the layer beneath this layer is readonly
- View Image file layer
podman image tree
[vagrant@centos9s ~]$ podman image tree httpd:latest
Image ID: a49fd2c04c02
Tags:     [docker.io/library/httpd:latest]
Size:     152.2MB
Image Layers
├── ID: 9853575bc4f9 Size: 77.83MB
├── ID: f12f352ba1b0 Size:  2.56kB
├── ID: 07f0fed8a161 Size: 1.024kB
├── ID: 27485a39d53c Size: 11.39MB
├── ID: f3f0f4e3457a Size: 62.92MB
└── ID: 51bf5b3f44e4 Size: 3.584kB Top Layer of: [docker.io/library/httpd:latest]
- inspect image
podman image inspectshow all meta data of an images
[vagrant@centos9s ~]$ podman image inspect hello:latest
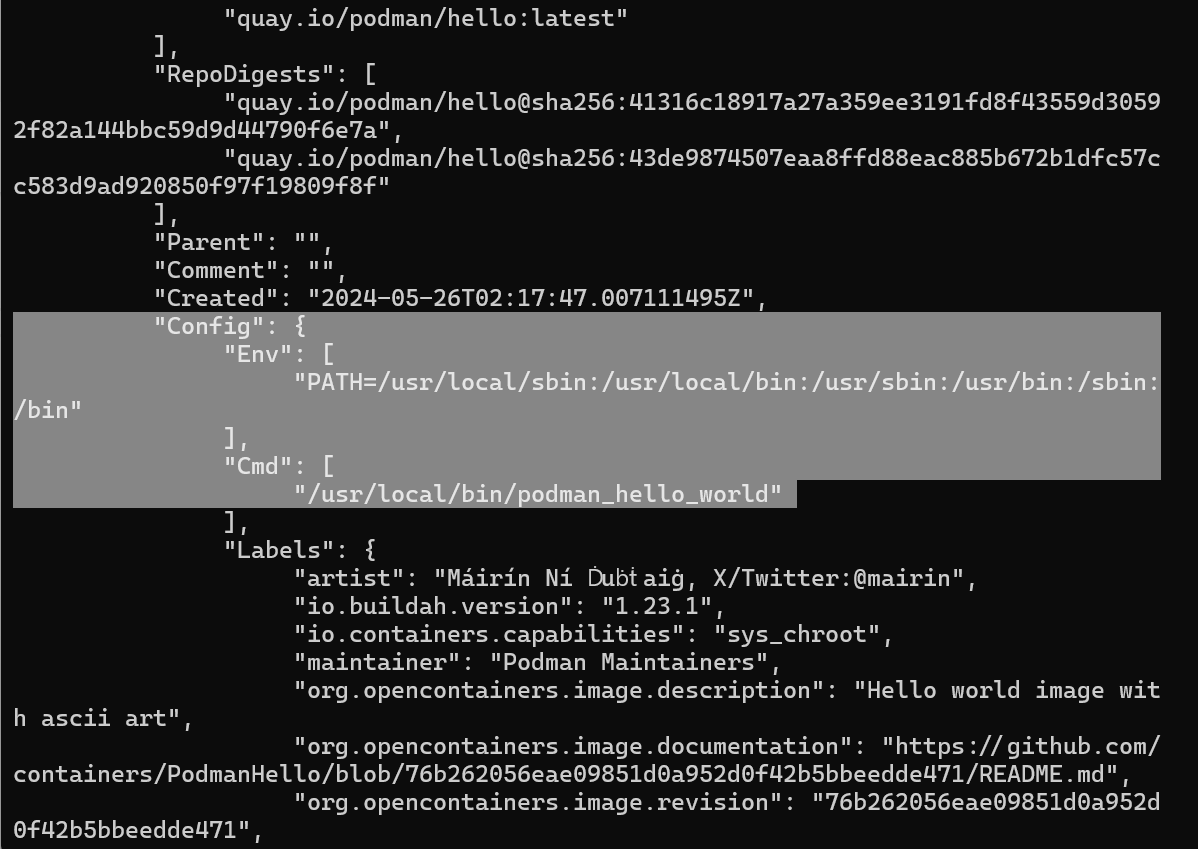
Config > Cmd which run by default in container when start container
Create podman container
- Container subcommand
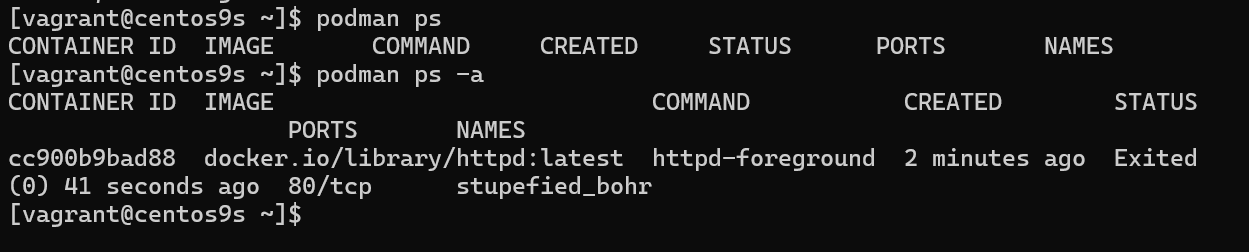
$ podman container list
$ podman ps
$ podman ps -a
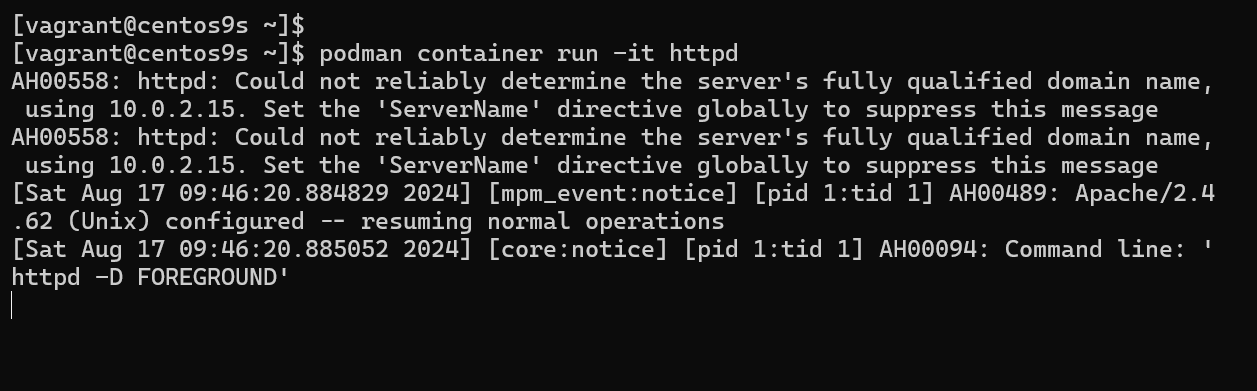
- Run with interactive
[vagrant@centos9s ~]$ podman container run -it httpd
use option
-itto attach interactive terminal to container. so We can see the output of running httd container
- Run
Contrl+Cto exit to running container. Terminate httpd process. Container will stop.
- Run command with override default
CMD. instate of running httpd command. the command below wil run/bin/bashshell
[vagrant@centos9s ~]$ podman container run -it httpd /bin/bash
root@8fc1732162a4:/usr/local/apache2#

Exit command with stop container

Give name to Run container
- add option
--name=wwwserverto give container a name
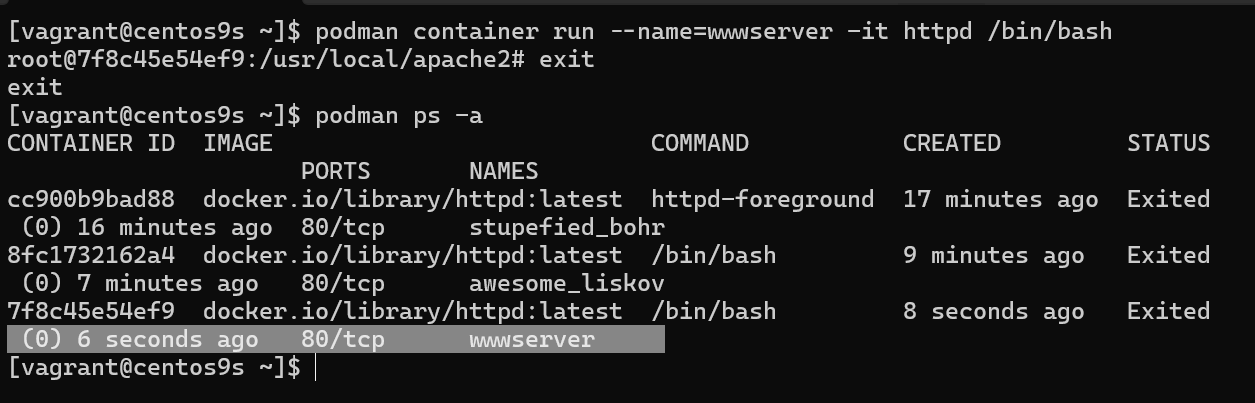
[vagrant@centos9s ~]$ podman container run --name=wwwserver -it httpd /bin/bash
root@7f8c45e54ef9:/usr/local/apache2# exit
exit
[vagrant@centos9s ~]$ podman ps -a
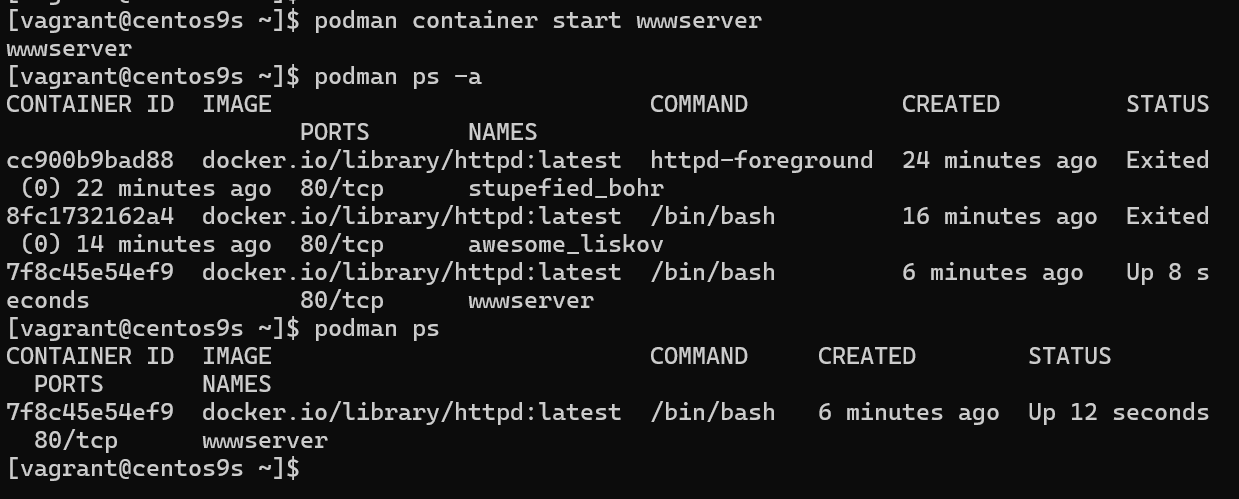
- Start container with name
[vagrant@centos9s ~]$ podman container start wwwserver
wwwserver

[vagrant@centos9s ~]$ podman ps -a
CONTAINER ID  IMAGE                           COMMAND           CREATED         STATUS                     PORTS       NAMES
cc900b9bad88  docker.io/library/httpd:latest  httpd-foreground  24 minutes ago  Exited (0) 22 minutes ago  80/tcp      stupefied_bohr
8fc1732162a4  docker.io/library/httpd:latest  /bin/bash         16 minutes ago  Exited (0) 14 minutes ago  80/tcp      awesome_liskov
7f8c45e54ef9  docker.io/library/httpd:latest  /bin/bash         6 minutes ago   Up 8 seconds               80/tcp      wwwserver

[vagrant@centos9s ~]$ podman ps
CONTAINER ID  IMAGE                           COMMAND     CREATED        STATUS         PORTS       NAMES
7f8c45e54ef9  docker.io/library/httpd:latest  /bin/bash   6 minutes ago  Up 12 seconds  80/tcp      wwwserver
[vagrant@centos9s ~]$
- Attach to inteactive shell
because we attach inteactive terminal when we create container
wwwserver. So we can attach to container
[vagrant@centos9s ~]$ podman container attach wwwserver
root@7f8c45e54ef9:/usr/local/apache2# exit
-
exit command will stop container
-
Remove container with name
[vagrant@centos9s ~]$ podman container rm wwwserver
wwwserver
- Remove all containers
[vagrant@centos9s ~]$ podman container prune
WARNING! This will remove all non running containers.
Are you sure you want to continue? [y/N] y
cc900b9bad88c1e9a3328495eeb76f3d62d84e8f08c7ff488bd927bd473488cd
8fc1732162a485d7563cdd1573c158d2e894a5bfc8016cd4c5c9900cd86bacf6
Run httpd image as WebServer
- Run Container in detach mode
-d(background process) and-pto specify port-p 8080:80
[vagrant@centos9s ~]$ podman container run --name=wwwserver -dit -p 8080:80 httpd
4b9e740408c13c2589b2cdec55cf001aed8d1f1723e74dec06ef0cd1c4867bde
[vagrant@centos9s ~]$ podman ps
CONTAINER ID  IMAGE                           COMMAND           CREATED        STATUS        PORTS                         NAMES
4b9e740408c1  docker.io/library/httpd:latest  httpd-foreground  7 seconds ago  Up 8 seconds  0.0.0.0:8080->80/tcp, 80/tcp  wwwserver
[vagrant@centos9s ~]$ curl localhost:8080
<html><body><h1>It works!</h1></body></html>
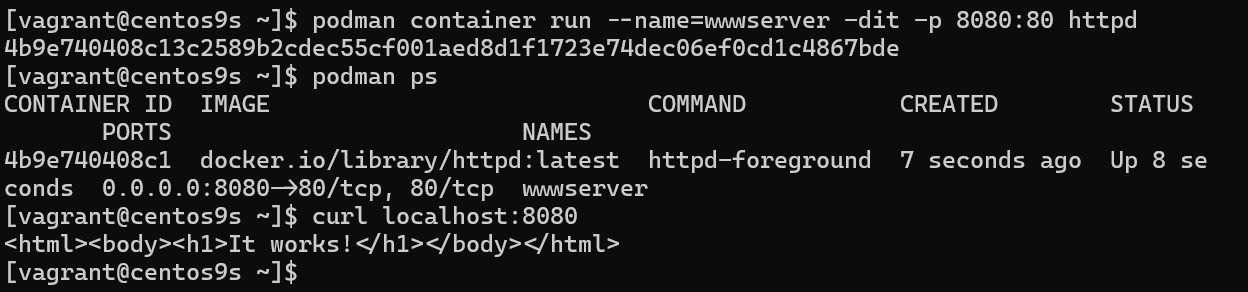
REMARK we map port 8080 on host(vagrant) to port 80 in container. However, we can't map port number under 1024 because we need root priviledge if we want to map port under 1024. Every Container isolated by its namespace. in host machine, we install only podman. and download image to host.
Manage Podman Volume (Remember for exam)
- Manage contain of webserver from host machine. By First check container is running.
[vagrant@centos9s ~]$ podman container list
CONTAINER ID  IMAGE                           COMMAND           CREATED         STATUS         PORTS                         NAMES
4b9e740408c1  docker.io/library/httpd:latest  httpd-foreground  11 minutes ago  Up 11 minutes  0.0.0.0:8080->80/tcp, 80/tcp  wwwserver
- Run command inside container
podman container execthis will run command in the context of running container
$ podman container exec -it wwwserver /bin/bash
[vagrant@centos9s ~]$ podman container exec -it wwwserver /bin/bash

root@4b9e740408c1:/usr/local/apache2# ls -F
bin/  build/  cgi-bin/  conf/  error/  htdocs/  icons/  include/  logs/  modules/
root@4b9e740408c1:/usr/local/apache2# ls htdocs/
index.html

root@4b9e740408c1:/usr/local/apache2#
- We need to know 2 things
- location of content that we want to overide
- Permission of content
root@4b9e740408c1:/usr/local/apache2# grep www /etc/passwd
www-data:x:33:33:www-data:/var/www:/usr/sbin/nologin

root@4b9e740408c1:/usr/local/apache2# exit
Explaination: from the result permission of content is udi=33, Gid=33 , The exit command after run exec command, we exit from exec option but container still keep running. Why. because we exit from exec. but container initially start by default command CMD apachhttp. but we exit from /bin/bash command
Understand permision, SElinux when share content share from host to container
- Check subuid, subgid from host (Vagrant)
[vagrant@centos9s ~]$ cat /etc/subuid
vagrant:100000:65536
[vagrant@centos9s ~]$ cat /etc/subgid
vagrant:100000:65536
[vagrant@centos9s ~]$ getenforce
Enforcing
- subuid,subgid
- SE Linux Enforce on this machine
- Create folder name web/ and content of index.html
[vagrant@centos9s ~]$ mkdir web
[vagrant@centos9s ~]$ echo "Test Apache Page" > web/index.html
[vagrant@centos9s ~]$
[vagrant@centos9s ~]$ ls -Z web/index.html
unconfined_u:object_r:httpd_user_content_t:s0 web/index.html
- Change context of selinux
[vagrant@centos9s ~]$ sudo chcon -Rvt container_file_t web
changing security context of 'web/index.html'
changing security context of 'web'

[vagrant@centos9s ~]$ ls -Z web/index.html
unconfined_u:object_r:container_file_t:s0 web/index.html
- change container
[vagrant@centos9s ~]$ podman unshare chown -R 33:33 web
[vagrant@centos9s ~]$ ls -ld web/
drwxr-xr-x. 2 100032 100032 24 Aug 17 11:01 web/
[vagrant@centos9s ~]$
- Remove Container
[vagrant@centos9s ~]$ podman container rm -f wwwserver
wwwserver
- Start new container and add option
-v host_dir:container_dir
[vagrant@centos9s ~]$ podman container run --name=wwwserver -dit -p 8080:80 -v /home/vagrant/web:/usr/local/apache2/htdocs httpd
2003e7955e43f31c7a2730e5b187c7a7449ad2c973da6686b82bef79002db7c2

[vagrant@centos9s ~]$ curl localhost:8080
Test Apache Page
[vagrant@centos9s ~]$
- Check content inside container
[vagrant@centos9s ~]$ podman container exec -it wwwserver /bin/bash
root@2003e7955e43:/usr/local/apache2# cat htdocs/index.html
Test Apache Page
root@2003e7955e43:/usr/local/apache2# exit
exit
SUMMARY Remember step to shared content from host to container.
Container as Service
- Use Systemd to start container. We config systemd to manage container
[vagrant@centos9s ~]$ sudo su -
[root@centos9s ~]#
- Turn on Policy in SELinux
container_manage_cgroupto on
[root@centos9s ~]# setsebool -P container_manage_cgroup on
[root@centos9s ~]#
[root@centos9s ~]# podman container run -dit --name wwwserver -p 9000:80 httpd
✔ docker.io/library/httpd:latest
Trying to pull docker.io/library/httpd:latest...
Getting image source signatures
Copying blob fd1a778092db done   |
Copying blob e4fff0779e6d done   |
Copying blob 4f4fb700ef54 done   |
Copying blob 1d0292c3dcd2 done   |
Copying blob 1316399d8fbf done   |
Copying blob b4cc6570db82 done   |
Copying config a49fd2c04c done   |
Writing manifest to image destination
e2837195ed7391ff922857bca573b2604f00912a06576b5240eb88829dacae44
[root@centos9s ~]#
- Generate systemd
[root@centos9s ~]# podman generate systemd --new --name wwwserver
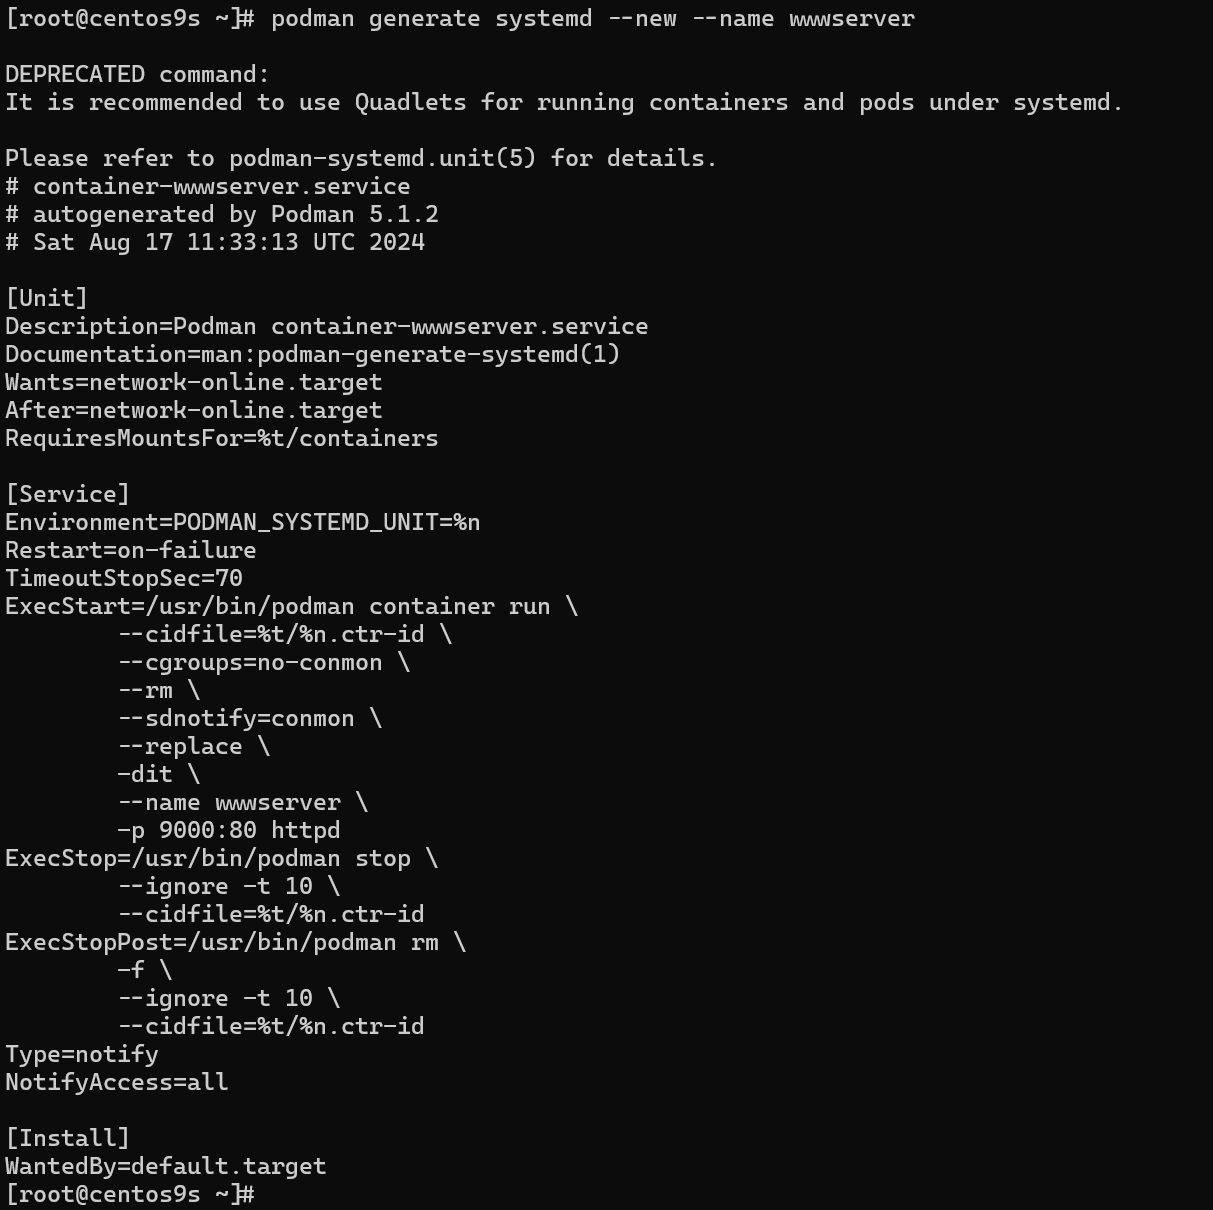
DEPRECATED command:
It is recommended to use Quadlets for running containers and pods under systemd.

Please refer to podman-systemd.unit(5) for details.
# container-wwwserver.service
# autogenerated by Podman 5.1.2
# Sat Aug 17 11:33:13 UTC 2024

[Unit]
Description=Podman container-wwwserver.service
Documentation=man:podman-generate-systemd(1)
Wants=network-online.target
After=network-online.target
RequiresMountsFor=%t/containers

[Service]
Environment=PODMAN_SYSTEMD_UNIT=%n
Restart=on-failure
TimeoutStopSec=70
ExecStart=/usr/bin/podman container run \
        --cidfile=%t/%n.ctr-id \
        --cgroups=no-conmon \
        --rm \
        --sdnotify=conmon \
        --replace \
        -dit \
        --name wwwserver \
        -p 9000:80 httpd
ExecStop=/usr/bin/podman stop \
        --ignore -t 10 \
        --cidfile=%t/%n.ctr-id
ExecStopPost=/usr/bin/podman rm \
        -f \
        --ignore -t 10 \
        --cidfile=%t/%n.ctr-id
Type=notify
NotifyAccess=all

[Install]
WantedBy=default.target
[root@centos9s ~]#  podman generate systemd --new --name wwwserver  > /etc/systemd/system/wwwserver.service
[root@centos9s ~]# systemctl daemon-reload
[root@centos9s ~]# systemctl enable --now wwwserver.service
Created symlink /etc/systemd/system/default.target.wants/wwwserver.service → /etc/systemd/system/wwwserver.service.
- Test it
- Delete container
- start systemd
- check container
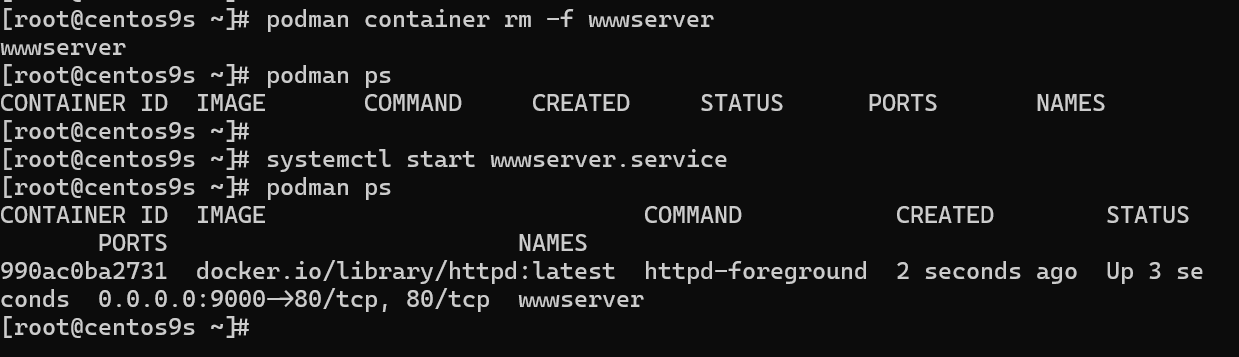
[root@centos9s ~]# podman container rm -f wwwserver
wwwserver
[root@centos9s ~]# podman ps
CONTAINER ID  IMAGE       COMMAND     CREATED     STATUS      PORTS       NAMES
[root@centos9s ~]#
[root@centos9s ~]# systemctl start wwwserver.service
[root@centos9s ~]# podman ps
CONTAINER ID  IMAGE                           COMMAND           CREATED        STATUS        PORTS                         NAMES
990ac0ba2731  docker.io/library/httpd:latest  httpd-foreground  2 seconds ago  Up 3 seconds  0.0.0.0:9000->80/tcp, 80/tcp  wwwserver
[root@centos9s ~]#
- Test which curl
[root@centos9s ~]# curl localhost:9000
<html><body><h1>It works!</h1></body></html>
CLEAR PICTURE Now we create container and run systemd stat container from host , Next Step we create container and use start service inside container with systemd
Next Approch
- Learn more step how to use podman container senario:
- Create own image
- Start Sevices with Systemd inside container
[vagrant@centos9s ~]$ mkdir mywebserver
[vagrant@centos9s ~]$ cd mywebserver/
[vagrant@centos9s mywebserver]$ vim Dockerfile
- Create Dockerfile
FROM registry.fedoraproject.org/fedora:40
RUN yum -y install httpd; yum clean all; systemctl enable httpd;
RUN echo "Successful Web Server Test" | tee /var/www/html/index.html
RUN mkdir /etc/systemd/system/httpd.service.d/; echo -e '[Service]\nRestart=always' | tee /etc/systemd/system/httpd.service.d/httpd.conf
EXPOSE 80
CMD [ "/sbin/init" ]
- Create image only
- don't miss dot end of command
[vagrant@centos9s mywebserver]$ podman image build --format=docker -t my-www-image  .

[vagrant@centos9s mywebserver]$ podman image ls
REPOSITORY                         TAG         IMAGE ID      CREATED        SIZE
localhost/my-www-image             latest      4806f71cc5e4  5 seconds ago  314 MB
- Start container from own custom image
- Remove existing container to release port 8080
[vagrant@centos9s mywebserver]$ podman container ls
CONTAINER ID  IMAGE                           COMMAND           CREATED            STATUS            PORTS                         NAMES
2003e7955e43  docker.io/library/httpd:latest  httpd-foreground  About an hour ago  Up About an hour  0.0.0.0:8080->80/tcp, 80/tcp  wwwserver
[vagrant@centos9s mywebserver]$ podman container rm -f wwwserver
wwwserver
[vagrant@centos9s mywebserver]$ podman container run -dit --name=my-www -p 8080:80 my-www-image:latest
- List image
[vagrant@centos9s mywebserver]$ podman container ls
CONTAINER ID  IMAGE                          COMMAND     CREATED         STATUS         PORTS                         NAMES
442db271fa6b  localhost/my-www-image:latest  /sbin/init  26 seconds ago  Up 26 seconds  0.0.0.0:8080->80/tcp, 80/tcp  my-www
- Test
[vagrant@centos9s mywebserver]$ curl localhost:8080
Successful Web Server Test
[vagrant@centos9s mywebserver]$
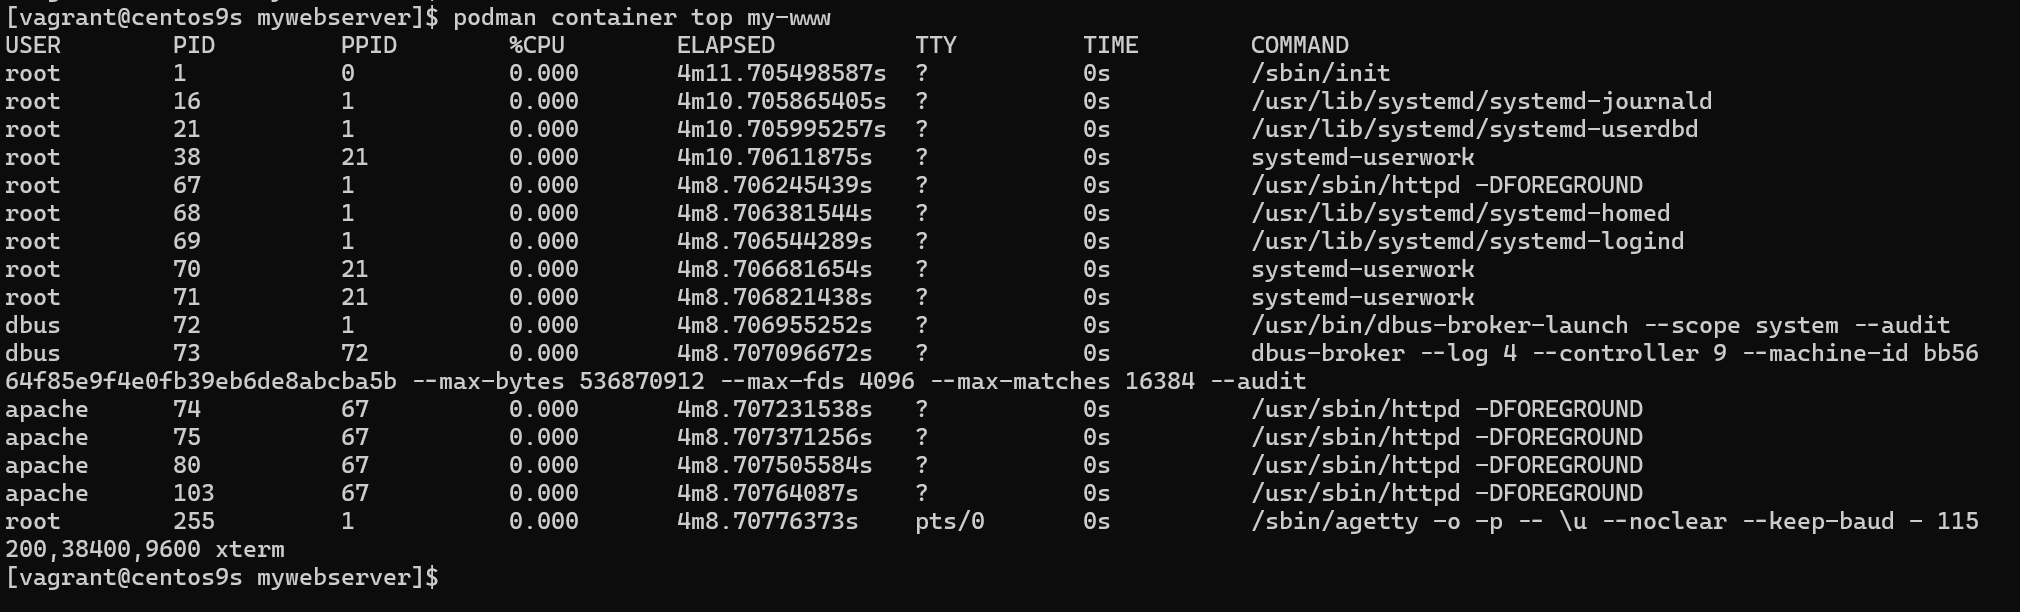
- Check internal process
[vagrant@centos9s mywebserver]$ podman container top my-www
Install Cockpit
- Install cockpit
sudo dnf install cockpit -y
sudo systemctl restart cockpit
- Enable firewalld
sudo firewall-cmd --permanent --zone=public --add-service=cockpit
sudo firewall-cmd --reload
- Open Browser https://192.168.33.10:9090/
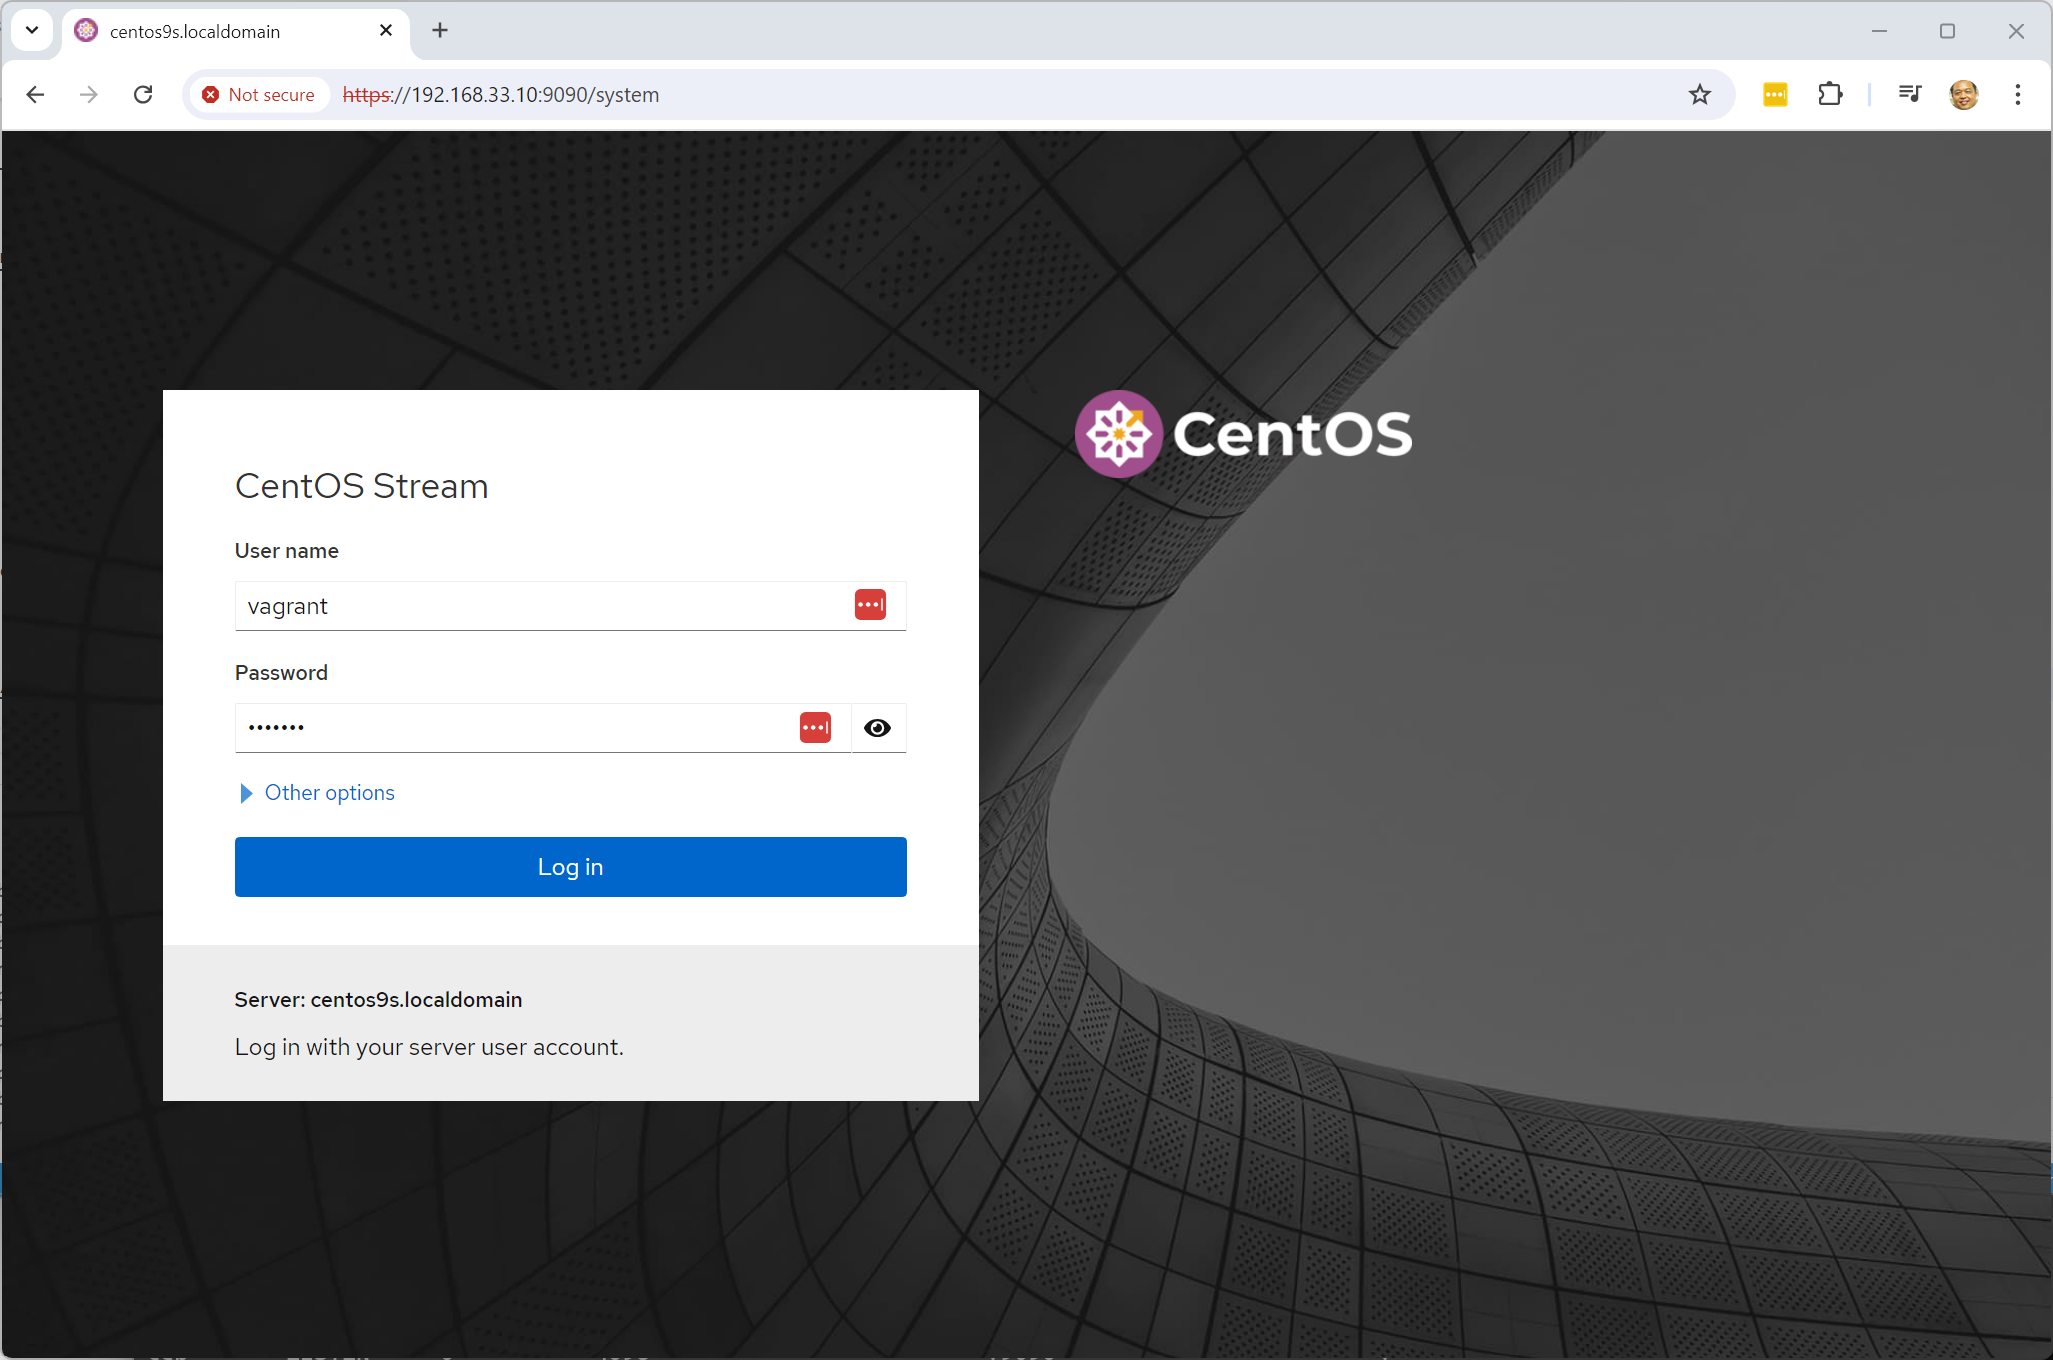
- Log in with username: vagrant, password: vagrant
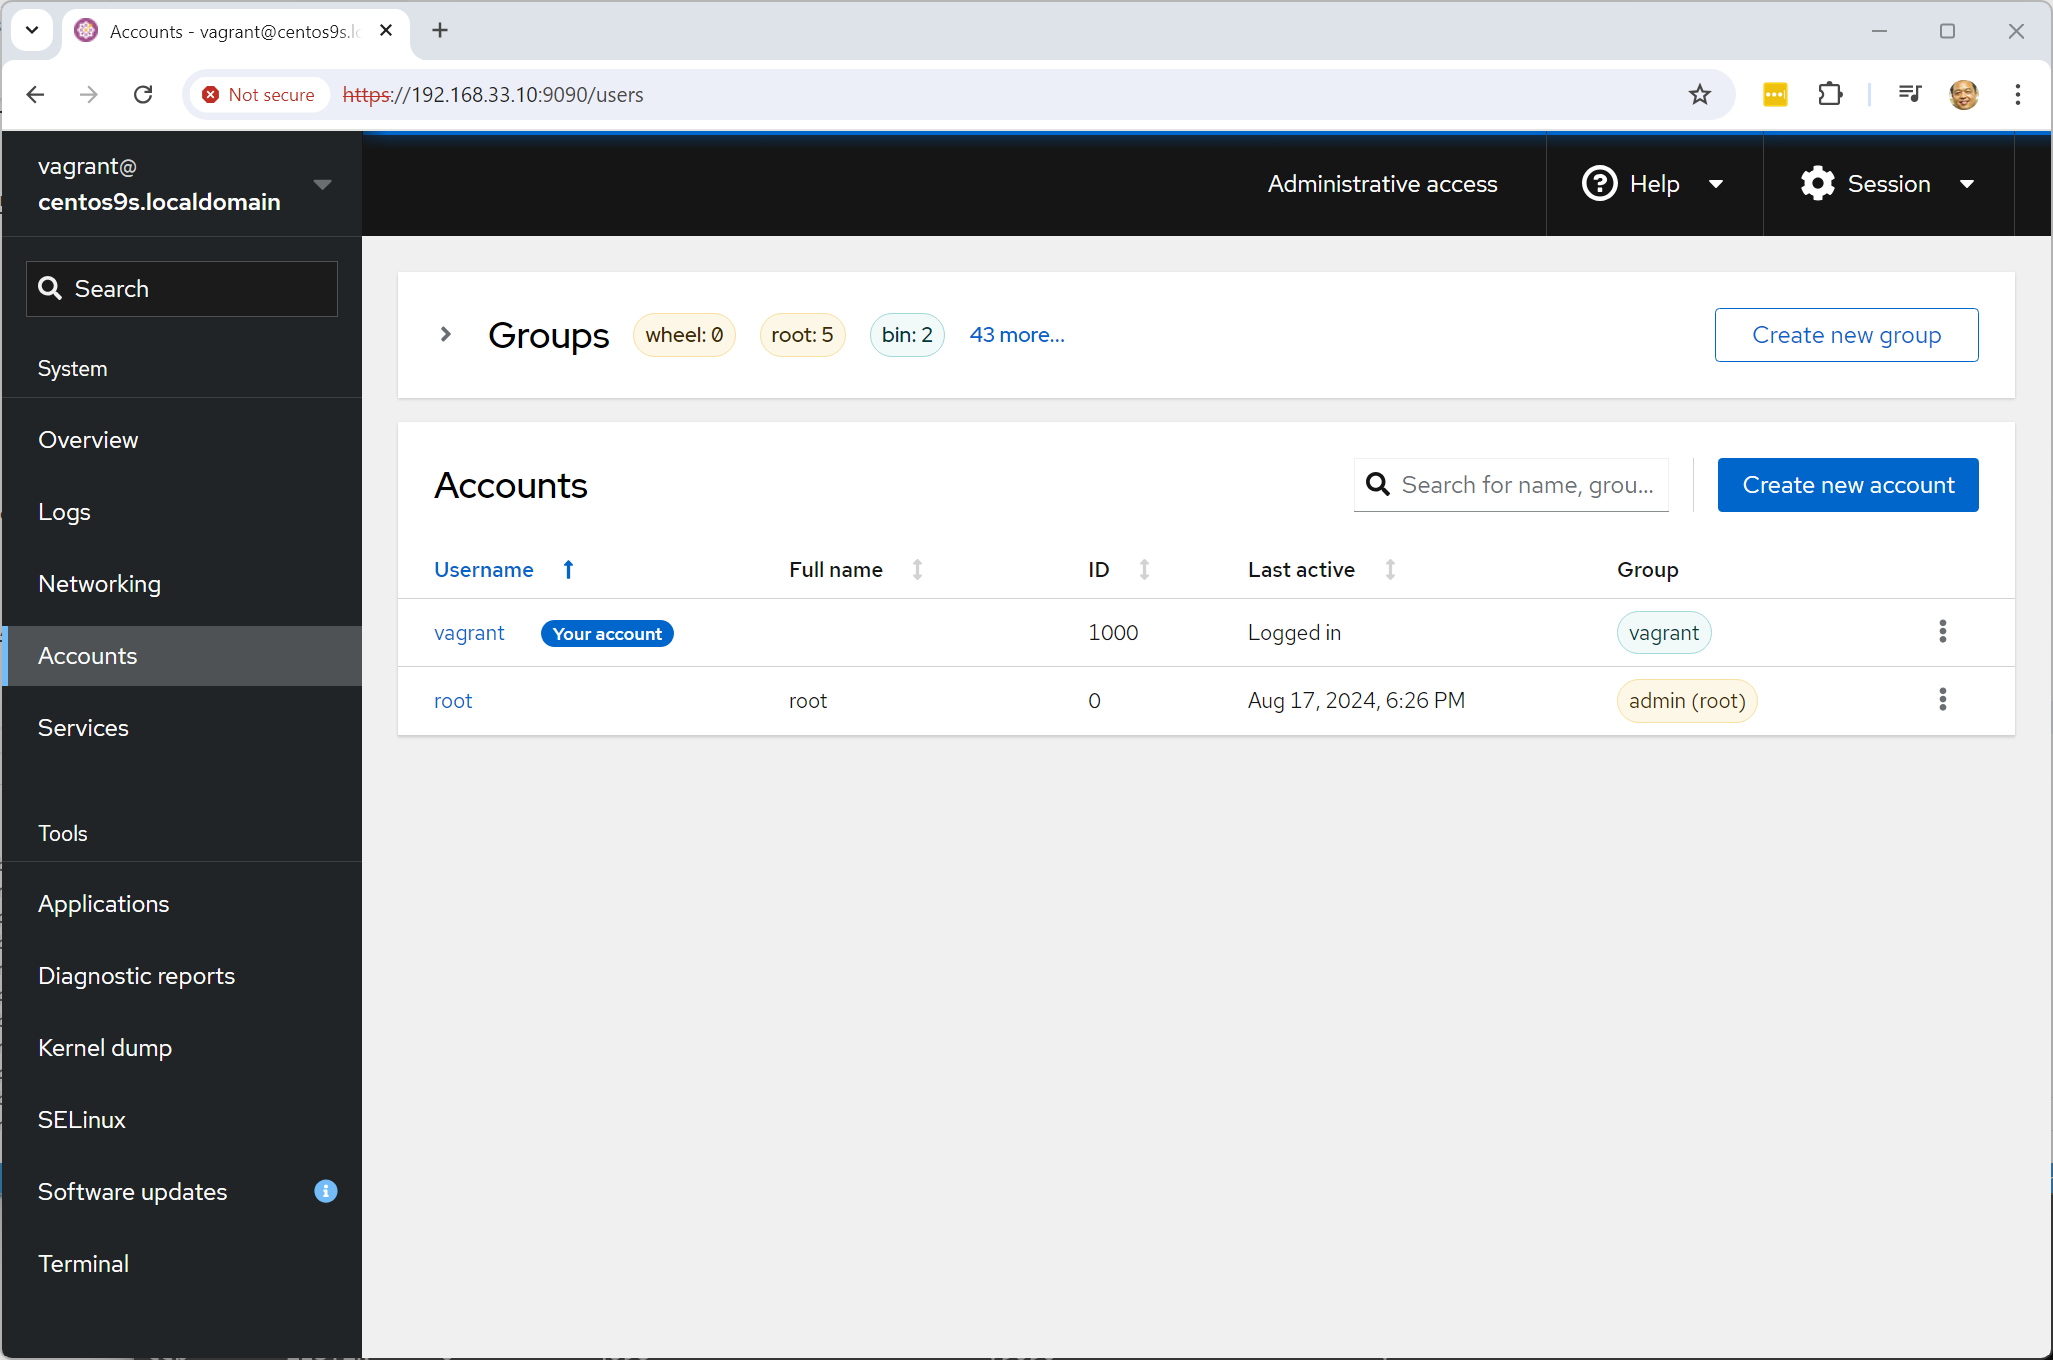
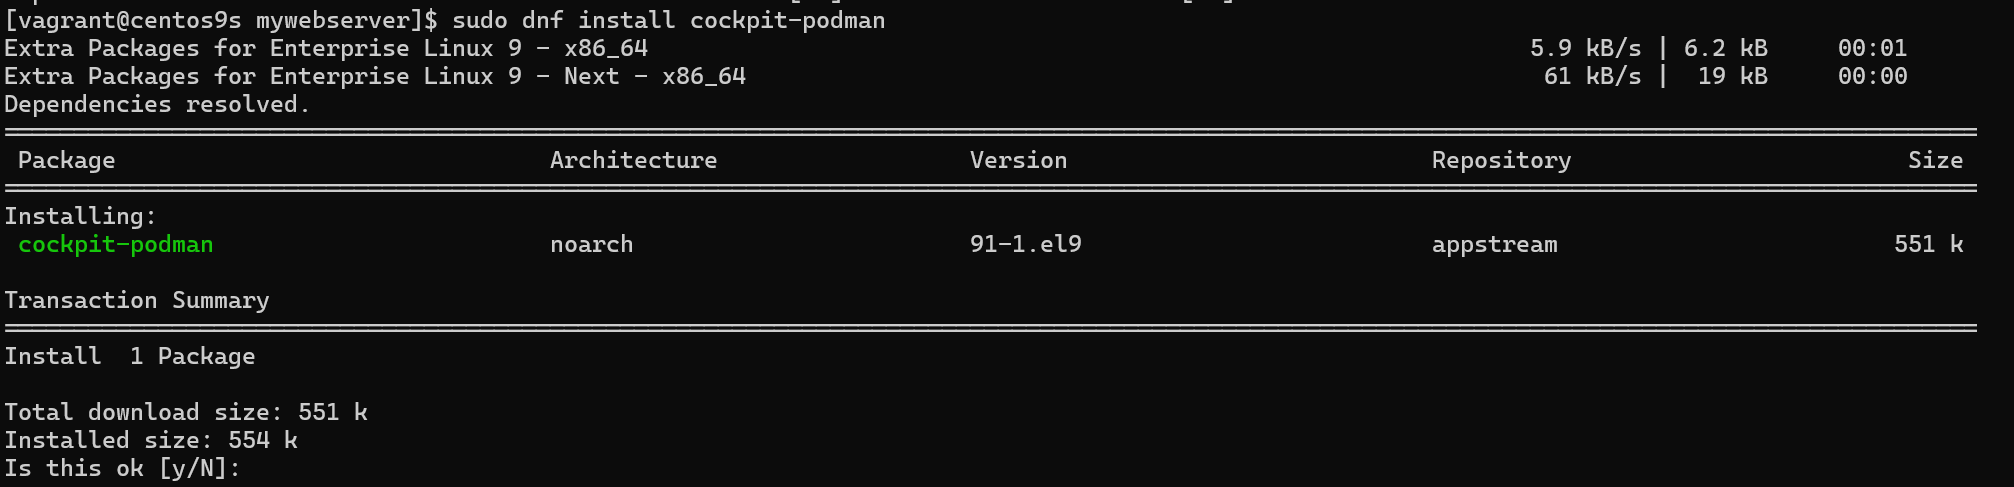
- install cockpit extension podman
[vagrant@centos9s ]$ sudo dnf install cockpit-podman
- Check cockpit podman menu

Lab2 Container Volume
Step-01 start vagrant up and install podman
> cd podman
> vagrant up
Install podman like process in lab1
sudo dnf install podman podman-docker
Step-02 Root vs Rootless in podman we can choose to start containre with root or rootless (unprivileged user). Example:
Run as rootless
$ podman run -d registry.access.redhat.com/ubi9:latest

Trying to pull registry.access.redhat.com/ubi9:latest...
Getting image source signatures
Checking if image destination supports signatures
Copying blob cc296d75b612 done   |
Copying config 159a1e6731 done   |
Writing manifest to image destination
Storing signatures
1d6ea7c49a974ffc17ebfccd3783addeec861124250df30dbce2cd38cd913b96

$ podman rm 1d6ea
Run podman as root
$ sudo su -
# podman run -d registry.access.redhat.com/ubi9:latest

Trying to pull registry.access.redhat.com/ubi9:latest...
Getting image source signatures
Checking if image destination supports signatures
Copying blob cc296d75b612 done   |
Copying config 159a1e6731 done   |
Writing manifest to image destination
Storing signatures
18b18e03e37aa8dffbbfdd3af7f352c49cae7bbf4848c56a458e3bee30e5304f

# podman rm 18b18e
both command create container in difference namespace event run same command
Processes that running within the container
- What account start podman on hosts?
- What is user account is running the processes within container
Remember Containers have their own
/etc/passwdand/etc/groupfiles that define in container users and groups. when we build container we can choose user run the process in Container
- Many Containers run their processes as root within the container, however is not recommmended from a security perspective.
4 Options to run container
Step-03 Option 1 : Container as Root
[root@centos9s ~]# podman run -it ubi9:latest /bin/bash
[root@99713d1d44e1 /]# whoami
root
[root@99713d1d44e1 /]# id -u root
0
[root@99713d1d44e1 /]# exit
[root@centos9s ~]# podman rm 99713
- processes run as UID 0 inside container
- processes run as UID 0 outside the container from host namespace
Step-04 Option 2 : Container as Root an assign user in container
[root@centos9s ~]# podman run -it -u sync ubi9:latest /bin/bash
bash-5.1$ whoami
sync
bash-5.1$ id -u sync
5
bash-5.1$ exit
exit
- Start podman as root
- processes run as UID 5 (sync) inside container
- processes run as UID 0 outside the container from host
Step-05 Option 3 : Container as user vagrant
[vagrant@centos9s ~]$ whoami
vagrant
[vagrant@centos9s ~]$ podman run -it ubi9:latest /bin/bash
[root@c39466bba6bc /]# whoami
root
[root@c39466bba6bc /]# exit
exit
- start container as user vagrant
- process run UID 1000 (vagrant) on host perspective
- process run UID 0 root inside container
- root process in container can restart process in container but can't manage process from host
- root inside container will map to user vagrant on host
Step-06 Option 4 : Container as user vagrant with sync user
[vagrant@centos9s ~]$ podman run -it -u sync ubi9:latest /bin/bash
bash-5.1$ whoami
sync
bash-5.1$ exit
exit
- start container as user vagrant
- process run UID 5 (sync) in container (also non root inside container)
- process map UID 5 inside to 1000 outside
- process run UID 1000 (vagrant) on host perspective
What is relation between maping user namespace
Step-07 Split windows teminal to 2 span
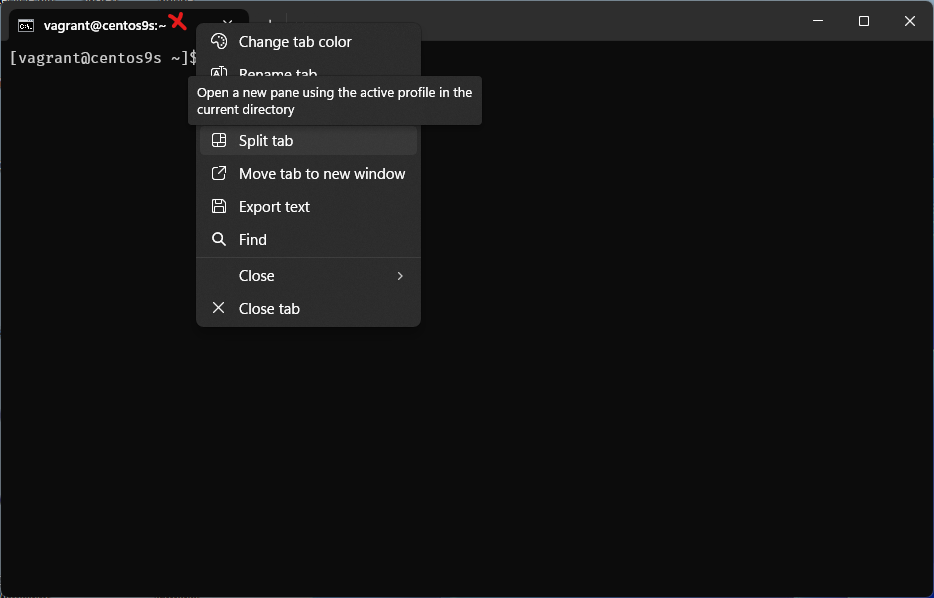
- boot run
vagrant sshinto Vagrant box - on Left run vagrant host command
- on Right site we run command inside container
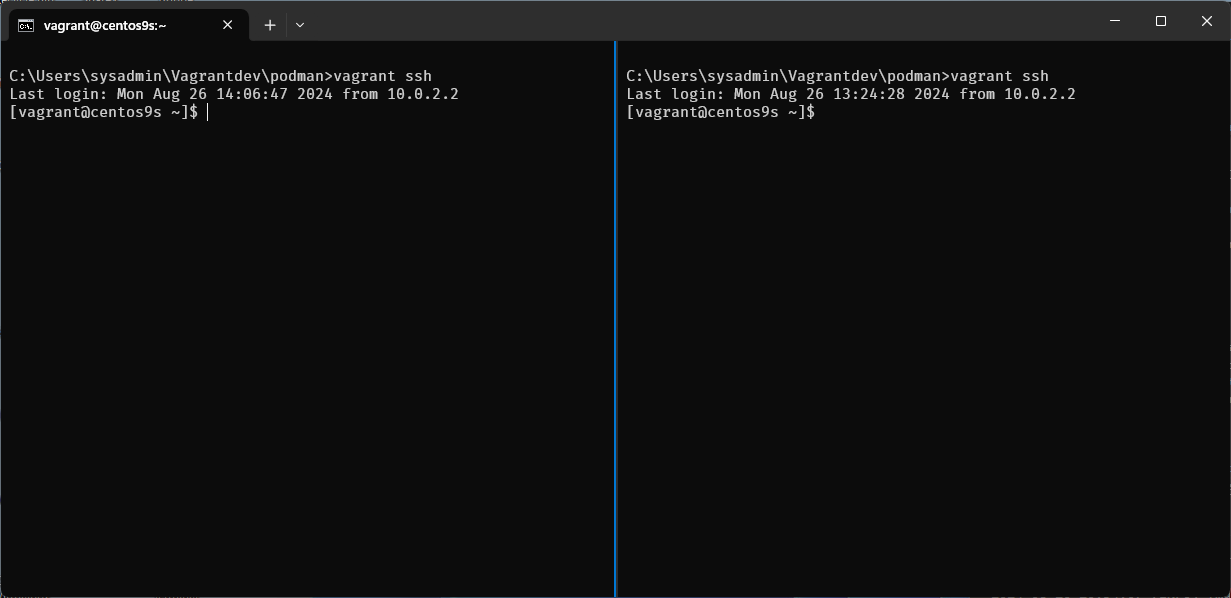
Run monitor command on left side
$ sudo su -
# ps -ef | grep sleep
Run command on Right site
$ podman run -it ubi9:latest /bin/bash

# whoami
# id
# dnf install procps-ng -y
# sleep 5000 &
# sleep 5100 &
# sleep 5200 &

# ps -ef
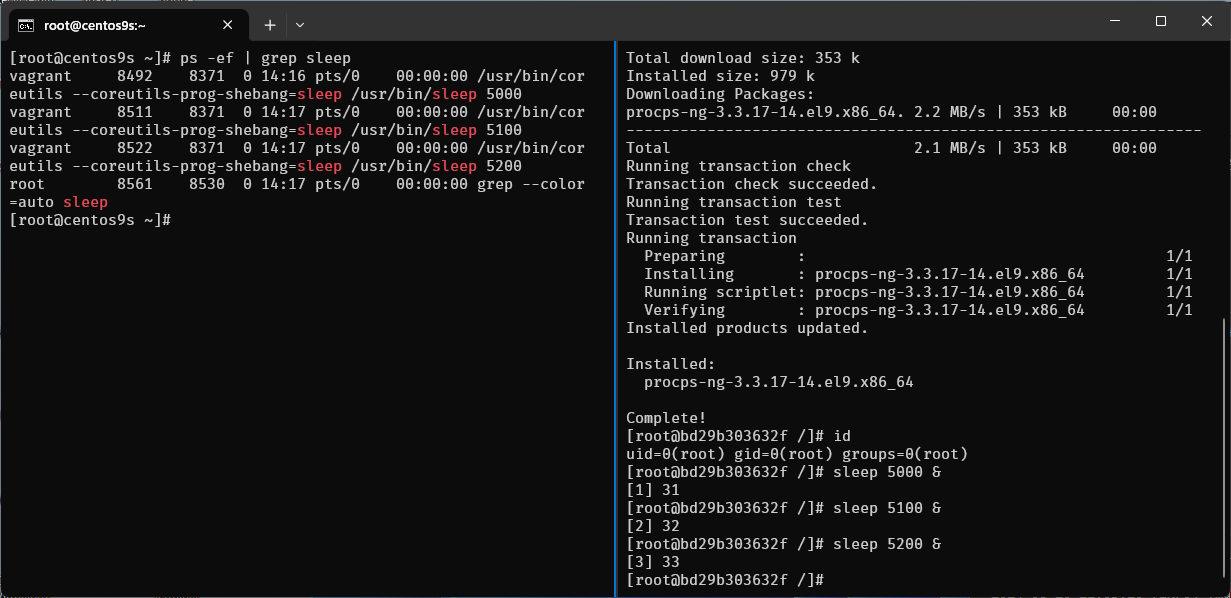
- On host perspective will run as vagrant user but inside container run as root
vagrant 8492 8371 0 14:16 pts/0 00:00:00 /usr/bin/coreutils --coreutils-prog-shebang=sleep /usr/bin/sleep 5000
Step-08 add new user in container
- create user1
- switch user
su -
# useradd -u 2000 user1
# id user1

# su - user1

$ sleep 3000 &
$ sleep 3100 &
$ sleep 3200 &
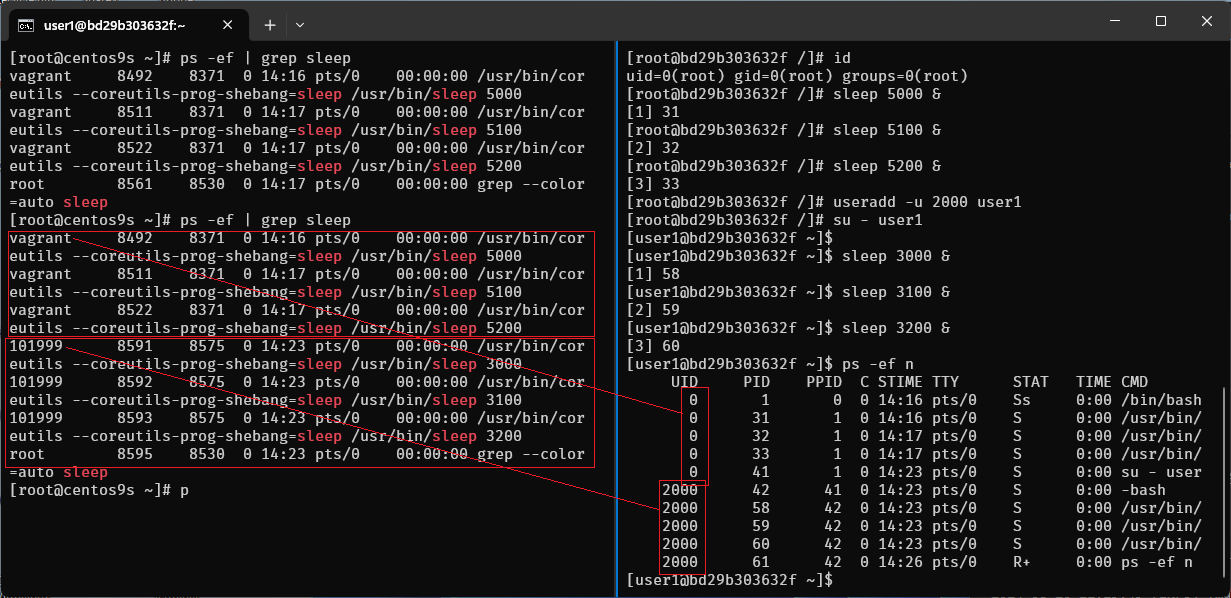
- also run
ps -ef | grep sleepin host terminal again also map with user vagrant
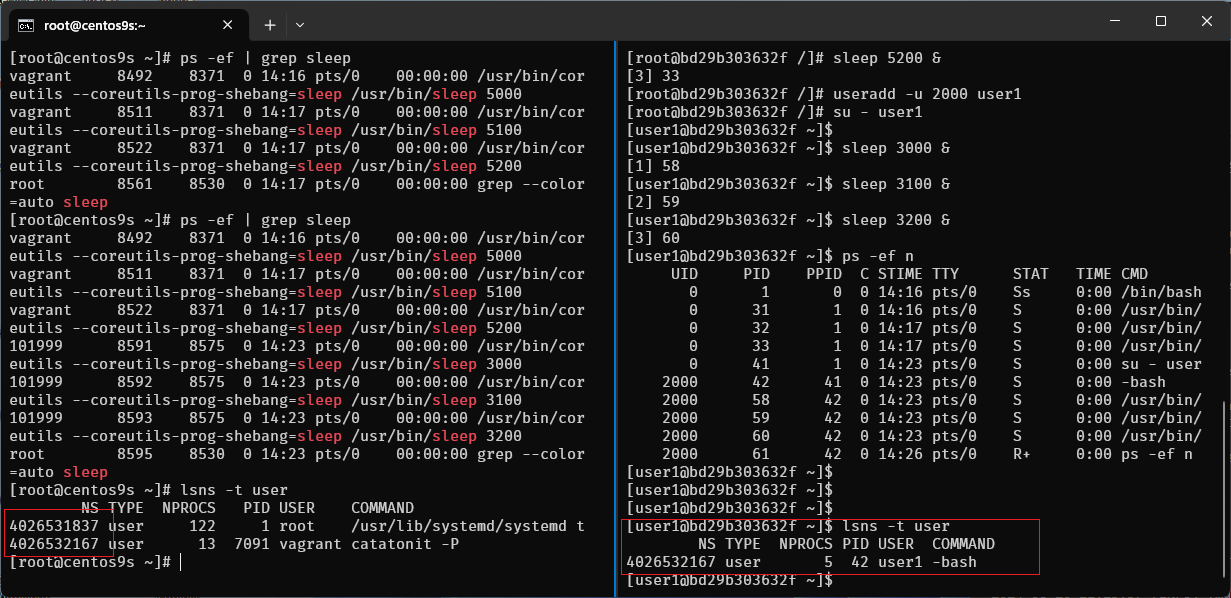
Step-09 run lsns -t user
- list user namespace in container
[user1@bd29b303632f ~]$ lsns -t user
        NS TYPE  NPROCS PID USER  COMMAND
4026532167 user       5  42 user1 -bash
- list user namespace in host
[root@centos9s ~]# lsns -t user
        NS TYPE  NPROCS   PID USER    COMMAND
4026531837 user     122     1 root    /usr/lib/systemd/systemd t
4026532167 user      13  7091 vagrant catatonit -P
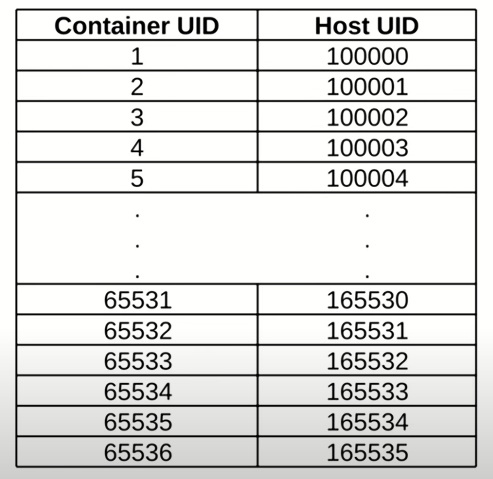
Step-10 run cat /etc/subuid
[root@centos9s ~]# cat /etc/subuid
vagrant:100000:65536
- 1st Field : Username or UID
- 2nd Field : Start Subordinate UID
- 3rd Field : Number of Subordinate UIDs
Create some more user
[root@centos9s ~]# useradd testuser1
[root@centos9s ~]# useradd testuser2
[root@centos9s ~]# useradd testuser3
[root@centos9s ~]# useradd testuser4
[root@centos9s ~]# cat /etc/subuid
vagrant:100000:65536
testuser1:165536:65536
testuser2:231072:65536
testuser3:296608:65536
testuser4:362144:65536
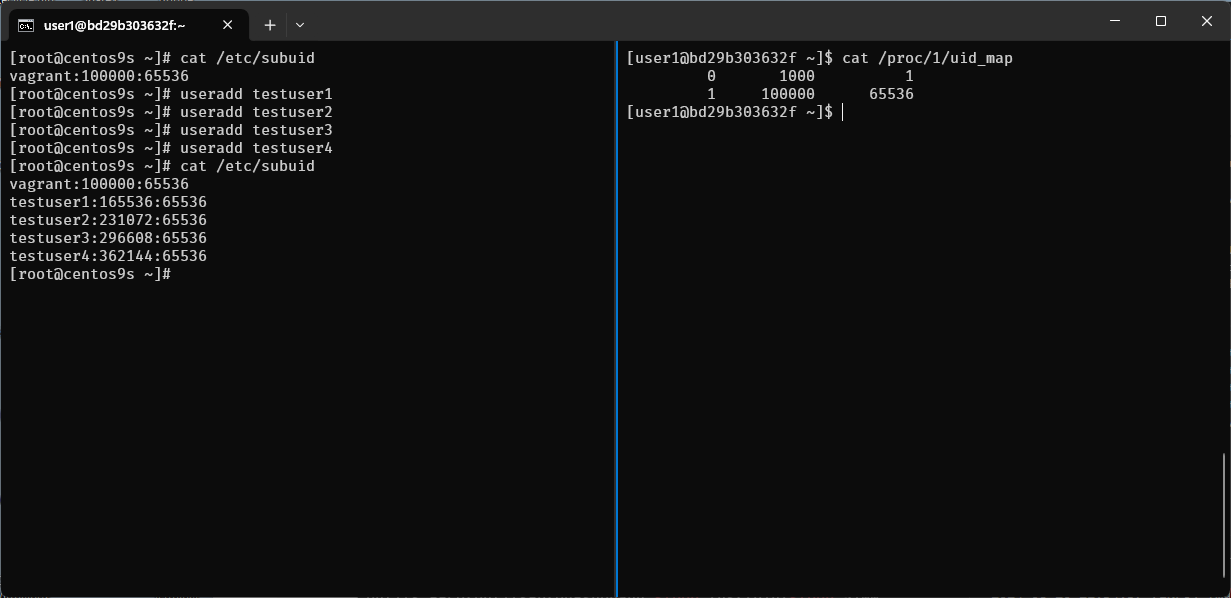
The output of cat /proc/1/uid_map shows the UID (User ID) mappings for the first process, which is typically the init or systemd process in a Linux system. This file is used in the context of user namespaces, which allow processes to have different user and group IDs inside the namespace than outside it.
Here's what each column represents:
-
Column 1 (Inside UID): The starting UID inside the user namespace.
-
Column 2 (Outside UID): The starting UID outside the user namespace.
-
Column 3 (Range): The number of UIDs in this range.
-
The first line indicates that inside the namespace, UID 0 (root) maps to UID 1000 outside the namespace. Only one UID is mapped.
-
The second line indicates that UIDs starting from 1 inside the namespace map to UIDs starting from 100000 outside the namespace, with a range of 65536 UIDs.
This setup is commonly seen in containerized environments, where the root user inside the container (namespace) is not actually root on the host system but mapped to an unprivileged user (like UID 1000). This enhances security by preventing processes within the container from having root privileges on the host system.
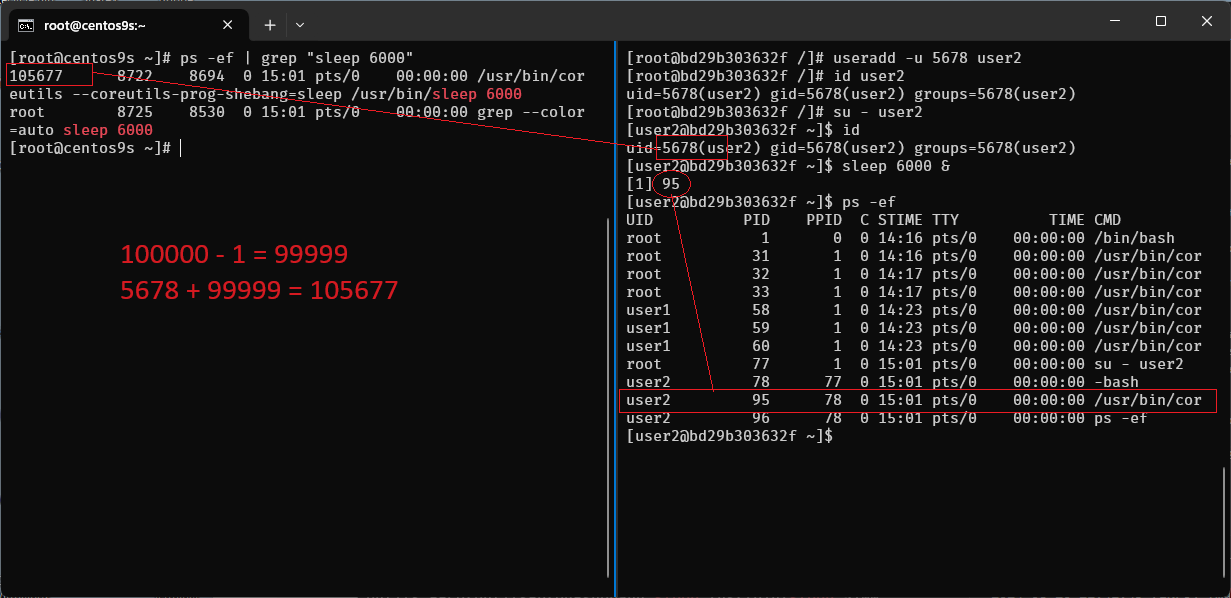
Step-11 How to find user mapping between inside and outside
[root@bd29b303632f /]# useradd -u 5678 user2
[root@bd29b303632f /]# id user2
uid=5678(user2) gid=5678(user2) groups=5678(user2)
[root@bd29b303632f /]#
- create user id 5678 in container. What is user map to host?
- Range between 100000 -1 = 99999
- User map on host 5678+99999 = 105,677
Step-12 Run monitor on host
[root@centos9s ~]# su - vagrant -c "podman ps"

[vagrant@centos9s ~]$ podman ps

[vagrant@centos9s ~]$ podman top bd29b303632f user huser args
USER        HUSER       COMMAND
root        1000        /bin/bash
root        1000        /usr/bin/coreutils --coreutils-prog-shebang=sleep /usr/bin/sleep 5000
root        1000        /usr/bin/coreutils --coreutils-prog-shebang=sleep /usr/bin/sleep 5100
root        1000        /usr/bin/coreutils --coreutils-prog-shebang=sleep /usr/bin/sleep 5200
user1       101999      /usr/bin/coreutils --coreutils-prog-shebang=sleep /usr/bin/sleep 3000
user1       101999      /usr/bin/coreutils --coreutils-prog-shebang=sleep /usr/bin/sleep 3100
user1       101999      /usr/bin/coreutils --coreutils-prog-shebang=sleep /usr/bin/sleep 3200
root        1000        su - user2
user2       105677      -bash
user2       105677      /usr/bin/coreutils --coreutils-prog-shebang=sleep /usr/bin/sleep 6000
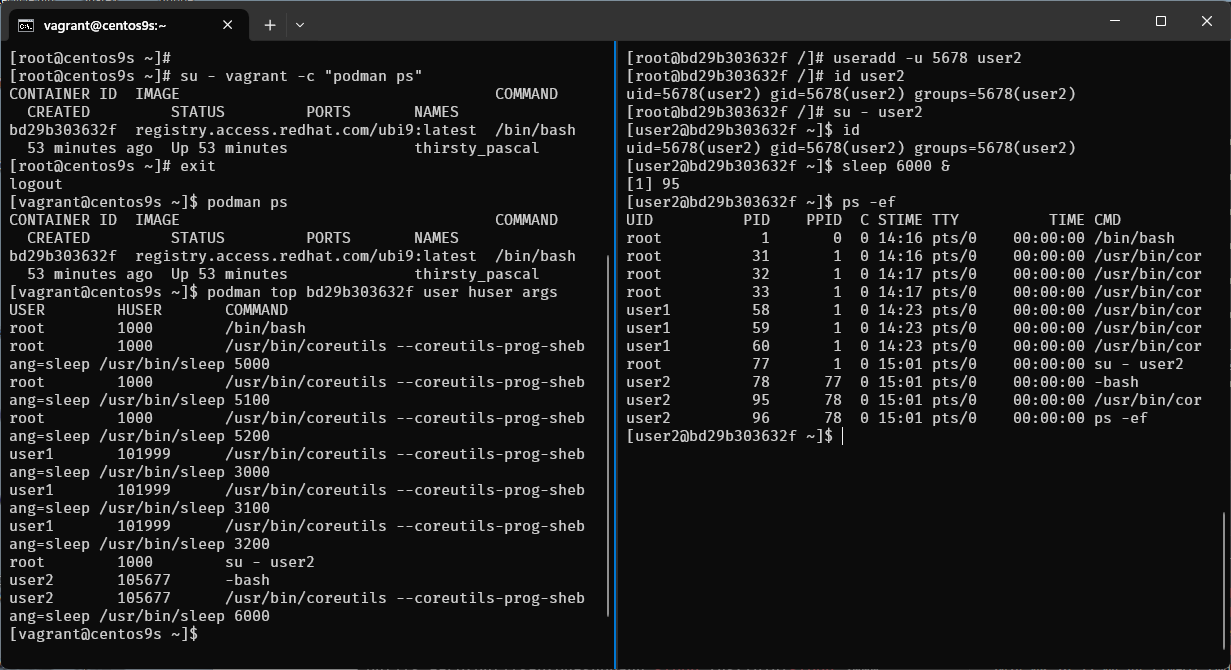
- Output command list process in container
- First Colume (USER) is from container point of view
- Second Colume (HUSER) is from Host point of view
Step-13 Limitation of Rootless container
- run nextcloud container
- map port 80:80
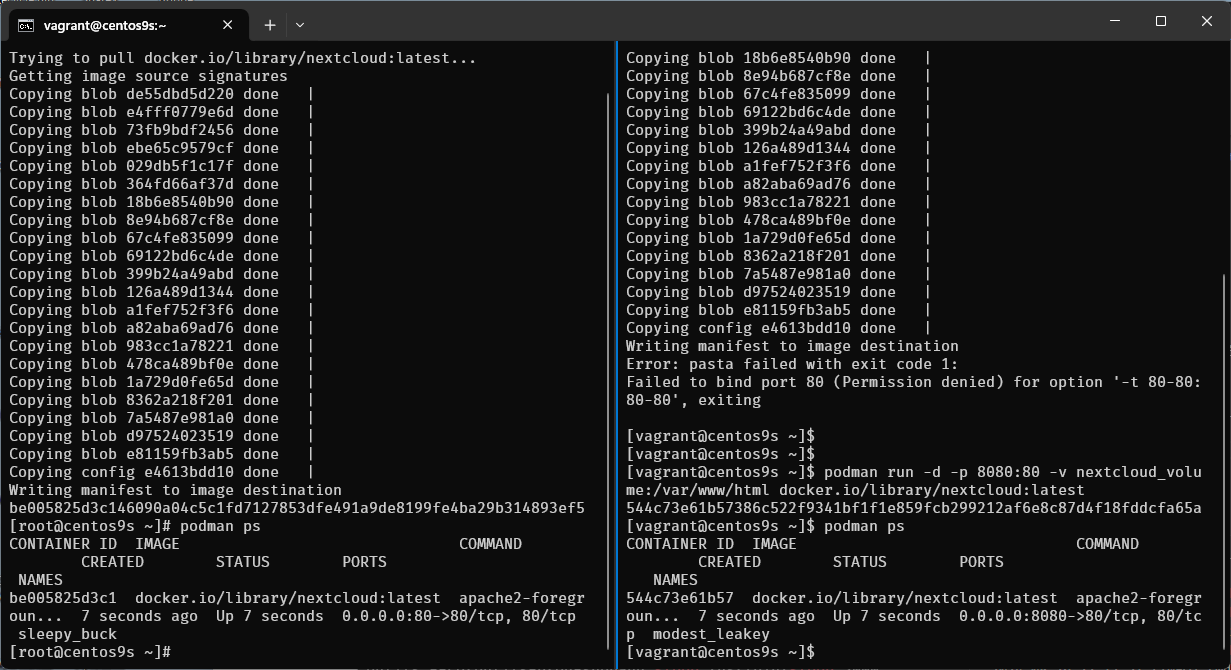
$ podman run -d -p 80:80 -v nextcloud_volume:/var/www/html docker.io/library/nextcloud:latest
- what is error mean?
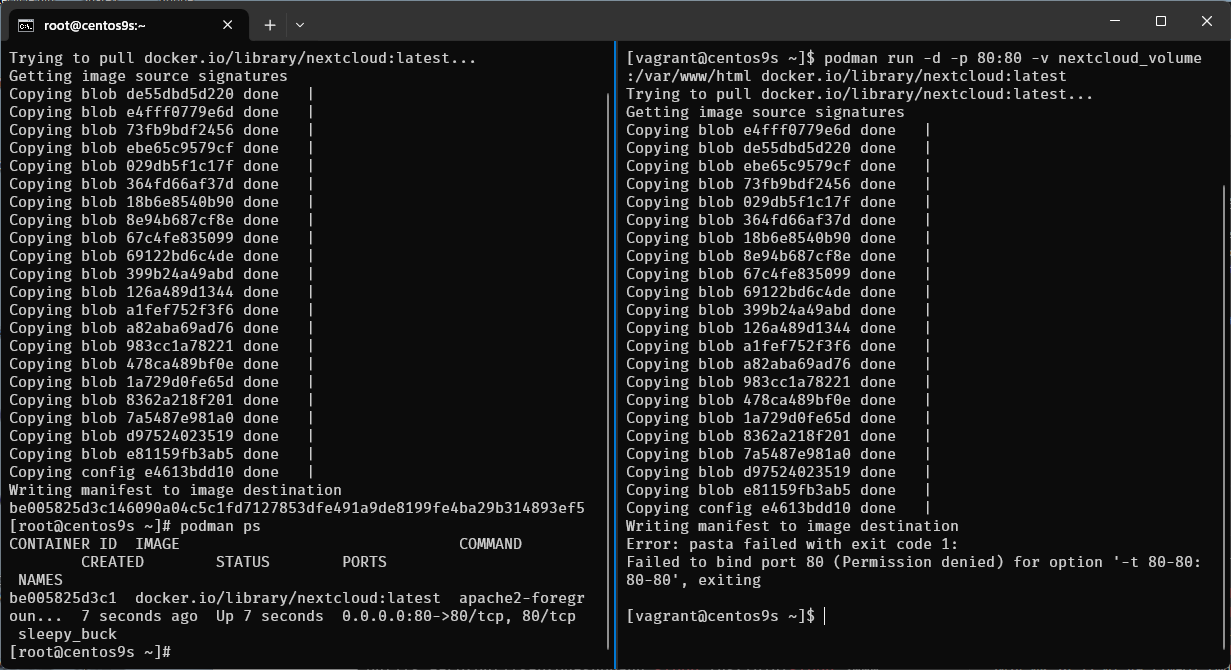
- Run command again
$ podman run -d -p 8080:80 -v nextcloud_volume:/var/www/html docker.io/library/nextcloud:latest
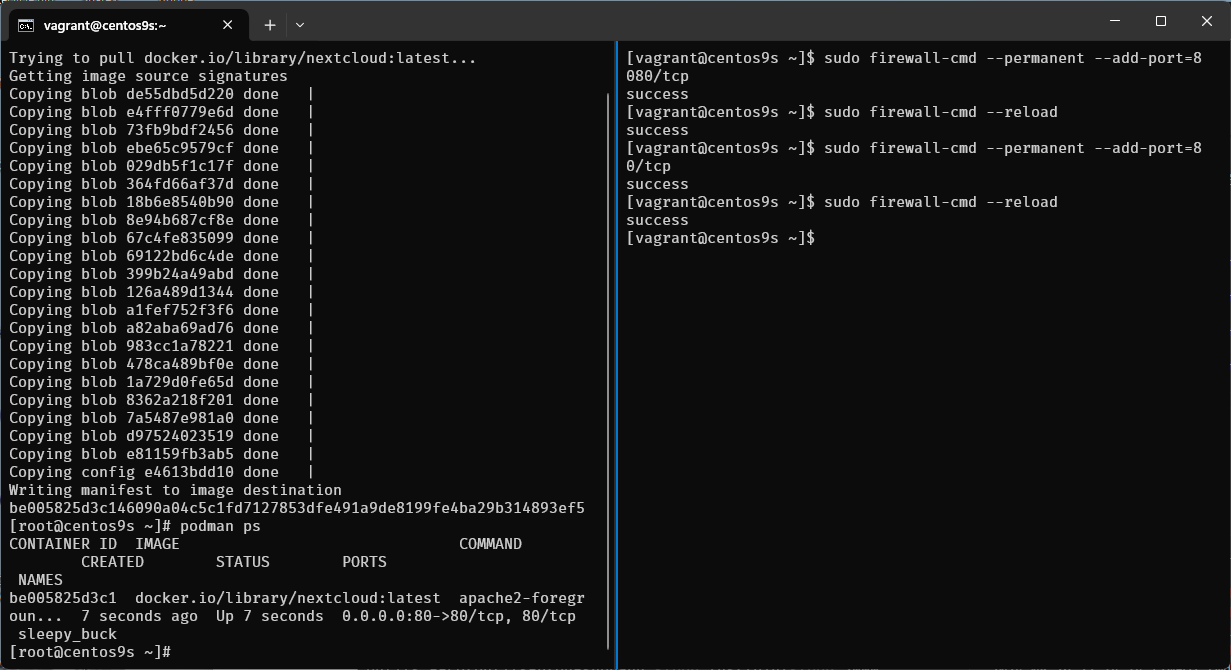
- Enable firewalld
[vagrant@centos9s ~]$ sudo firewall-cmd --permanent --add-port=8080/tcp
success
[vagrant@centos9s ~]$ sudo firewall-cmd --reload
success
[vagrant@centos9s ~]$ sudo firewall-cmd --permanent --add-port=80/tcp
success
[vagrant@centos9s ~]$ sudo firewall-cmd --reload
success
[vagrant@centos9s ~]$
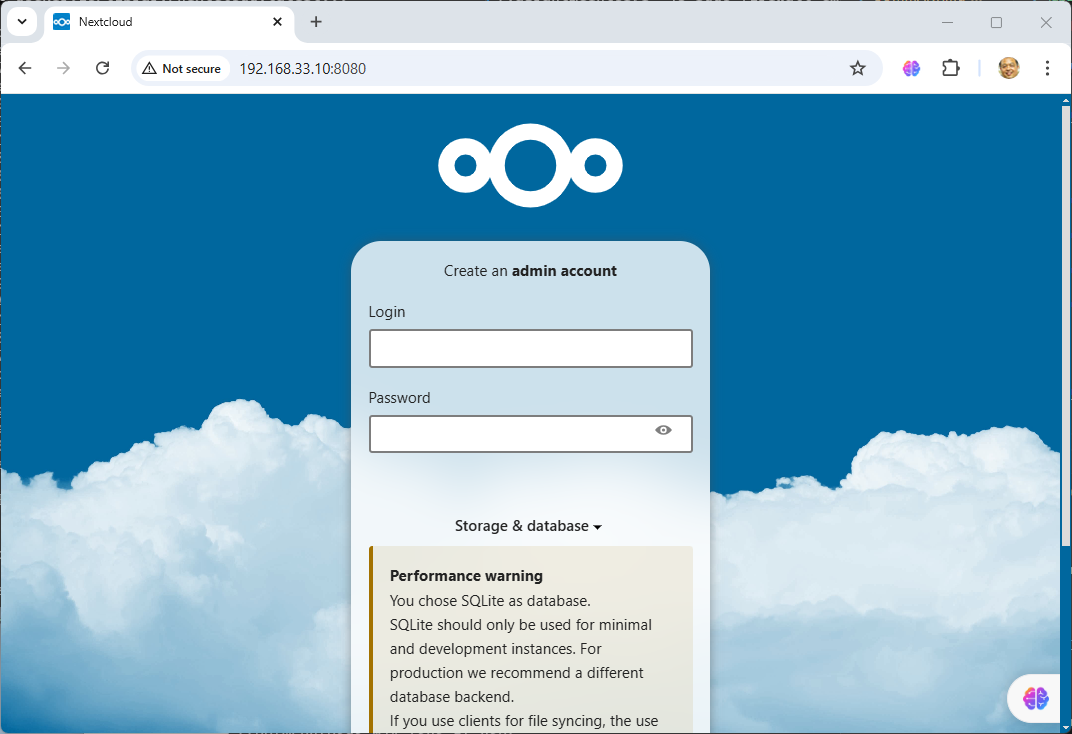
- Open browser http://192.168.33.10:8080/
- Next we run exec command to go inside next cloud container
[vagrant@centos9s ~]$ podman ps
CONTAINER ID  IMAGE                               COMMAND               CREATED        STATUS        PORTS                         NAMES
544c73e61b57  docker.io/library/nextcloud:latest  apache2-foregroun...  5 minutes ago  Up 5 minutes  0.0.0.0:8080->80/tcp, 80/tcp  modest_leakey
[vagrant@centos9s ~]$ podman exec -it 544c73e61b57 /bin/bash
root@544c73e61b57:/var/www/html# ps -ef
root@544c73e61b57:/var/www/html# ps -ef n
ps -efshow username,ps -ef nshow user id name
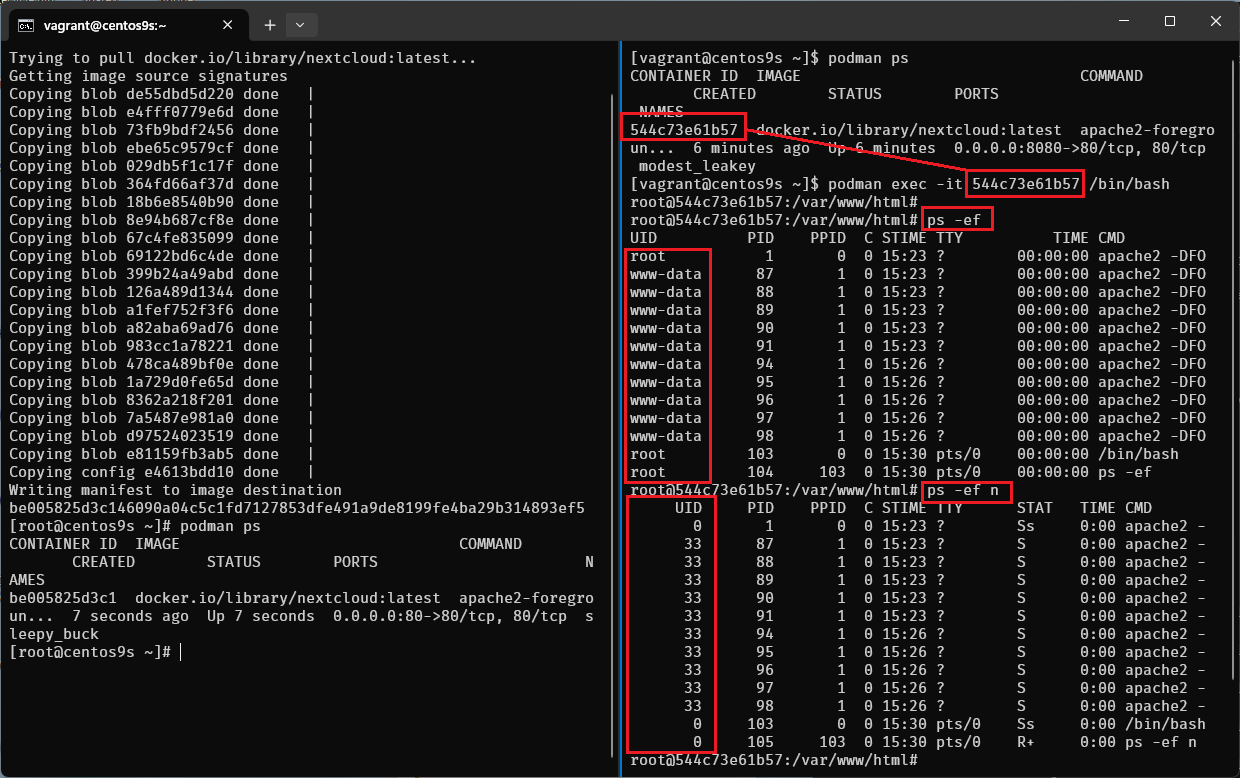
- UID of www-data is 33 then User on host will be 33+99999 = 100032
- Check from host by run
ps -ef n
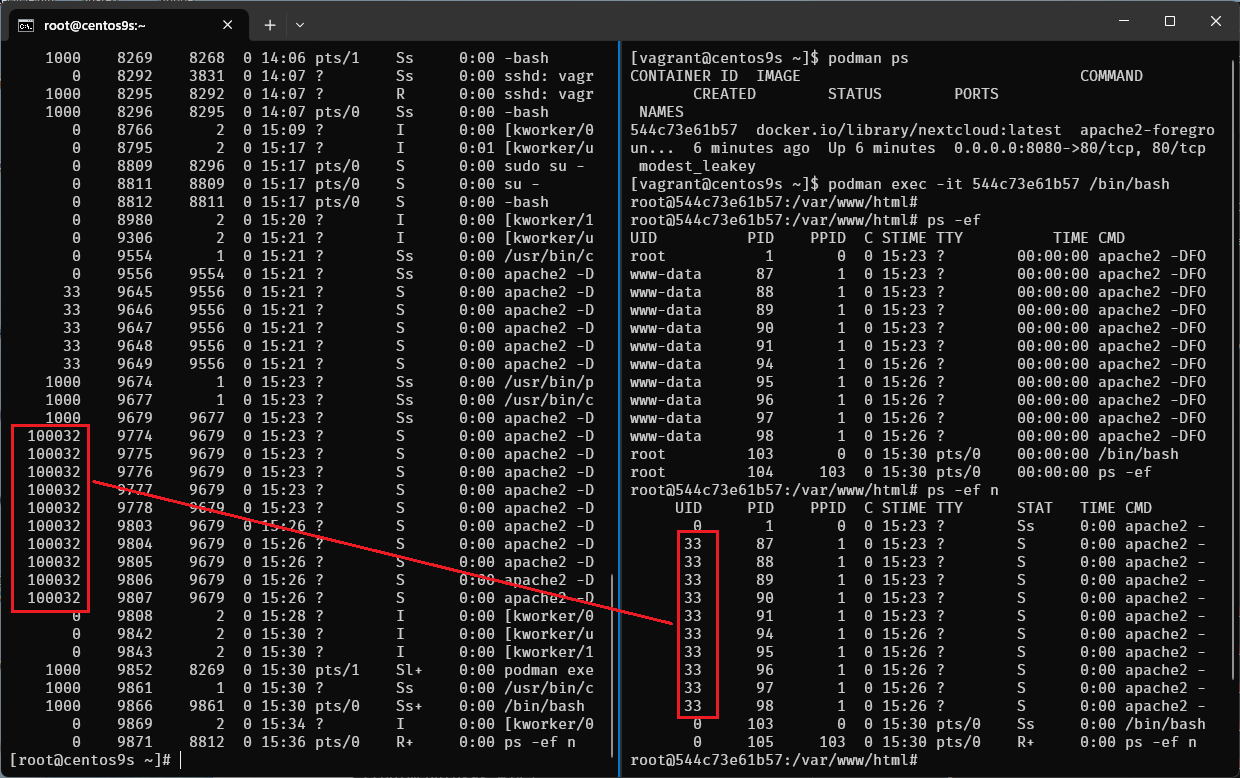
- On host run command
podman volume ls
[vagrant@centos9s ~]$ podman volume ls
[vagrant@centos9s ~]$ podman volume inspect nextcloud_volume
[vagrant@centos9s ~]$ ls -l /home/vagrant/.local/share/containers/storage/volumes/nextcloud_volume/_data
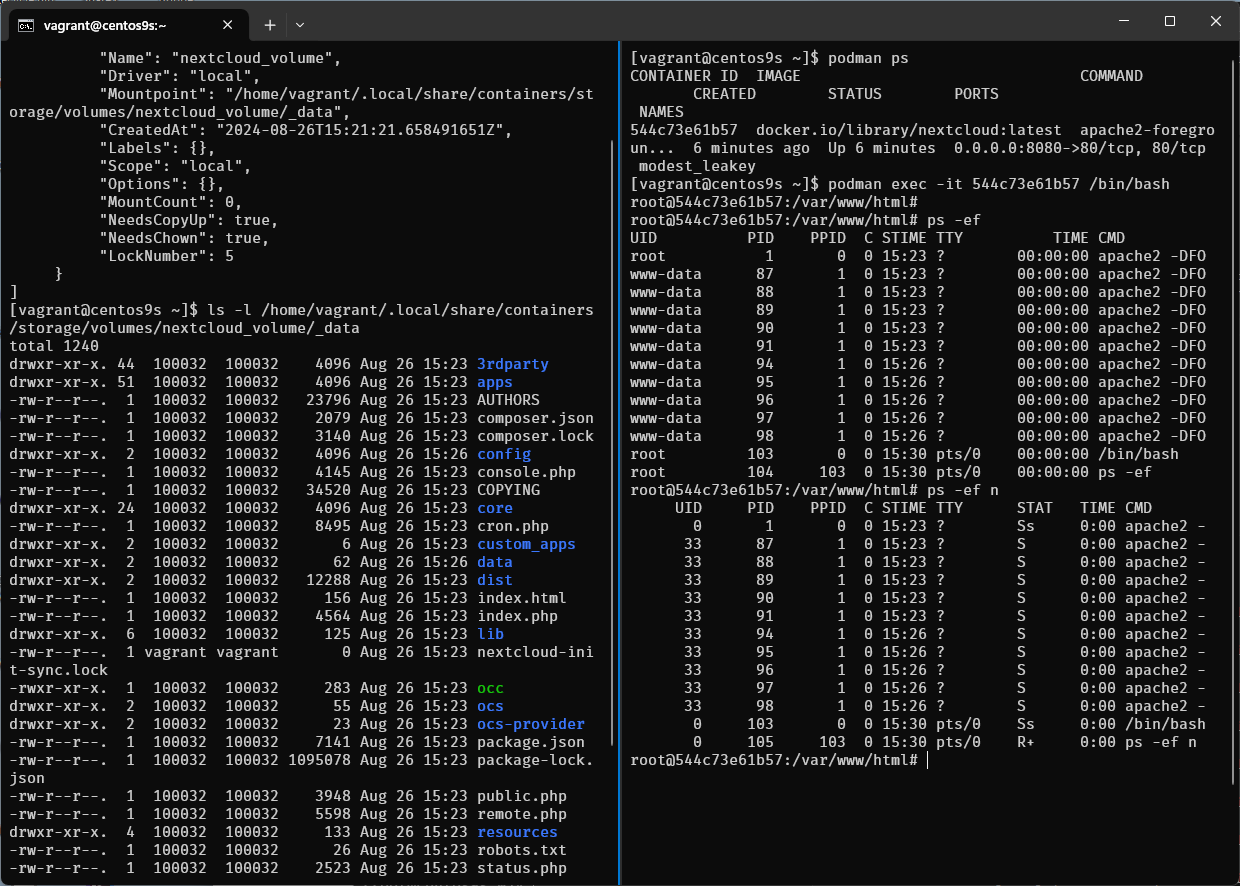
confirm user id 100032 is owner of file on host
Lab3 Container OverlayFS
OverlayFS in Podman: A Step-by-Step Tutorial
Overview OverlayFS is a powerful and efficient union filesystem that allows you to layer multiple filesystems on top of each other. In the context of Podman, OverlayFS is used to manage container storage, allowing for efficient storage and management of container images and layers.
Prerequisites
- Basic understanding of Linux filesystems.
- Podman installed on your system.
- Root or rootless user access to Podman.
Step 1: Understanding OverlayFS in Podman
OverlayFS works by stacking layers on top of each other, with each layer representing a change or update. These layers are managed as follows:
- Lowerdir: The base image or read-only layers.
- Upperdir: The top writable layer where changes are made.
- Workdir: A work directory used during operations like copy-up.
- Merged: The final view that merges the lower and upper directories.
In Podman, these directories correspond to different layers in container images.
package
$ rpm -qa | grep fuse-overlayfs
fuse-overlayfs-1.14-1.el9.x86_64
Step 2: Checking OverlayFS Support
- Before proceeding, ensure that your kernel supports OverlayFS:
$ grep overlay /proc/filesystems
nodev   overlay
Step 3 configuration of podman use overlay
$ sudo vim /etc/containers/storage.conf
[storage]

# Default Storage Driver, Must be set for proper operation.
driver = "overlay"
Step 4 Inspect Container layer with OverlayFS
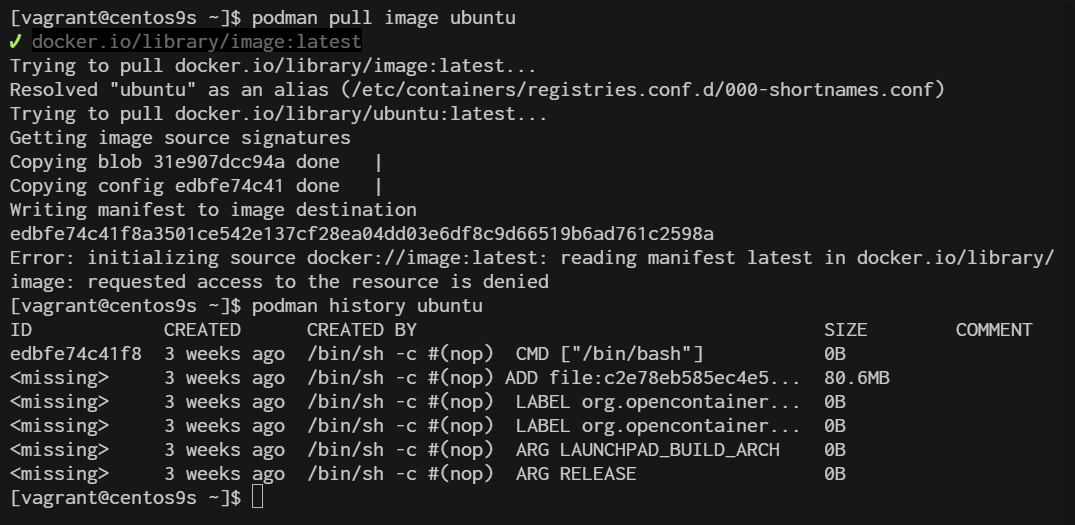
[vagrant@centos9s ~]$ podman pull image ubuntu
[vagrant@centos9s ~]$ podman history ubuntu
Step 5 Creating and managing Containers with overlayFS
When you create or manage containers with podman, OverlayFS automatically handles the storage layers
- Create a new container
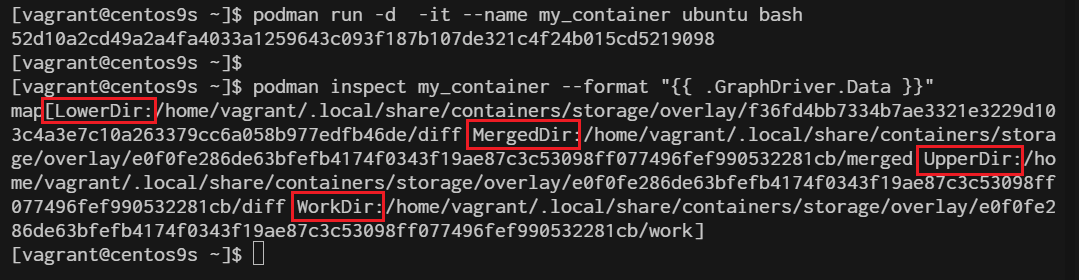
$ podman run -it --name my_container ubuntu bash
root@e1c95b5aed74:/# exit
- Inspect the container's storage layers:
$ podman inspect my_container --format "{{ .GraphDriver.Data }}"
This will display details about the OverlayFS layers used by the container.
Step 6 Manual working with practical workshop
1 Create the required directories:
- lowerdir: This is the lower (read-only) layer.
- upperdir: This is the upper (read-write) layer.
- workdir: A directory used internally by OverlayFS.
- merged: The directory where the final merged view will be mounted.
$ sudo mkdir -p /mnt/lower /mnt/upper /mnt/work /mnt/merged
2 Ensure that the lowerdir and upperdir have content:
- You can add some files to lowerdir to simulate the lower layer.
- The upperdir should be empty initially, as it will contain changes. Example:
$ echo "Lower Layer File" | sudo tee /mnt/lower/lowerfile.txt
3 Mount the OverlayFS:
Use the following command, replacing /mnt/lower, /mnt/upper, /mnt/work, and /mnt/merged with your actual directory paths:
sudo mount -t overlay overlay -o lowerdir=/mnt/lower,upperdir=/mnt/upper,workdir=/mnt/work /mnt/merged

4 Verify
$ ls /mnt/merged
lowerfile.txt
Ensure all directories exist: The lowerdir, upperdir, workdir, and merged directories must exist before attempting the mount.
Lab4 Container Network
Podman provides robust networking capabilities for containers, allowing you to manage how containers communicate with each other and the outside world. Here's a guide to understanding and working with Podman networks.
1. Understanding Podman Networks Podman supports several types of networks:
- Bridge (Default): Containers are connected to an internal bridge network that allows them to communicate with each other and the host system.
- Host: Containers share the host’s network namespace, meaning they use the host’s network directly.
- None: The container has no network interfaces.
- Custom Networks: You can create custom networks to provide isolated environments for containers.
2. Listing Available Networks You can list all available networks using the following command:
$ podman network ls
NETWORK ID    NAME        DRIVER
2f259bab93aa  podman      bridge
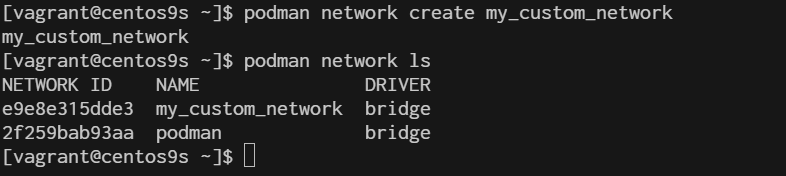
3. Create a Custom network You can create a custom network to provide containers with isolated or shared networking configurations.
$ podman network create my_custom_network
$ podman network ls
- create network with option subnet, gateway and ip range
$ podman network create --subnet 192.168.100.0/24 --gateway 192.168.100.1 my_custom_network2
$ podman network ls
4. Running Container on Custom network
$ podman run -d --name my_nginx --network my_custom_network nginx
769023d96c6044cd34c1edbac9778a1fb0dfae321558a2dcaeaa498f96f8e9cc

$ podman network inspect my_custom_network
Connect bridge nework we will use port mapping
$ sudo podman run -dt --name webserver -p 8080:80 quay.io/libpod/banner
$ podman network create  podman1
$ podman run -dt --name webserver --net podman1 -p 8081:80 quay.io/libpod/banner
$ curl 192.168.33.10:8080
   ___          __
  / _ \___  ___/ /_ _  ___ ____
 / ___/ _ \/ _  /  ' \/ _ `/ _ \
/_/   \___/\_,_/_/_/_/\_,_/_//_/
$ curl 192.168.33.10:8081
   ___          __
  / _ \___  ___/ /_ _  ___ ____
 / ___/ _ \/ _  /  ' \/ _ `/ _ \
/_/   \___/\_,_/_/_/_/\_,_/_//_/

5 . Connecting and Disconnecting Containers from Networks
- Connect
$ podman network connect my_custom_network my_nginx
- Disconnect
$ podman network disconnect my_custom_network my_nginx
- Delete network
$ podman network rm my_custom_network
Network Layer
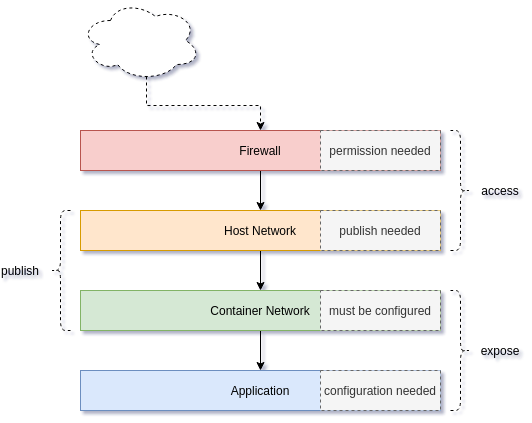
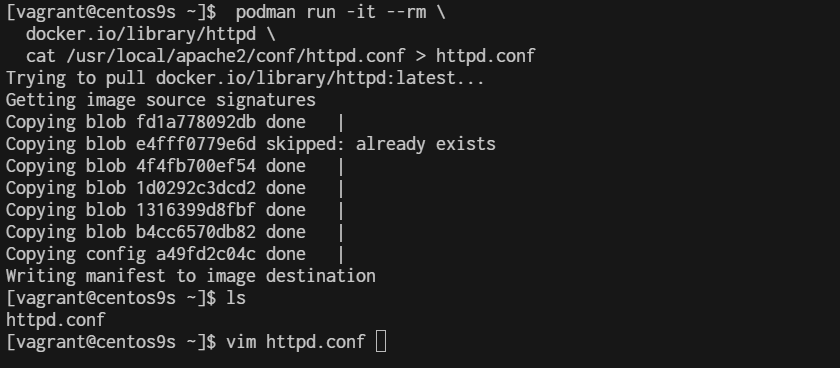
7. Extract Application network configuration The first artifact of the network is the application. Almost all applications can listen to defined addresses and/or defined ports. By checking the Apache httpd config file, we can see what's happening.
$  podman run -it --rm \
  docker.io/library/httpd \
  cat /usr/local/apache2/conf/httpd.conf > httpd.conf

$ vim httpd.conf
 50 #
 51 #Listen 12.34.56.78:80
 52 Listen 80
 53
 54 #
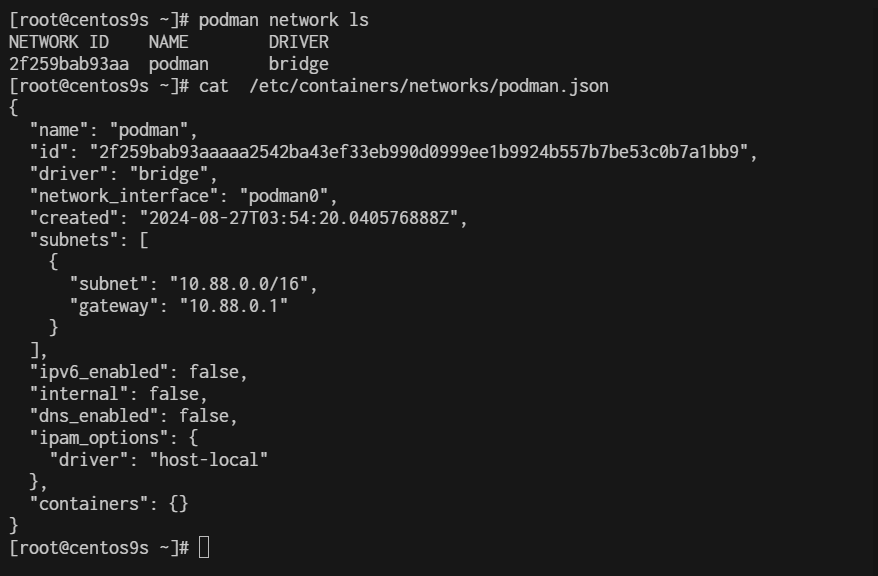
- Check network
- Rootfull
[root@centos9s ~]# podman network ls
NETWORK ID    NAME        DRIVER
2f259bab93aa  podman      bridge
[root@centos9s ~]# cat  /etc/containers/networks/podman.json
- Rootless
[vagrant@centos9s ~]$ podman network inspect podman
[
     {
          "name": "podman",
          "id": "2f259bab93aaaaa2542ba43ef33eb990d0999ee1b9924b557b7be53c0b7a1bb9",
          "driver": "bridge",
          "network_interface": "podman0",
          "created": "2024-08-27T03:59:17.405621928Z",
          "subnets": [
               {
                    "subnet": "10.88.0.0/16",
                    "gateway": "10.88.0.1"
               }
          ],
          "ipv6_enabled": false,
          "internal": false,
          "dns_enabled": false,
          "ipam_options": {
               "driver": "host-local"
          },
          "containers": {}
     }
]

By default, rootful and rootless containers use the netavark for its default network
[vagrant@centos9s ~]$ rpm -qa | grep netavark
netavark-1.12.1-1.el9.x86_64
https://github.com/containers/netavark
Macvlan Network
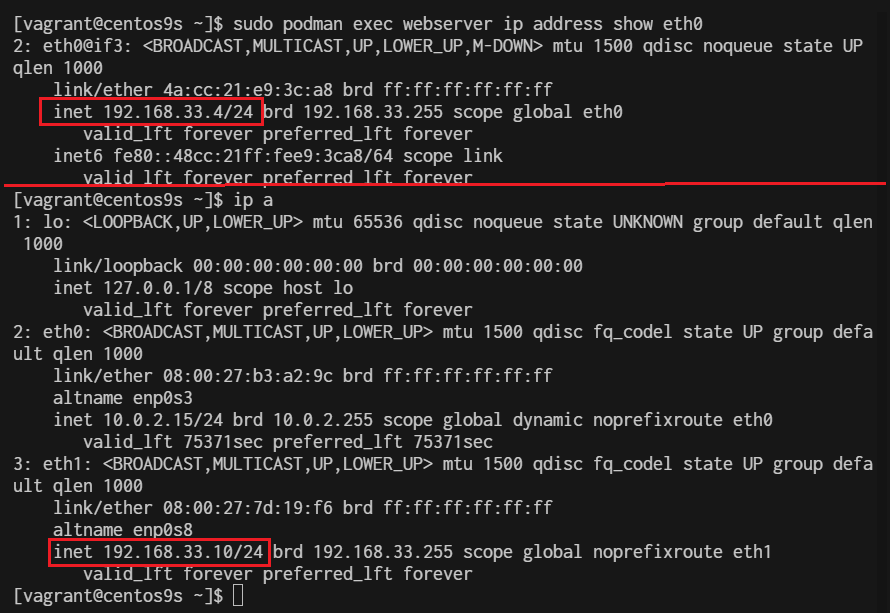
With macvlan, the container is given access to a physical network interface on the host. This interface can configure multiple subinterfaces. And each subinterface is capable of having its own MAC and IP address. In the case of Podman containers, the container will present itself as if it is on the same network as the host. outside clients will be able to access the web container by its IP address directly
- Create macvlan network
$ sudo podman network create -d macvlan -o parent=eth1 webnetwork
- list network
$ sudo podman network ls
NETWORK ID    NAME        DRIVER
2f259bab93aa  podman      bridge
01a566095b49  webnetwork  macvlan
- Start dhcp
sudo systemctl enable --now netavark-dhcp-proxy.socket
- Start run container
$ sudo podman run -dt --name webserver --network webnetwork quay.io/libpod/banner
- Check ip address inside container
$ sudo podman exec webserver ip address show eth0
Install Docker on CentOs 9 Stream
Docker simplifies the process of managing application processes in containers, which are isolated from each other and the host system. This isolation improves the security and efficiency of deploying applications.
เตรียม vagrantfile
- Create folder
mkdir vagrant-docker
cd vgrant-docker
- Create Vagrantfile
# -*- mode: ruby -*-
# vi: set ft=ruby :

# All Vagrant configuration is done below. The "2" in Vagrant.configure
# configures the configuration version (we support older styles for
# backwards compatibility). Please don't change it unless you know what
# you're doing.

$script = <<-SCRIPT


SCRIPT
Vagrant.configure("2") do |config|
  config.vm.box = "generic/centos9s"
  config.vm.network "private_network", ip: "192.168.33.40"
  config.vm.synced_folder ".", "/vagrant", type: 'rsync'


  config.vm.provider "virtualbox" do |vb|
    vb.cpus = 2
    vb.memory = 2048
  end

  config.vm.provision "shell" , inline: $script
end
Step1 Add Docker Repository
- install docker latest version from docker inc
$ sudo dnf install -y yum-utils device-mapper-persistent-data lvm2
$ sudo dnf config-manager --add-repo=https://download.docker.com/linux/centos/docker-ce.repo
$ sudo dnf repolist -v
Step2 Install
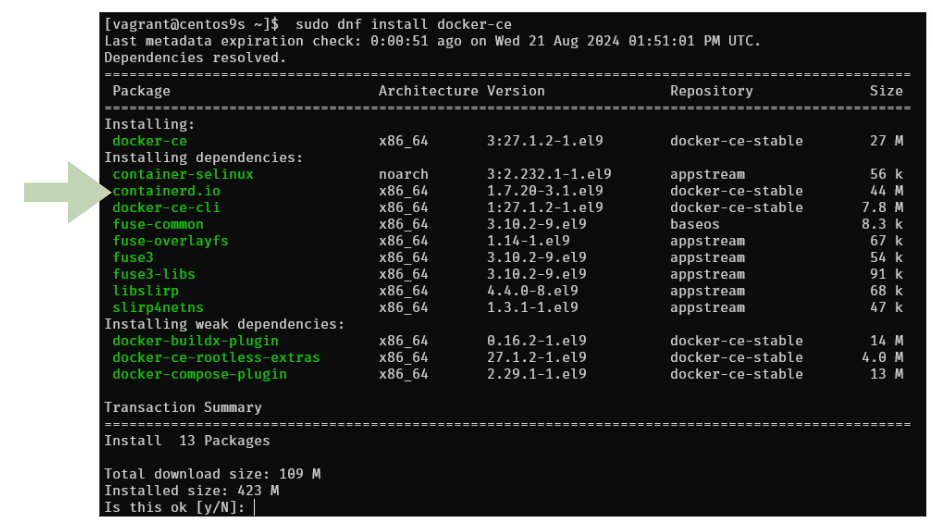
- Install Docker CE
$ sudo dnf install docker-ce
Step3 Enable and Start Docker Service
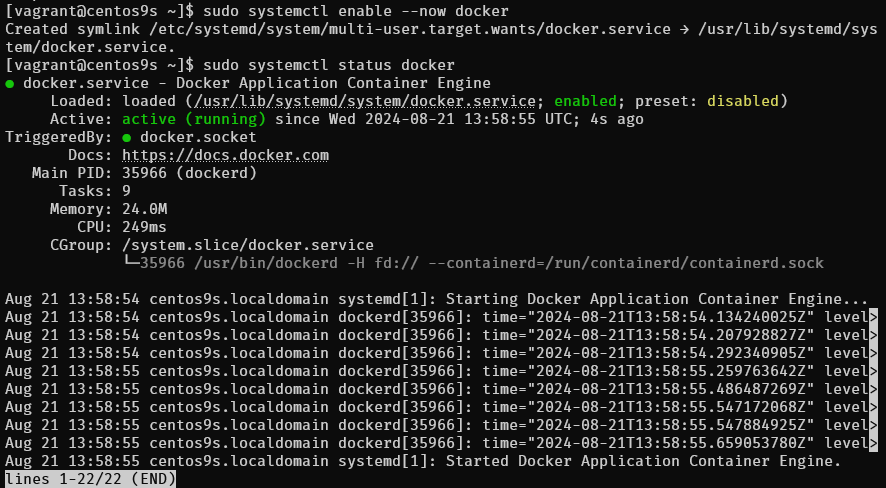
$ sudo systemctl enable --now docker
$ sudo systemctl status docker
Step3 Check info
- Check info
sudo docker info
$ sudo docker version
$ sudo docker info
Client: Docker Engine - Community
 Version:    27.1.2
 Context:    default
 Debug Mode: false
 Plugins:
  buildx: Docker Buildx (Docker Inc.)
    Version:  v0.16.2
    Path:     /usr/libexec/docker/cli-plugins/docker-buildx
  compose: Docker Compose (Docker Inc.)
    Version:  v2.29.1
    Path:     /usr/libexec/docker/cli-plugins/docker-compose

Server:
 Containers: 0
  Running: 0
  Paused: 0
  Stopped: 0
 Images: 0
 Server Version: 27.1.2
 Storage Driver: overlay2
  Backing Filesystem: xfs
  Supports d_type: true
  Using metacopy: false
  Native Overlay Diff: true
  userxattr: false
 Logging Driver: json-file
 Cgroup Driver: systemd
 Cgroup Version: 2
 Plugins:
  Volume: local
  Network: bridge host ipvlan macvlan null overlay
  Log: awslogs fluentd gcplogs gelf journald json-file local splunk syslog
 Swarm: inactive
 Runtimes: io.containerd.runc.v2 runc
 Default Runtime: runc
 Init Binary: docker-init
 containerd version: 8fc6bcff51318944179630522a095cc9dbf9f353
 runc version: v1.1.13-0-g58aa920
 init version: de40ad0
 Security Options:
  seccomp
   Profile: builtin
  cgroupns
 Kernel Version: 5.14.0-391.el9.x86_64
 Operating System: CentOS Stream 9
 OSType: linux
 Architecture: x86_64
 CPUs: 2
 Total Memory: 1.734GiB
 Name: centos9s.localdomain
 ID: 25e199fb-abb2-4ef6-9ceb-f843d3c50b8c
 Docker Root Dir: /var/lib/docker
 Debug Mode: false
 Experimental: false
 Insecure Registries:
  127.0.0.0/8
 Live Restore Enabled: false
Step4 Manage Docker as Non-root user
- By default, running Docker requires root privileges. However, you can add your user to the Docker group to manage Docker as a non-root user.
$ sudo usermod -aG docker $(whoami)
$ newgrp docker
$ docker ps
CONTAINER ID   IMAGE     COMMAND   CREATED   STATUS    PORTS     NAMES
user
newgrp dockeror logout and re login again
- Check file system of docker and containerd
[vagrant@centos9s ~]$ sudo ls -l  /var/lib/docker/
total 12
drwx--x--x.  4 root root  138 Aug 21 13:58 buildkit
drwx--x---.  5 root root 4096 Aug 21 14:15 containers
-rw-------.  1 root root   36 Aug 21 13:58 engine-id
drwx------.  3 root root   22 Aug 21 13:58 image
drwxr-x---.  3 root root   19 Aug 21 13:58 network
drwx--x---. 11 root root 4096 Aug 21 14:15 overlay2
drwx------.  4 root root   32 Aug 21 13:58 plugins
drwx------.  2 root root    6 Aug 21 13:58 runtimes
drwx------.  2 root root    6 Aug 21 13:58 swarm
drwx------.  2 root root    6 Aug 21 14:12 tmp
drwx-----x.  2 root root   50 Aug 21 13:58 volumes
[vagrant@centos9s ~]$ sudo ls -l  /var/lib/containerd/
total 0
drwxr-xr-x. 4 root root 33 Aug 21 14:06 io.containerd.content.v1.content
drwx--x--x. 2 root root 21 Aug 21 13:58 io.containerd.metadata.v1.bolt
drwx--x--x. 2 root root  6 Aug 21 13:58 io.containerd.runtime.v1.linux
drwx--x--x. 3 root root 18 Aug 21 14:06 io.containerd.runtime.v2.task
drwx------. 2 root root  6 Aug 21 13:58 io.containerd.snapshotter.v1.blockfile
drwx------. 3 root root 23 Aug 21 13:58 io.containerd.snapshotter.v1.native
drwx------. 3 root root 23 Aug 21 13:58 io.containerd.snapshotter.v1.overlayfs
drwx------. 2 root root  6 Aug 21 13:58 tmpmounts
Step5 Run Test Docker Container
- Test with image
hello-world
$ docker run hello-world

Unable to find image 'hello-world:latest' locally
latest: Pulling from library/hello-world
c1ec31eb5944: Pull complete
Digest: sha256:53cc4d415d839c98be39331c948609b659ed725170ad2ca8eb36951288f81b75
Status: Downloaded newer image for hello-world:latest

Hello from Docker!
This message shows that your installation appears to be working correctly.

To generate this message, Docker took the following steps:
 1. The Docker client contacted the Docker daemon.
 2. The Docker daemon pulled the "hello-world" image from the Docker Hub.
    (amd64)
 3. The Docker daemon created a new container from that image which runs the
    executable that produces the output you are currently reading.
 4. The Docker daemon streamed that output to the Docker client, which sent it
    to your terminal.

To try something more ambitious, you can run an Ubuntu container with:
 $ docker run -it ubuntu bash

Share images, automate workflows, and more with a free Docker ID:
 https://hub.docker.com/

For more examples and ideas, visit:
 https://docs.docker.com/get-started/
Step6 Check image
- Check image
$ docker image ls
REPOSITORY    TAG       IMAGE ID       CREATED         SIZE
hello-world   latest    d2c94e258dcb   15 months ago   13.3kB
Step 7 Download image
- download image of centos 9 stream from quay.io repository
$ docker pull quay.io/centos/centos:stream9

stream9: Pulling from centos/centos
26ef76492da3: Pull complete
Digest: sha256:a0017fa930fbbbb706509aafdb287b16d9d3d1672f09712a04ea634fea68a85d
Status: Downloaded newer image for quay.io/centos/centos:stream9
quay.io/centos/centos:stream9
- Run echo command inside container, then container will stop
$ docker run quay.io/centos/centos:stream9 /bin/echo "Welcome to the Docker World!"
Welcome to the Docker World!
Step 8 Run container with -it option to connect to interactive session
$  docker run -it quay.io/centos/centos:stream9 /bin/bash
[root@503c0e47b2be /]# uname -a
[root@503c0e47b2be /]# exit
- after
exityou will return back to origin shell and container will stop - Check container
$ docker ps -a

Note: you can exit container without stop container by use
Ctrl+p, Ctrl+q
Step 8 Install docker compose
Docker Compose is a tool for defining and running multi-container applications. It is the key to unlocking a streamlined and efficient development and deployment experience.
Compose simplifies the control of your entire application stack, making it easy to manage services, networks, and volumes in a single, comprehensible YAML configuration file. Then, with a single command, you create and start all the services from your configuration file.
Compose works in all environments; production, staging, development, testing, as well as CI workflows. It also has commands for managing the whole lifecycle of your application:
Install Docker compose
$ sudo dnf install docker-compose-plugin
- Check version docker compose
$ docker compose version
Docker Compose version v2.29.1
Step 8 Configure an application that has web and DB services with Docker Compose
$ mkdir web_db
$ cd web_db
$ vim Dockerfile
- add content of docker file from below
FROM quay.io/centos/centos:stream9
MAINTAINER ServerWorld <admin@srv.world>

RUN dnf -y install nginx

EXPOSE 80
CMD ["/usr/sbin/nginx", "-g", "daemon off;"]
- define application configuration
$ vim docker-compose.yml
- add content of docker compose
services:
  db:
    image: mariadb
    volumes:
      - /var/lib/docker/disk01:/var/lib/mysql
    environment:
      MYSQL_ROOT_PASSWORD: password
      MYSQL_USER: cent
      MYSQL_PASSWORD: password
      MYSQL_DATABASE: cent_db
    ports:
      - "3306:3306"
  web:
    build: .
    ports:
      - "80:80"
    volumes:
      - /var/lib/docker/disk02:/usr/share/nginx/html
- Build and run docker compose
$ docker compose up -d
- Result of command
$ docker compose up -d
[+] Running 9/9
 ✔ db Pulled                                                                                   20.5s
   ✔ 31e907dcc94a Pull complete                                                                 4.8s
   ✔ 8687fa065e6d Pull complete                                                                 4.9s
   ✔ bc75b4546118 Pull complete                                                                 5.5s
   ✔ 90824338d93e Pull complete                                                                 5.5s
   ✔ c13aedba8d5d Pull complete                                                                 5.6s
   ✔ ad9066662cff Pull complete                                                                15.9s
   ✔ 537f82e52967 Pull complete                                                                16.0s
   ✔ a5e6bca88fae Pull complete                                                                16.0s
[+] Building 52.5s (7/7) FINISHED                                                     docker:default
 => [web internal] load build definition from Dockerfile                                        0.1s
 => => transferring dockerfile: 256B                                                            0.0s
 => WARN: MaintainerDeprecated: Maintainer instruction is deprecated in favor of using label (  0.1s
 => [web internal] load metadata for quay.io/centos/centos:stream9                              0.0s
 => [web internal] load .dockerignore                                                           0.0s
 => => transferring context: 2B                                                                 0.0s
 => [web 1/2] FROM quay.io/centos/centos:stream9                                                0.0s
 => [web 2/2] RUN dnf -y install nginx                                                         51.4s
 => [web] exporting to image                                                                    0.8s
 => => exporting layers                                                                         0.8s
 => => writing image sha256:2054d035639c4bc56c2dcb6a4c34351f8a6a18e08d53c759af55a977ad217341    0.0s
 => => naming to docker.io/library/web_db-web                                                   0.0s
 => [web] resolving provenance for metadata file                                                0.0s
[+] Running 3/3
 ✔ Network web_db_default  Created                                                              0.6s
 ✔ Container web_db-web-1  Started                                                              0.6s
 ✔ Container web_db-db-1   Started                                                              0.6s
- Confirm running container
$ docker ps
CONTAINER ID   IMAGE        COMMAND                  CREATED              STATUS              PORTS                    NAMES
1cc94e9479fd   mariadb      "docker-entrypoint.s…"   About a minute ago   Up About a minute   0.0.0.0:3306->3306/tcp   web_db-db-1
5d95646a1f62   web_db-web   "/usr/sbin/nginx -g …"   About a minute ago   Up About a minute   0.0.0.0:80->80/tcp       web_db-web-1
- Test Verify access to database
$ sudo dnf install mysql
$ mysql -h 127.0.0.1 -u root -p -e "show variables like 'hostname';"
Enter password:
+---------------+--------------+
| Variable_name | Value        |
+---------------+--------------+
| hostname      | 1cc94e9479fd |
+---------------+--------------+

$ mysql -h 127.0.0.1 -u cent -p -e "show databases;"
Enter password:
+--------------------+
| Database           |
+--------------------+
| cent_db            |
| information_schema |
+--------------------+
- Add index.html content
$ sudo su -
# echo "Hello Docker Compose World" > /var/lib/docker/disk02/index.html
# curl 127.0.0.1
Hello Docker Compose World

# exit
Docker compose command
- check container process
$ docker compose ps
NAME           IMAGE        COMMAND                  SERVICE   CREATED         STATUS         PORTS
web_db-db-1    mariadb      "docker-entrypoint.s…"   db        7 minutes ago   Up 7 minutes   0.0.0.0:3306->3306/tcp
web_db-web-1   web_db-web   "/usr/sbin/nginx -g …"   web       7 minutes ago   Up 7 minutes   0.0.0.0:80->80/tcp
- Access to services (container) Servers list db and web.
$ docker compose exec db /bin/bash
root@1cc94e9479fd:/# exit
$ docker compose exec web /bin/bash
[root@5d95646a1f62 /]# exit
- Stop container
$ docker compose stop
[+] Stopping 2/2
 ✔ Container web_db-db-1   Stopped                                                                                                                              0.4s
 ✔ Container web_db-web-1  Stopped
- Start up a service only web
$ docker compose up -d web
[+] Running 1/1
 ✔ Container web_db-web-1  Started
                                 0.3s
$ docker compose ps
NAME           IMAGE        COMMAND                  SERVICE   CREATED          STATUS         PORTS
web_db-web-1   web_db-web   "/usr/sbin/nginx -g …"   web       13 minutes ago   Up 6 seconds   0.0.0.0:80->80/tcp
- Delete container
$ docker compose down
[+] Running 3/3
 ✔ Container web_db-web-1  Removed                                                                                                                              0.0s
 ✔ Container web_db-db-1   Removed                                                                                                                              0.0s
 ✔ Network web_db_default  Removed                                                                                                                              0.2s
Deploy Wordpress with Docker
Let Verify docker engine host (install docker engine from chapter 6)
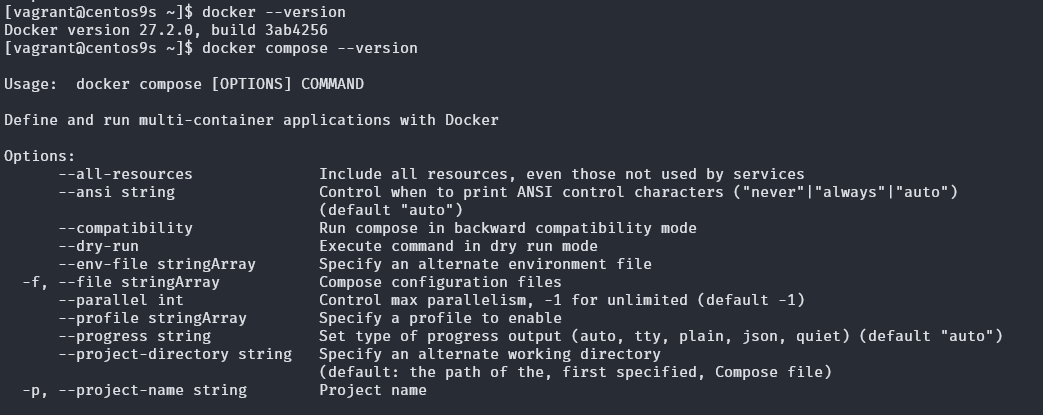
[vagrant@centos9s ~]$ docker --version
[vagrant@centos9s ~]$ docker compose --version
Step 1 Create project directory
- Create wordpress folder project
$ mkdir wordpress
$ mkdir wordpress/nginx
$ cd wordpress
- create 2 File
- docker-compose.yml
- nginx.conf
$ tree wordpress/
wordpress/
├── docker-compose.yml
└── nginx
    └── nginx.conf
Step 2 Define Docker compose
- create docker compose file
$ vim docker-compose.yml
services:
  database:
    image: mysql:latest
    container_name: database
    networks:
      - mynet
    volumes:
      - mydb:/var/lib/mysql/
    environment:
      - MYSQL_ROOT_PASSWORD=password
      - MYSQL_DATABASE=wpdb
      - MYSQL_USER=user
      - MYSQL_PASSWORD=password

  wordpress:
    image: wordpress:6.6.1-php8.1-fpm-alpine
    container_name: wordpress
    networks:
      - mynet
    volumes:
      - mywp:/var/www/html/
    environment:
      - WORDPRESS_DB_HOST=database
      - WORDPRESS_DB_USER=user
      - WORDPRESS_DB_PASSWORD=password
      - WORDPRESS_DB_NAME=wpdb

  nginx:
    image: nginx:latest
    ports:
      - "80:80"
    container_name: nginx
    networks:
      - mynet
    volumes:
      - ./nginx:/etc/nginx/conf.d/
      - mywp:/var/www/html/
      - certbot-etc:/etc/letsencrypt

  certbot:
    image: certbot/certbot
    container_name: certbot
    volumes:
      - certbot-etc:/etc/letsencrypt
      - mywp:/var/www/html/
    command: certonly --webroot --webroot-path=/var/www/html --email sawangpongm@gmail.com --agree-tos --no-eff-email --staging -d demodomain.com -d www.demodomain.com

networks:
  mynet:

volumes:
  mywp:
  mydb:
  certbot-etc:
- create nginx configuration
vim nginx.conf
server {
    listen 80;
    server_name www.demodomain.com demodomain.com;


    root /var/www/html;
    index index.php;


    # log files
    access_log /var/log/nginx/demodomain.com.access.log;
    error_log /var/log/nginx/demodomain.com.error.log;

    location = /favicon.ico {
        log_not_found off;
        access_log off;
    }

    location = /robots.txt {
        allow all;
        log_not_found off;
        access_log off;
    }

    location / {
        try_files $uri $uri/ /index.php?$args;
    }

    location ~ \.php$ {
        try_files $uri =404;
            fastcgi_pass wordpress:9000;
        fastcgi_index   index.php;
        fastcgi_param SCRIPT_FILENAME $document_root$fastcgi_script_name;
        include fastcgi_params;
    }

    location ~* \.(js|css|png|jpg|jpeg|gif|ico|svg)$ {
        expires max;
        log_not_found off;
    }

}
- Run Docker compose up ตามด้วย option -d
[vagrant@centos9s wordpress]$ docker compose up -d
output:

- use
docker compose upcompare withdocker ps
[vagrant@centos9s ~]$ docker ps

[vagrant@centos9s ~]$ docker compose ps
output:

- log monitor ด้วยคำสั่ง
docker compose logs service_name
[vagrant@centos9s ~]$ docker compose logs database
[vagrant@centos9s ~]$ docker compose logs nginx
[vagrant@centos9s ~]$ docker compose logs wordpress
- Exec shell in database Container
[vagrant@centos9s ~]$ docker compose exec database sh
output:
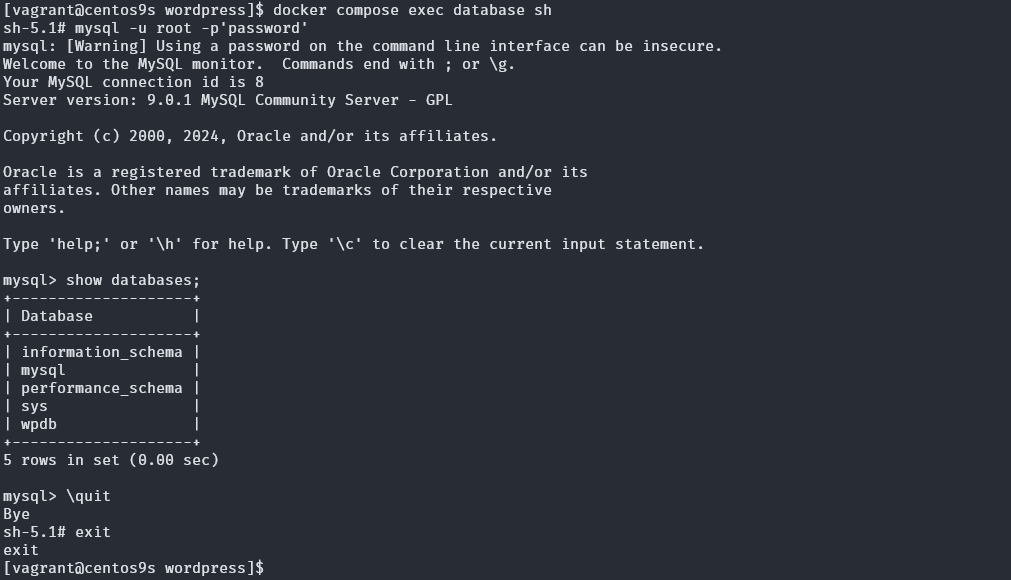
- List Volume
[vagrant@centos9s ~]$ docker volume ls
...
local     wordpress_certbot-etc
local     wordpress_mydb
local     wordpress_mywp
format name of volume "projectfolder_servicename"
- List Network
[vagrant@centos9s wordpress]$ docker network ls
NETWORK ID     NAME                DRIVER    SCOPE
3cb46e381eca   bridge              bridge    local
65eb29bf910d   host                host      local
...
863fe8638234   wordpress_default   bridge    local
a675fbecf8a8   wordpress_mynet     bridge    local
- Open Browser http://demodomain.com/, http://www.demodomain.com/

- Exec to nginx controller
[vagrant@centos9s wordpress]$ docker compose exec nginx bash
root@57db1db01aad:/# cd /var/www/html/
- Renew Certificate
[vagrant@centos9s wordpress]$ docker compose up --force-recreate --no-deps certbot
Full implementation by USE https
- add port mapping in docker-compose.yml
ports: - "80:80" - "443:443" - Final docker-compose.yml
services:
  database:
    image: mysql:latest
    container_name: database
    networks:
      - mynet
    volumes:
      - mydb:/var/lib/mysql/
    environment:
      - MYSQL_ROOT_PASSWORD=password
      - MYSQL_DATABASE=wpdb
      - MYSQL_USER=user
      - MYSQL_PASSWORD=password

  wordpress:
    depends_on:
      - database
    image: wordpress:6.6.1-php8.1-fpm-alpine
    container_name: wordpress
    restart: unless-stopped
    networks:
      - mynet
    volumes:
      - mywp:/var/www/html/
    environment:
      - WORDPRESS_DB_HOST=database
      - WORDPRESS_DB_USER=user
      - WORDPRESS_DB_PASSWORD=password
      - WORDPRESS_DB_NAME=wpdb

  nginx:
    image: nginx:latest
    ports:
      - "80:80"
      - "443:443"
    container_name: nginx
    networks:
      - mynet
    volumes:
      - ./nginx:/etc/nginx/conf.d/
      - mywp:/var/www/html/
      - certbot-etc:/etc/letsencrypt

  certbot:
    depends_on:
      - nginx
    image: certbot/certbot
    container_name: certbot
    volumes:
      - certbot-etc:/etc/letsencrypt
      - mywp:/var/www/html/
    command: certonly --webroot --webroot-path=/var/www/html --email sawangpongm@gmail.com --agree-tos --no-eff-email --staging -d demodomain.com -d www.demodomain.com

networks:
  mynet:

volumes:
  mywp:
  mydb:
  certbot-etc:
- update nginx.conf
- Backup config
[vagrant@centos9s wordpress]$ cd nginx/
[vagrant@centos9s nginx]$ ls
nginx.conf
[vagrant@centos9s nginx]$ mv nginx.conf nginx.conf.back
[vagrant@centos9s nginx]$ vim nginx.conf
- download options-ssl-nginx.conf
[vagrant@centos9s nginx]$ wget https://raw.githubusercontent.com/certbot/certbot/master/certbot-nginx/certbot_nginx/_internal/tls_configs/options-ssl-nginx.conf
- Add new nginx.config
server {
        listen 80;
        listen [::]:80;

        server_name demodomain.com www.demodomain.com;

        location ~ /.well-known/acme-challenge {
                allow all;
                root /var/www/html;
        }

        location / {
                rewrite ^ https://$host$request_uri? permanent;
        }
}

server {
        listen 443 ssl http2;
        listen [::]:443 ssl http2;
        server_name demodomain.com www.demodomain.com;

        index index.php index.html index.htm;

        root /var/www/html;

        server_tokens off;

        ssl_certificate /etc/letsencrypt/live/demodomain.com/fullchain.pem;
        ssl_certificate_key /etc/letsencrypt/live/demodomain.com/privkey.pem;

        include /etc/nginx/conf.d/options-ssl-nginx.conf;

        add_header X-Frame-Options "SAMEORIGIN" always;
        add_header X-XSS-Protection "1; mode=block" always;
        add_header X-Content-Type-Options "nosniff" always;
        add_header Referrer-Policy "no-referrer-when-downgrade" always;
        add_header Content-Security-Policy "default-src * data: 'unsafe-eval' 'unsafe-inline'" always;
        # add_header Strict-Transport-Security "max-age=31536000; includeSubDomains; preload" always;
        # enable strict transport security only if you understand the implications

        location / {
                try_files $uri $uri/ /index.php$is_args$args;
        }

        location ~ \.php$ {
                try_files $uri =404;
                fastcgi_split_path_info ^(.+\.php)(/.+)$;
                fastcgi_pass wordpress:9000;
                fastcgi_index index.php;
                include fastcgi_params;
                fastcgi_param SCRIPT_FILENAME $document_root$fastcgi_script_name;
                fastcgi_param PATH_INFO $fastcgi_path_info;
        }

        location ~ /\.ht {
                deny all;
        }

        location = /favicon.ico {
                log_not_found off; access_log off;
        }
        location = /robots.txt {
                log_not_found off; access_log off; allow all;
        }
        location ~* \.(css|gif|ico|jpeg|jpg|js|png)$ {
                expires max;
                log_not_found off;
        }
}
- Regenrate key
[vagrant@centos9s wordpress]$ docker compose up --force-recreate --no-deps certbot
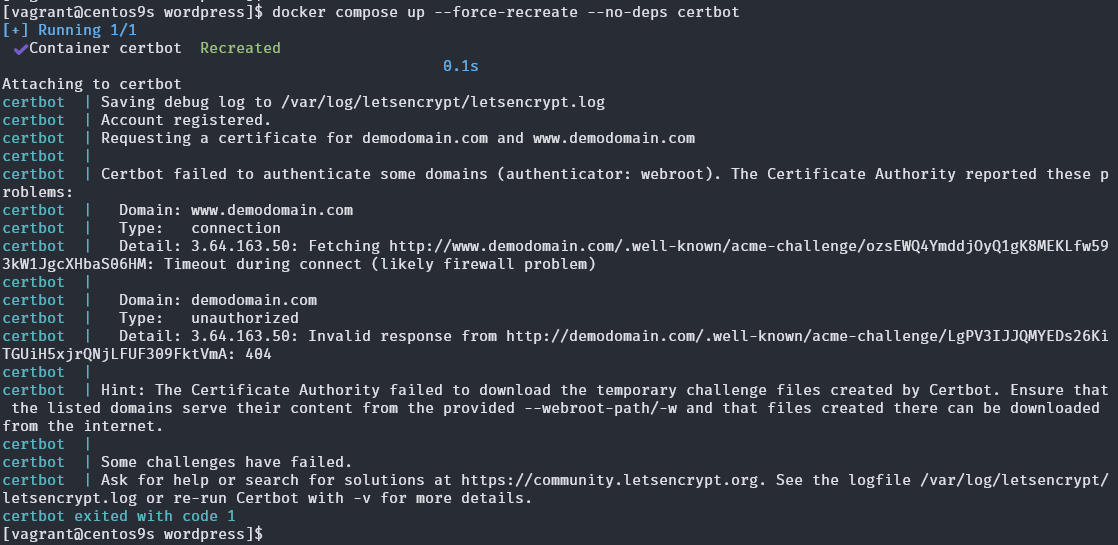
- Recreate only nginx-server
[vagrant@centos9s wordpress]$ docker compose up -d --force-recreate --no-deps nginx
[+] Running 1/1
 ✔ Container nginx  Started
- monitor volume Format use busybox image
docker run --rm -it -v <volume_name>:/mnt busybox sh
[vagrant@centos9s wordpress]$ sudo docker run --rm -it -v wordpress_mywp:/mnt busybox sh
output: