Kubenetes Dashboard
1. Deploy the Kubernetes Dashboard Run the following command to install the official Kubernetes Dashboard:
$ kubectl apply -f https://raw.githubusercontent.com/kubernetes/dashboard/v2.7.0/aio/deploy/recommended.yaml
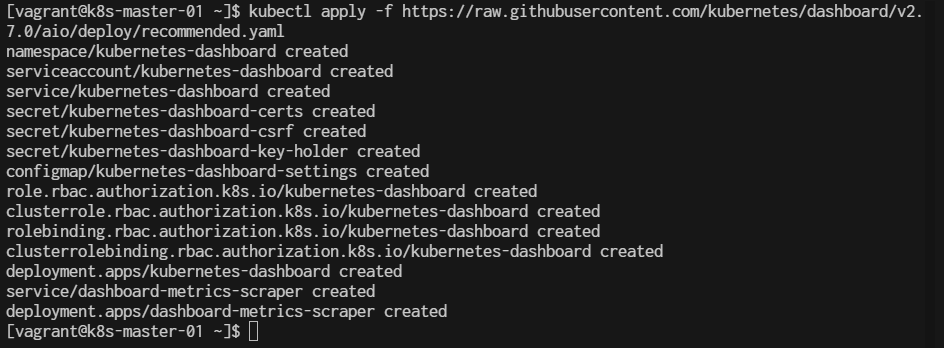
This command installs the latest stable version of the Kubernetes Dashboard and creates all the necessary resources like the kubernetes-dashboard service, deployment, and necessary RBAC (Role-Based Access Control) permissions.
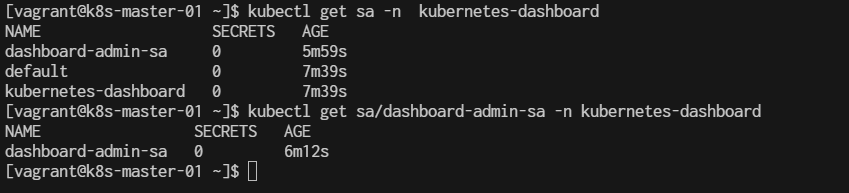
2. Create a Service Account and ClusterRoleBinding You need a service account with proper permissions to access the dashboard. You can create an admin user with this command:
$ kubectl create serviceaccount dashboard-admin-sa -n kubernetes-dashboard

$ kubectl create clusterrolebinding dashboard-admin-sa \
  --clusterrole=cluster-admin \
  --serviceaccount=kubernetes-dashboard:dashboard-admin-sa

Verify account
$ kubectl get sa -n  kubernetes-dashboard
$ kubectl get sa/dashboard-admin-sa -n kubernetes-dashboard
3. Create a Secret for the Service Account Run the following command to create a secret with a token for the dashboard-admin-sa service account:
$ kubectl create token dashboard-admin-sa -n kubernetes-dashboard

$ kubectl get secrets -n kubernetes-dashboard

4. Verify the Token If you still need to create a secret token manually (for versions where kubectl create token isn't available), you can do it with the following steps:
Create a Secret:
cat <<EOF | tee dashboard-admin-sa-secret.yaml
apiVersion: v1
kind: Secret
metadata:
  name: dashboard-admin-sa-token
  namespace: kubernetes-dashboard
  annotations:
    kubernetes.io/service-account.name: "dashboard-admin-sa"
type: kubernetes.io/service-account-token
EOF
Apply:
$ kubectl apply -f dashboard-admin-sa-secret.yaml
Retrieve the Token:
$ kubectl describe secret dashboard-admin-sa-token -n kubernetes-dashboard
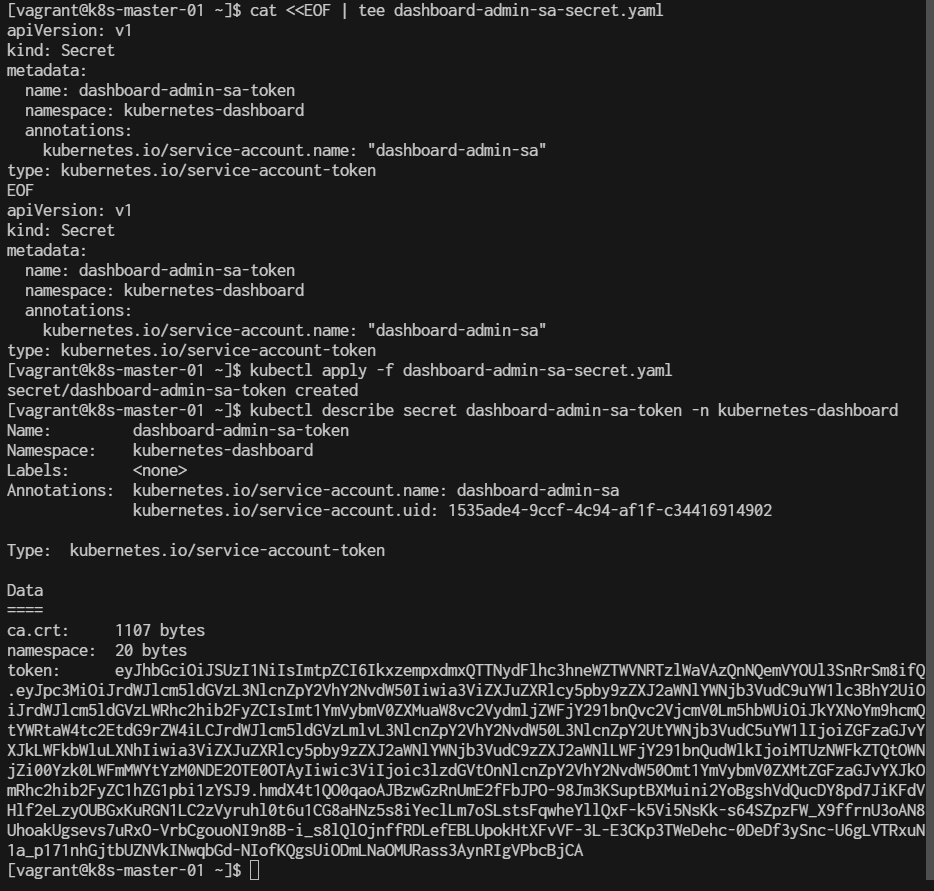 In the output, look for the token field, which will contain the bearer token for logging into the Kubernetes dashboard.
5. Access the Dashboard The Kubernetes Dashboard is not exposed on an external IP by default for security reasons. You can access it via kubectl proxy:
$ kubectl proxy
Starting to serve on 127.0.0.1:8001
This command allows you to access the dashboard at the following URL:
http://localhost:8001/api/v1/namespaces/kubernetes-dashboard/services/https:kubernetes-dashboard:/proxy/
7 login to Dashboard
- Open a browser and go to the URL from step 4.
- Choose the Token option for login and paste the token you retrieved earlier. Optional: Expose the Dashboard Externally For testing or easy access, you can expose the dashboard using a NodePort service. Be aware that this exposes your cluster to the public if not properly secured.
To do this:
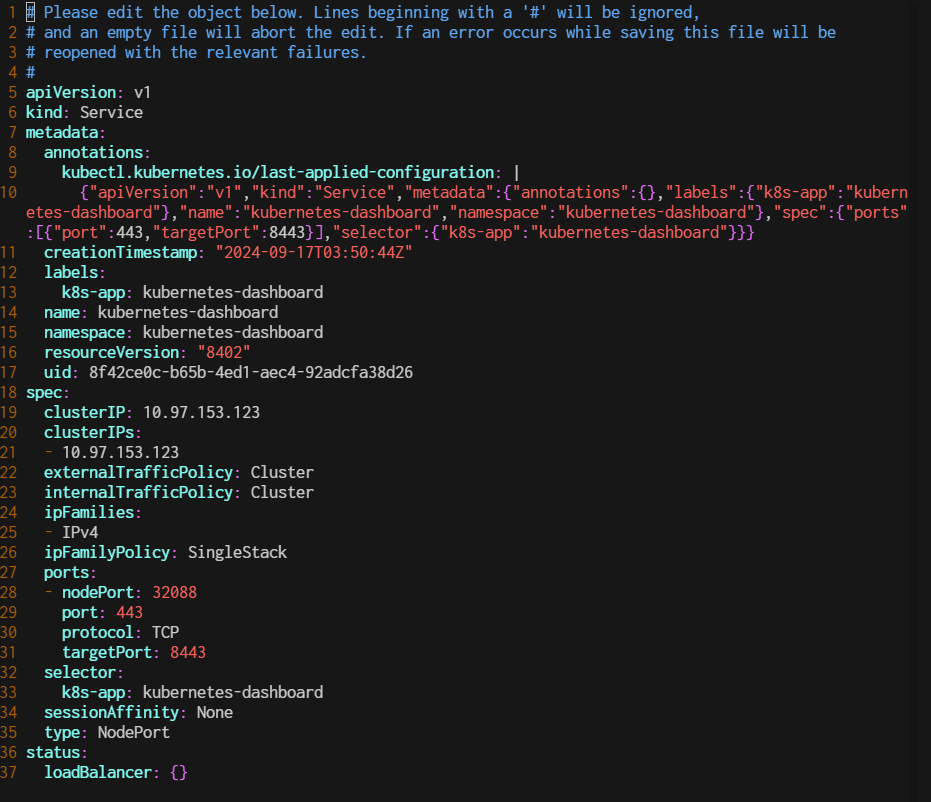
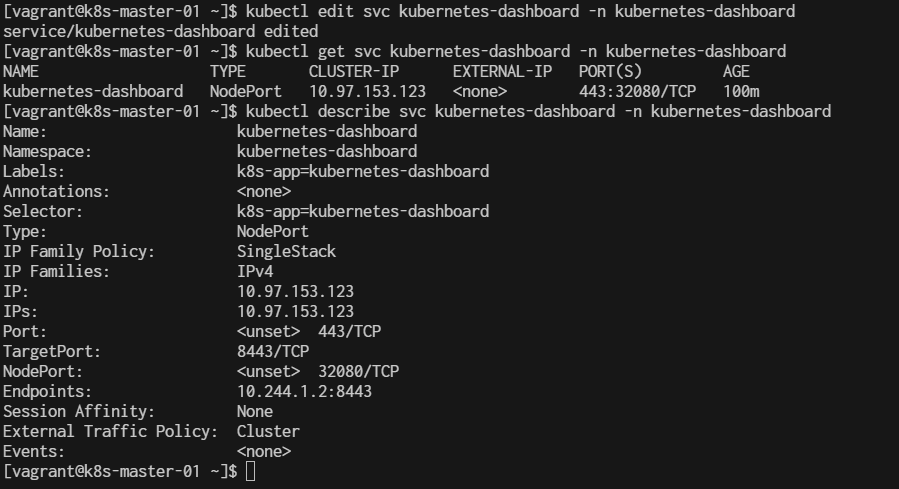
$ kubectl edit service kubernetes-dashboard -n kubernetes-dashboard
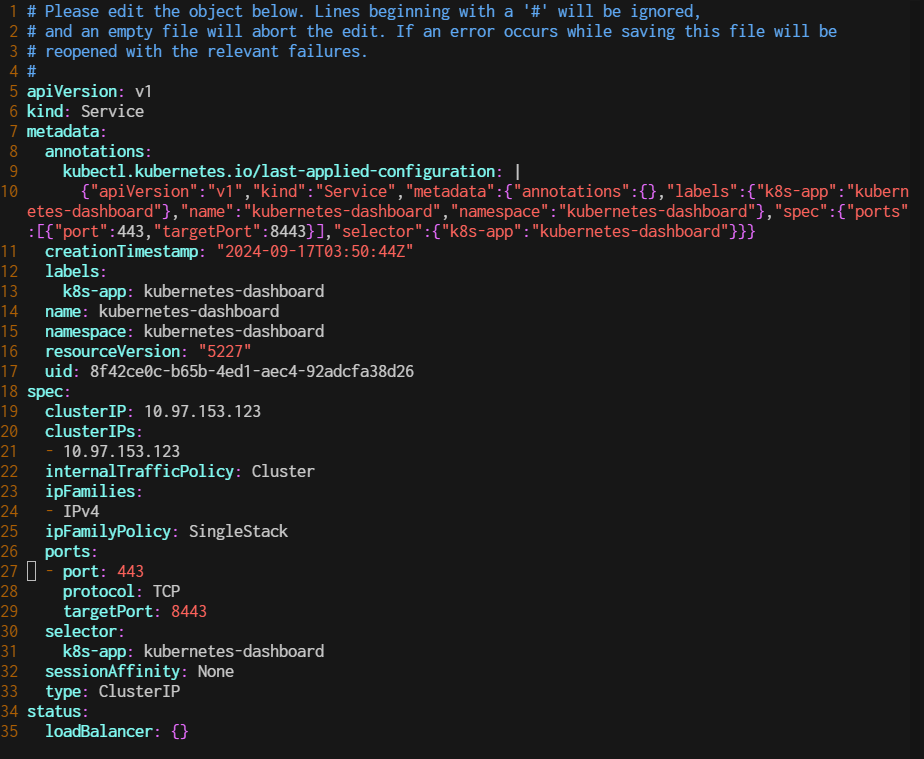
Change the type from ClusterIP to NodePort.
 Then, access the dashboard to nodeport
**-option use ** or use ```kubectl patch``
kubectl patch svc kubernetes-dashboard -n kubernetes-dashboard -p '{"spec":{"type":"NodePort"}}'
Check nodeport:
$ kubectl get svc -n kubernetes-dashboard
 This will show all the services in the kubernetes-dashboard namespace. Look for the service of type NodePort, and under the PORT(S) column, you will see something like 443:XXXXX/TCP, where XXXXX is the NodePort assigned.
For more detailed information, including all port mappings, run:
$ kubectl describe svc kubernetes-dashboard -n kubernetes-dashboard
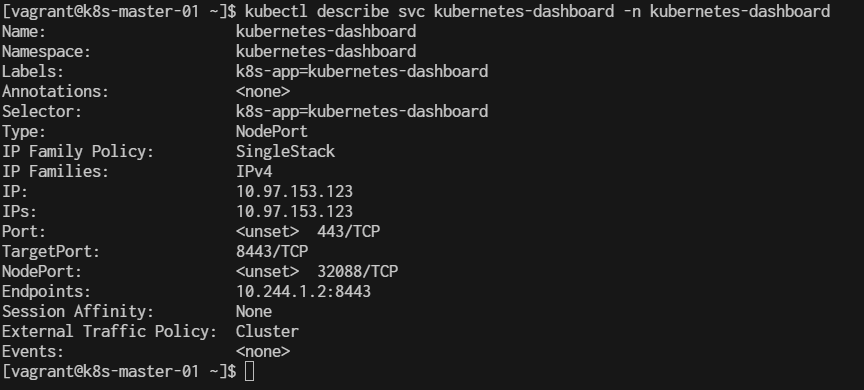
This will show you the NodePort under the Port section in the output, like this:
Type:                     NodePort
Port:                     <Service_Port>  443/TCP
NodePort:                 <NodePort_Assigned>  <XXXXX>/TCP
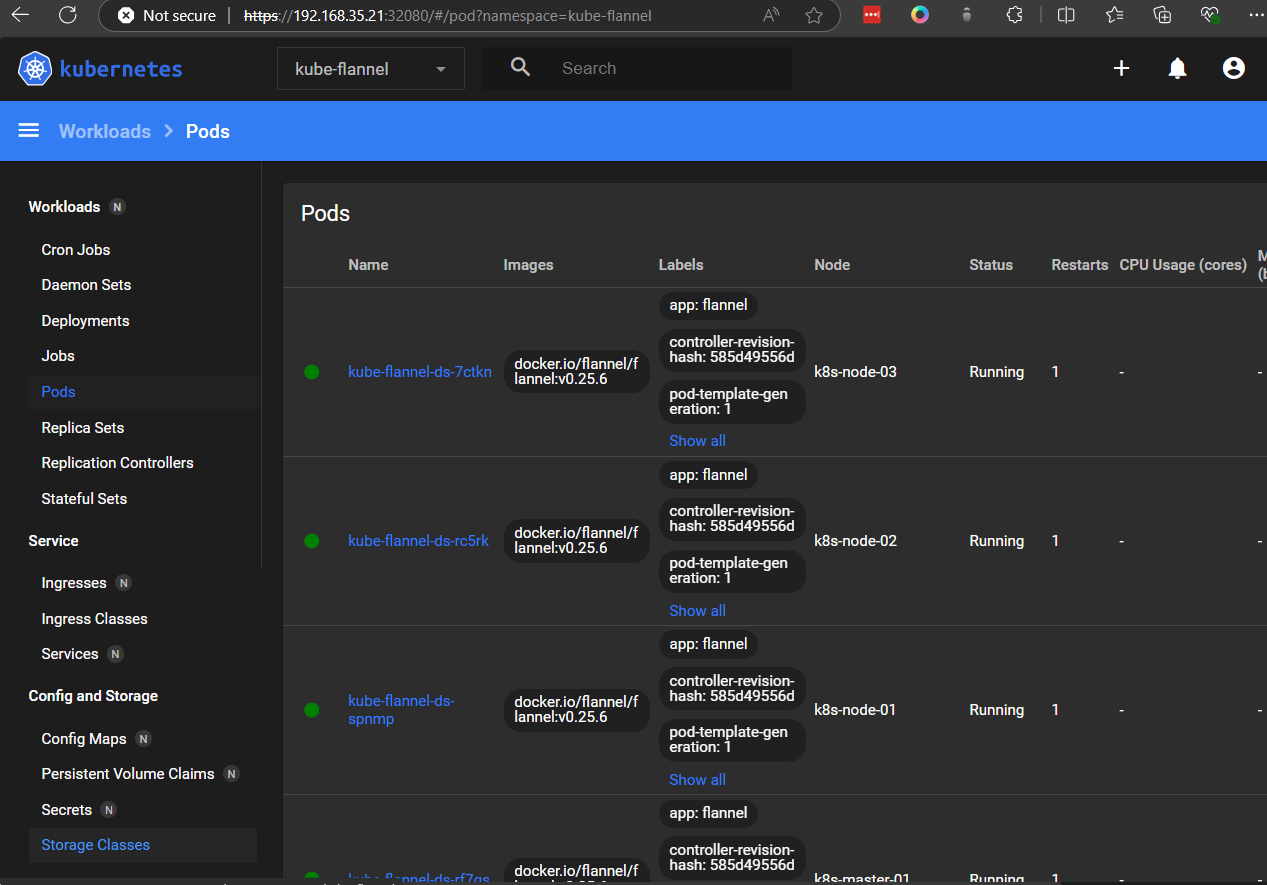
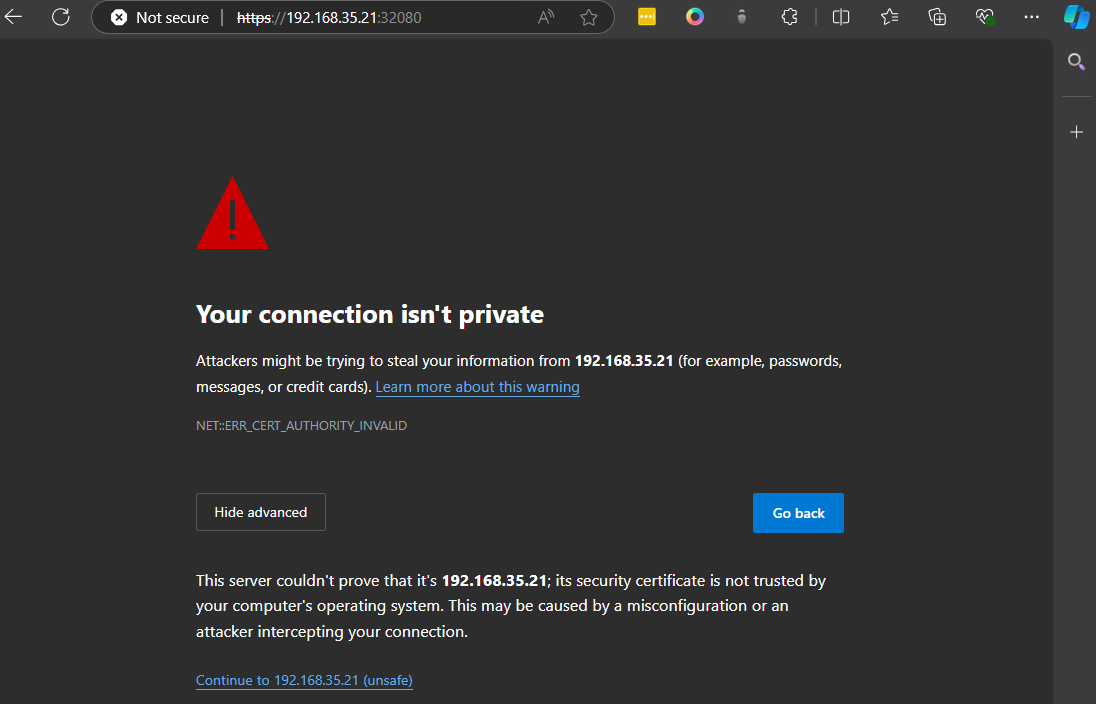
You can then access the Kubernetes Dashboard using: https://<Node_IP>:<NodePort_Assigned>
https://192.168.35.21:32088/
**Summary Steps to Change the NodePort (Repeat) ** (options)
- Edit the Service and Set NodePort Manually
You can manually edit the service to ensure that a NodePort is set. Run the following command to edit the service:
$ kubectl edit svc kubernetes-dashboard -n kubernetes-dashboard
2. Set the NodePort Manaual
ports:
- port: 443
  targetPort: 8443
  protocol: TCP
  nodePort: 32080  # Set the NodePort manually or remove this line to let Kubernetes auto-assign it.
3 Save the Changes
After editing, save and close the editor. Kubernetes will automatically apply the changes.
4 Verify the NodePort
After applying the changes, verify that the NodePort is correctly set by running:
$ kubectl get svc kubernetes-dashboard -n kubernetes-dashboard
Open browser
https://192.168.35.21:32080/
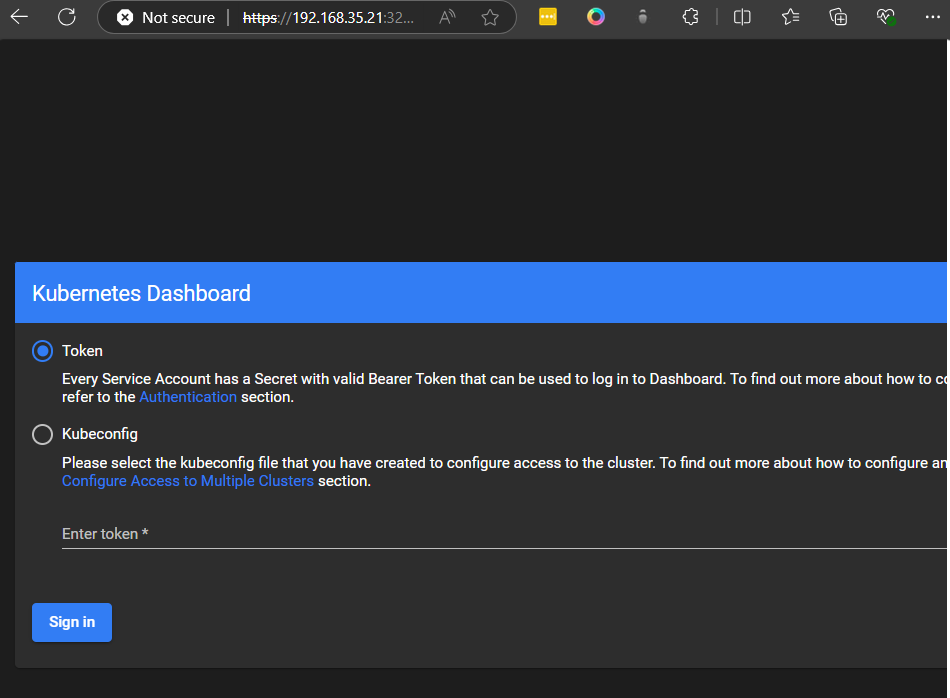 copy paste token and click sign in
eyJhbGciOiJSUzI1NiIsImtpZCI6IkxzempxdmxQTTNydFlhc3hneWZTWVNRTzlWaVAzQnNQemVYOUl3SnRrSm8ifQ.eyJhdWQiOlsiaHR0cHM6Ly9rdWJlcm5ldGVzLmRlZmF1bHQuc3ZjLmNsdXN0ZXIubG9jYWwiXSwiZXhwIjoxNzI2NTU1NjYxLCJpYXQiOjE3MjY1NTIwNjEsImlzcyI6Imh0dHBzOi8va3ViZXJuZXRlcy5kZWZhdWx0LnN2Yy5jbHVzdGVyLmxvY2FsIiwia3ViZXJuZXRlcy5pbyI6eyJuYW1lc3BhY2UiOiJrdWJlcm5ldGVzLWRhc2hib2FyZCIsInNlcnZpY2VhY2NvdW50Ijp7Im5hbWUiOiJkYXNoYm9hcmQtYWRtaW4tc2EiLCJ1aWQiOiIxNTM1YWRlNC05Y2NmLTRjOTQtYWYxZi1jMzQ0MTY5MTQ5MDIifX0sIm5iZiI6MTcyNjU1MjA2MSwic3ViIjoic3lzdGVtOnNlcnZpY2VhY2NvdW50Omt1YmVybmV0ZXMtZGFzaGJvYXJkOmRhc2hib2FyZC1hZG1pbi1zYSJ9.S2iNcL4dLEkQqKDnTZaeCfY_IOUts88WcPd-go18aA2ktB3pp3ASHx7hOzp8AQOYJ3Ysk8fCZgGjRK4mlRs8Tq7sXoNDL-tWecBWfxoO15z5RFMgC882_uBS-_AUB2FVeM41yPIhGnbSJOXbpdntH1fLEgWRf1IzRHS_UuVl6-EvsiC7C7DUzT2Zqa63YF7pSwHnGBo52YsLYYLJzeZk_S7unuA1EfvjISrWkdvyxkGJwCMCjJNMWB3zED08f61iLxlNV2wozMMivwrOBu2mCUd2va66p7jKwkyyw4yTPlmmAplf0AHAEI_VqW45q_MgVXacdpC5kgiyKA7JPHwH1g